
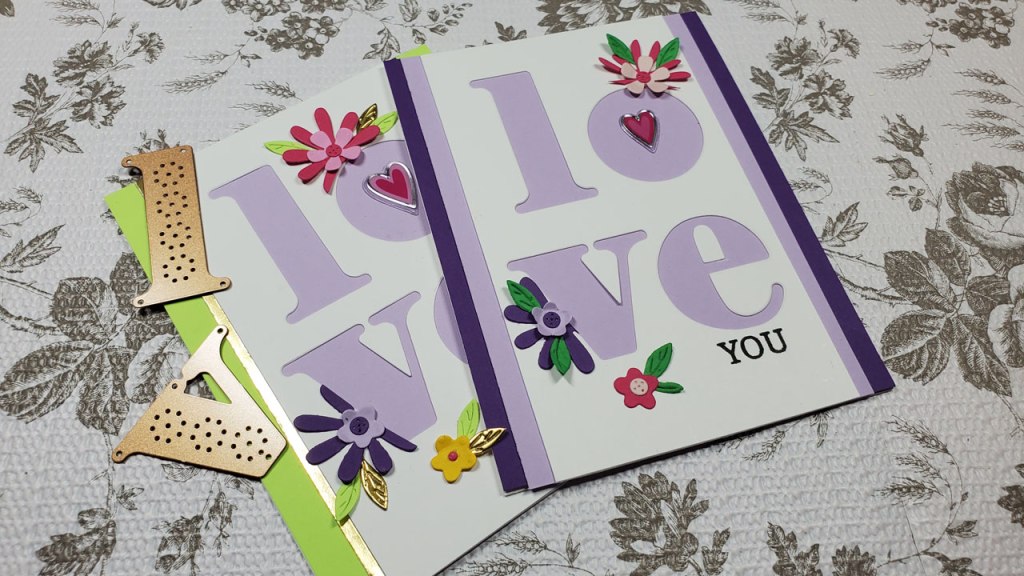
Today’s cards are similar to the last card in that the same dies were used to create the card. I always love it when you can get a two for one! In order to accomplish this, I am going to use the negative space created when cutting with the dies instead of the actual die cut letter.
You will need:
Spellbinders’ Stitched Alphabet Dies in the letters: l, o, v, e
Flower dies-I used dies from the Spellbinders Card Kit of the Month-April 2021 called, “Sincerely Yours”
White cardstock 65lb to 80lb for the front panel
White cardstock 110lb for the card base
Spring color cardstock: I chose a light purple and bright green as well as a dark pink and purple
Mirrored Gold Cardstock for the leaves and left/right border lines
Black dye ink
Spellbinders stamp set “Let’s Celebrate Sentiments” STP-102
How to make it:
Create the top-folding A2 sized card base
- cut an 8.5″ x 11″ piece of 110lb white cardstock in half lengthwise at 4.25 inches (you should have two long pieces of cardstock that measure 4.25″ across and 8.5″ long)
- rotate the long piece of cardstock and score at 5.5″
- fold it so that the “bump” is on the inside of the card.
Cut the front panel
- cut an piece of white cardstock to 3.5″ x 5.5″
- align the letter dies on the cardstock to spell “love”
- by placing the l and o on the top line and the v and e on the bottom line (center the letters)
- Save the cut out letters for another project. You will only use the cardstock panel for this project. Save the inserts for the letter o and e because we will glue them into the letters later.
Cut the light purple cardstock to 4″ by 5.5″. This will be adhered tot he back of your card panel out of which you just cut the letters.
Cut the dark purple cardstock to 4.25″ by 5.5″. This will be your background.
Cut the flowers from the dark purple, light purple, dark pink, light pink cardstocks.
Cut the leaves from the gold mirrored cardstock and the bright green cardstock.
Cut two strips of gold mirrored cardstock with a paper trimmer to 1/8th of an inch x 5.5 inches.
Assemble your card:
- adhere the dark purple (or bright green) to the card base
- adhere the light purple to the back of the “love” panel
- adhere the inserts into the letters o and e ( I used a heart sticker for the center of the o)
- adhere the flowers onto the card being sure to trim them so they don’t overlap the letters
- adhere the leaves behind the flowers
- for the green card, adhere the two strips of gold mirrored cardstock to both sides of the white “love” panel
Stamp your greeting using black ink
Please enjoy the video below:
Affiliate Links
These links are FREE for you to use and I will receive a small portion of any purchases you make using Amazon and Share a Sale links. As an Amazon Associate I earn from qualifying purchases.
Spellbinders Platinum 6 Machine: https://shrsl.com/3fh78 (Small one)
Spellbinders Stitched Alphabet Dies: https://shrsl.com/3it7j
Spellbinders Flower Dies from the Card Kit of the Month, “Sincerely Yours” April 2021 is unavailable…here is an alternative: https://shrsl.com/3it7x
Gold Mirror Cardstock: https://shrsl.com/3fj6l (If you buy one of the card kits, the gold cardstock will be in it)
Teflon bone folder (it is supposed to not leave a burnishing mark or shine on the paper: https://amzn.to/2QYdHE5
Rhinestone Picker/aka Crystal Katana: https://amzn.to/3i8CIqY
EK Success Craft Tweezers (reverse): https://amzn.to/3tFzPBS
Tool ‘n One (to remove pieces from dies and die cut shapes): https://shrsl.com/38b28
Tombow Mono Liquid Adhesive: https://amzn.to/37DhjRI
