Two Techniques to Create Backgrounds using Stencils, Gelatos, and a Brayer

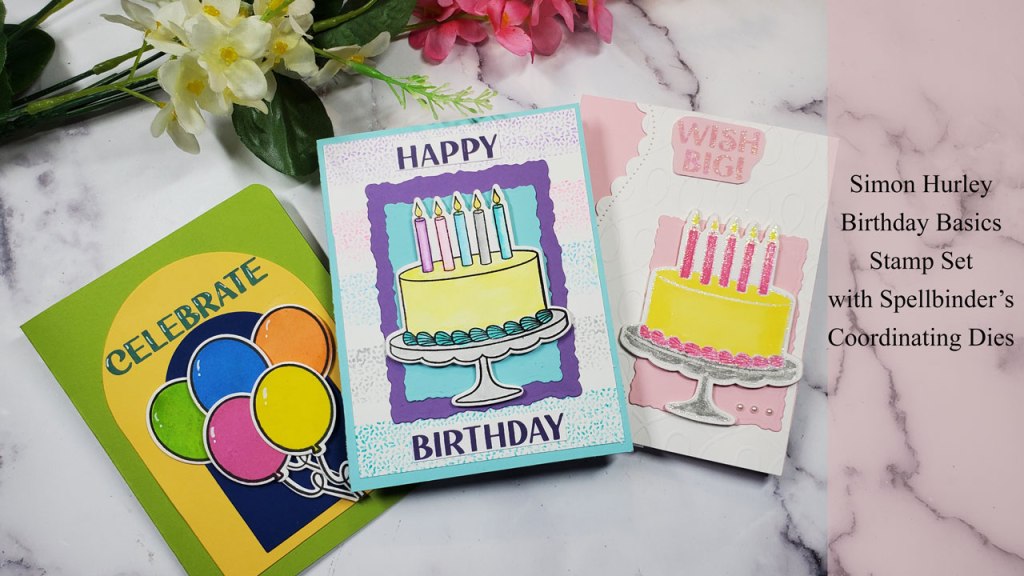
These beautiful cards were made using dies, stamps, and a stencil from the Spellbinder’s Kaleidoscope Arch Collection. The collection includes a BetterPress Plate as well, but I did not buy it or use it for these cards.

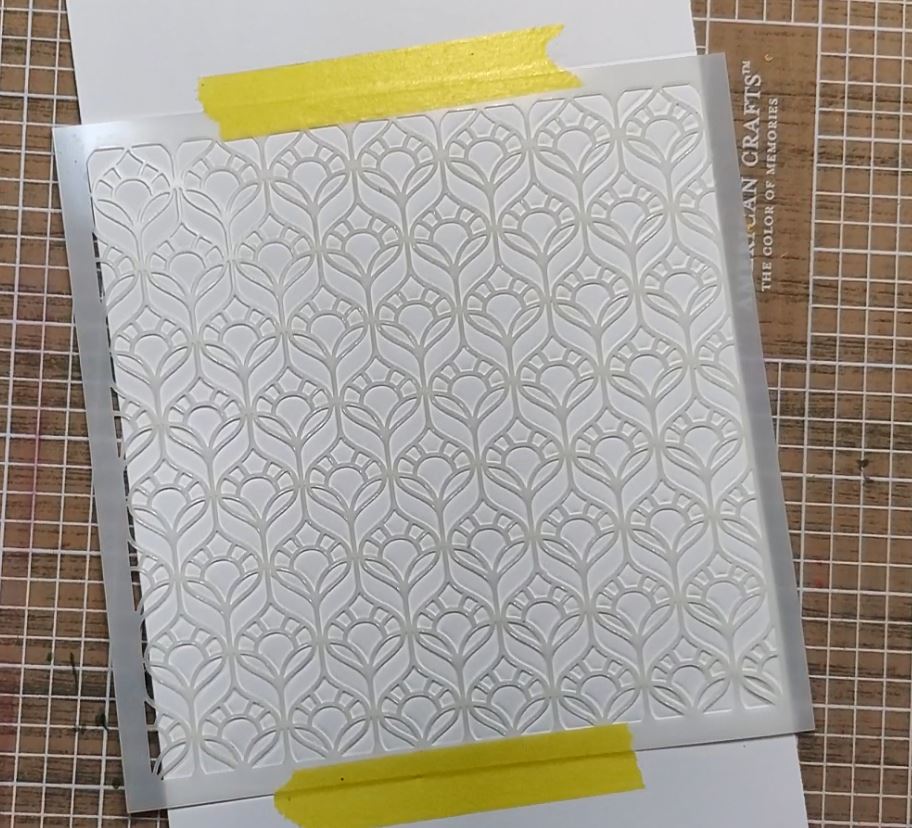
The technique used to create the background for these cards was done using a stencil to dry emboss a piece of cardstock. Basically, it is using the stencil like an embossing folder. To do this, I used the brown embossing pad that comes with my Spellbinder’s Platinum 6 die cutting machine along with the blue embossing plate instead of the clear cutting plates. The result is a dry embossed card panel.

The second step is to add color to the card panel. First, put the stencil back over the embossed card panel and tape it down.

Next, add some color through the stencil. Here’s how: rub gelatos on an Amazon Basics Palette Pad or any nonstick surface; use a blender brush (the one I used is from Amazon and it’s technically a make-up brush) to pick up the color and rub them over the stencil to add color to the card panel. The image below shows the beginning of this process. I added other colors as well.

Gelatos are water soluble crayons, BUT they have a very “creamy” texture instead of waxy like a crayon. They blend easily with or without water. I love all the different ways they can be used: rubbed on and blended with a finger to add color; add water to them to use them as a watercolor; add some to a spray bottle with water to create a mister with pigment, just to list a few.

When you are finished you end up with a beautiful background for your card, which I trimmed down to fit on my A2 sized card base(4.25: x 5.5″).

BUT, don’t stop there. You can use the color left on the stencil to get a second background for free! Just tape the stencil to a clean palette pad and spritz it with some water. Then place a piece of cardstock over the stencil and hold it in place with one hand and use a brayer with the other to roll over the cardstock so it will absorb the color from the stencil. The brayer I’m using is a speedball acrylic brayer. I bought it as a combination pack which came with other types of rollers such as rubber and foam.

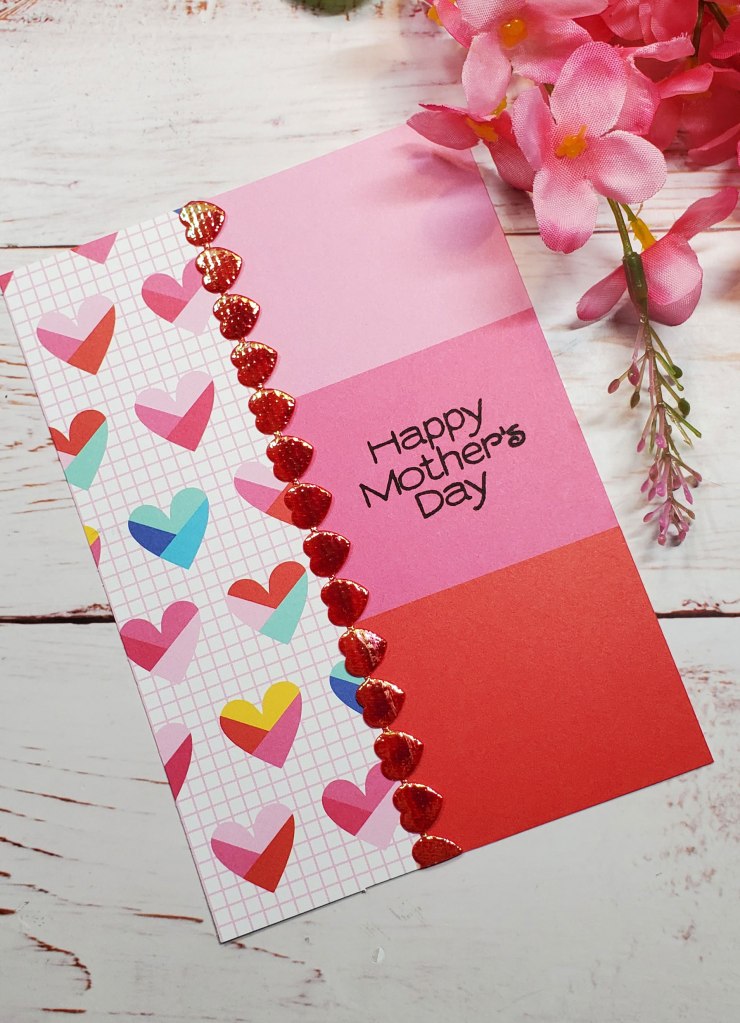
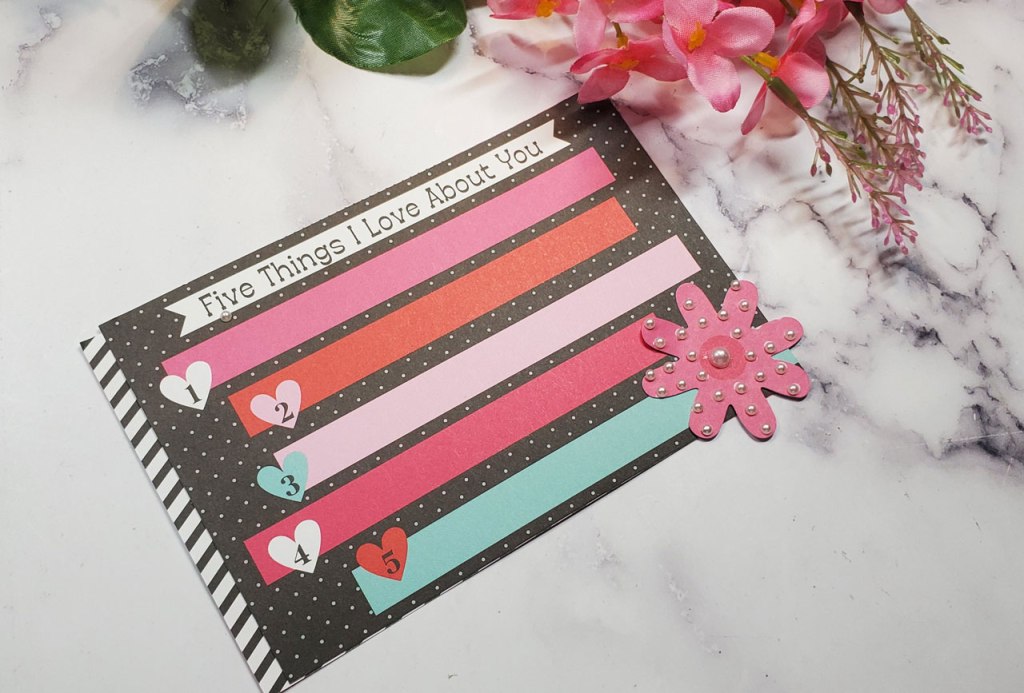
The first card below shows this background. The second card was another version after I continued to make cards with this technique. The rectangle is cut from the Spellbinder’s Deckled Rectangles LG die out of Pink Sand cardstock. The card above shows a rectangle cut out of Dahlia cardstock.

The flowers and arches on these cards were die cut with the Stitched Kaleidoscope Arch Etched Dies and the stamped words are from the Kaleidoscope Arch Sentiments Clear Stamp Set.

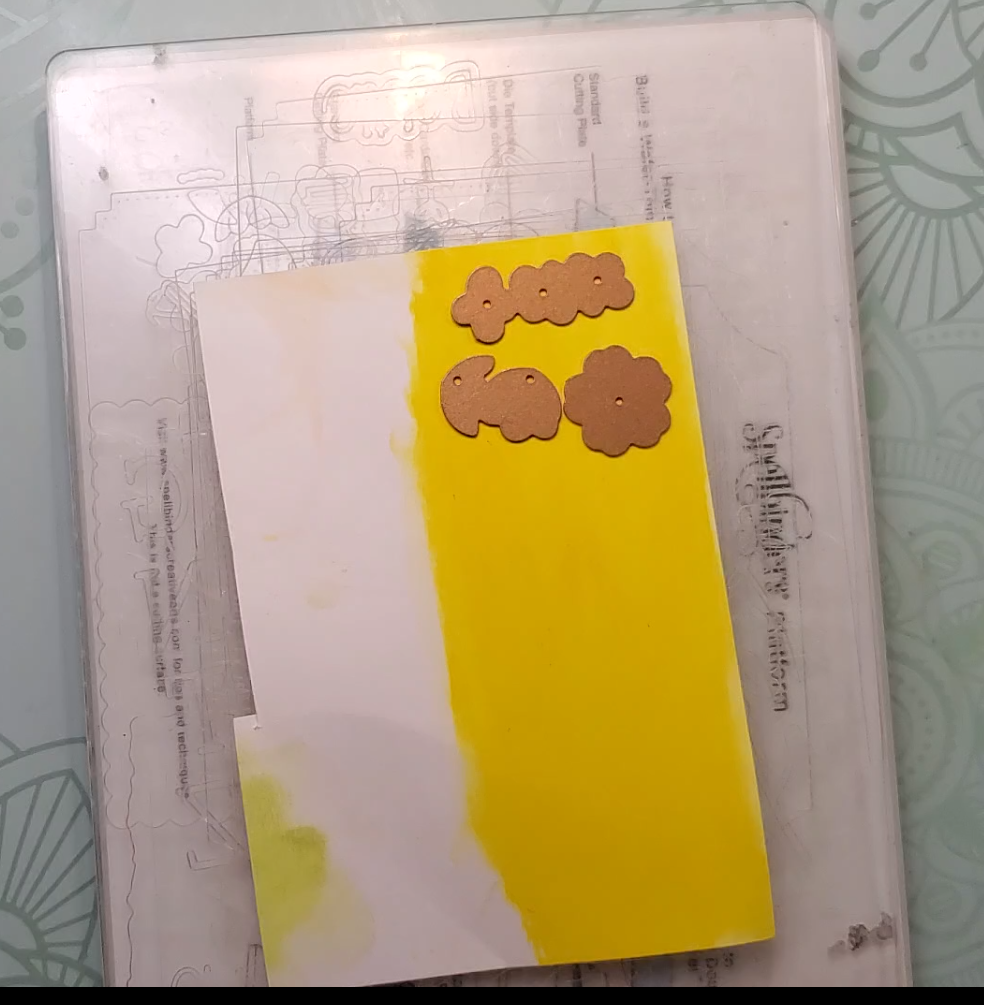
In order to get flowers that matched the colors in the background, I rubbed the same gelato colors on pieces of white cardstock and cut them out with the dies.

Finally, I stamped the words on the die cuts. The words “MOTHER’S DAY” comes from another stamp set outside of the Kaleidoscope Arch collection. It’s called the Build a Sentiment STP-036. It’s not available on Spellbinder’s website anymore, but you may be able to get it elsewhere.

If you’d like to see a demonstration of these cards being made, please watch my YouTube video.

Below is a list of supplies I used to make these cards. These are my affiliate links, which are free for you to use, and I will receive a small portion of your purchase price.

Spellbinder’s Kaleidoscope Arch Collection:  https://shrsl.com/4gt94

Spellbinder’s New & Improved Platinum 6 Die Cutting Machine:  https://shrsl.com/4g85t

Spellbinder’s Color Essential Cardstock (Dahlia and Pink Sand):  https://shrsl.com/4g82s

Spellbinder’s Deckled Rectangles LG:  https://shrsl.com/3voh1

Spellbinder’s Build a Sentiment Stamp Set STP-036: https://amzn.to/3vruAeQ

Amazon Basics Palette Pad:  https://amzn.to/4asH58A

Speeball 4” Brayer Kit with various rollers:  https://amzn.to/3TDK1bY

LETTERPRESS WITH THE SPELLBINDER’S BETTERPRESS: HAPPY BIRTHDAY CARD

This is a lovely card created with the  Spellbinder’s BetterPress Letterpress System. If you look closely you can see that the text and images are impressed into the paper.

This product uses inked metal plates to impress an image into thick cardstock; essentially it debosses the image. The result makes your card look as if it were fine stationery. The process and tools are very easy to use and I’ve had excellent results with every project I’ve tried with it.

Basically, the product has two parts to it: a chase and a platen, which is seen in the image below. The chase is a magnetic platform where you will place your metal plates. It has vertical and horizontal markings to help with alignment. The platen is a clear cover with registration marks for A2 and A7 sizes, onto which you attach the cardstock. There are four magnets on the four corners of the platen, which align with four magnets on the chase to hold it in place. The system is designed to be used with a Spellbinder’s die cutting machine such as the Platinum 6, which is what I used to create this project.

The cardstock I used for this card is the Spellbinder’s Color Essentials Cardstock in Partly Cloudy color.. The ink I used is the Spellbinders BetterPress Ink in the colors French Blue and Leaf..

For more details on how I made this card you can watch my YouTube video.

Here is a list of of supplies I used on this card. These links are my affiliate links:

BetterPress Letterpress System by Spellbinders:  https://shrsl.com/4g7p6

Copperplate Everyday Sentiments:  https://shrsl.com/4g7q6

Spellbinder’s New & Improved Platinum 6 Die Cutting Machine:  https://shrsl.com/4g85t

Spellbinder’s Color Essential Cardstock:  https://shrsl.com/4g82s

Spellbinder’s BetterPress Mini Ink Sets and Reinkers:  https://shrsl.com/4g7pb

Spellbinder’s BetterPress Cotton Card Panels:  https://shrsl.com/4g7pc

Spellbinder’s Sweet Birdie Etched Dies: https://shrsl.com/4gqxc

Letterpress With the Spellbinder’s BetterPress: Thinking of You Card

This is a lovely card created with the  Spellbinder’s BetterPress Letterpress System. If you look closely you can see that the text and images are impressed into the paper.

This product uses inked metal plates to impress an image into thick cardstock; essentially it debosses the image. The result makes your card look as if it were fine stationery. The process and tools are very easy to use and I’ve had excellent results with every project I’ve tried with it.

Basically, the product has two parts to it: a chase and a platen, which is seen in the image below. The chase is a magnetic platform where you will place your metal plates. It has vertical and horizontal markings to help with alignment. The platen is a clear cover with registration marks for A2 and A7 sizes, onto which you attach the cardstock. There are four magnets on the four corners of the platen, which align with four magnets on the chase to hold it in place. The system is designed to be used with a Spellbinder’s die cutting machine such as the Platinum 6, which is what I used to create this project.

The cardstock I used for this card is the Spellbinder’s Color Essentials Cardstock in Purple Mist and Royal Amethyst. The ink I used is the Spellbinders BetterPress Ink in the colors Wild Berry and Leaf.

For more details on how I made this card you can watch my YouTube video.

Here is a list of of supplies I used on this card. These links are my affiliate links:

BetterPress Letterpress System by Spellbinders:  https://shrsl.com/4g7p6

Copperplate Everyday Sentiments:  https://shrsl.com/4g7q6

Spellbinder’s New & Improved Platinum 6 Die Cutting Machine:  https://shrsl.com/4g85t

Spellbinder’s Color Essential Cardstock:  https://shrsl.com/4g82s

Spellbinder’s BetterPress Mini Ink Sets and Reinkers:  https://shrsl.com/4g7pb

Spellbinder’s BetterPress Cotton Card Panels:  https://shrsl.com/4g7pc

Spellbinder’s Fashion Oyster Color Essentials Pearl Dots:  https://shrsl.com/4g7pf

Metallic Washi Tape from Amazon:  https://amzn.to/49MZs8g

Letterpress with the Spellbinder’s BetterPress: Hello Card

This project is the first one I’ve done using the Spellbinder’s BetterPress Letterpress System. This product uses inked metal plates to impress an image into thick cardstock; essentially it debosses the image. The result makes your card look as if it were fine stationery. The process and tools are very easy to use and I’ve had excellent results with every project I’ve tried with it.

Basically, the product has two parts to it: a chase and a platen, which is seen in the image below. The chase is a magnetic platform where you will place your metal plates. It has vertical and horizontal markings to help with alignment. The platen is a clear cover with registration marks for A2 and A7 sizes, onto which you attach the cardstock. There are four magnets on the four corners of the platen, which align with four magnets on the chase to hold it in place. The system is designed to be used with a Spellbinder’s die cutting machine such as the Platinum 6, which is what I used to create this project.

I started my project by creating a non-standard sized cardbase out of 8.5″ x 11″ mahogany color essentials cardstock. I first scored it at 5.5″ to create an 8.5″ x 5.5″ card. I then trimmed it with my paper trimmer on the 5.5″ short side to 4.5″ and on the 8.5″ long side to 5.75″. In the end I had card that measured 4.5″ x 5.75″ which you can see below.

Next, I will align my metal plates on my chase and adhere the cotton cardstock to the platen. I used the Copperplate Everyday Sentiments Hello and the flower plate that came with the BetterPress. Before running it through my die cutting machine, I have to ink up the metal plates. I chose to use the Clay, Azalea, and Leaf ink colors. The Clay is for the word, “Hello”. The Azalea for the flowers, and the Leaf for the leaves of course.

The result for the top half of the card can be seen below. I hope you can see the beautiful inlaid impression that the Spellbinder’s BetterPress System makes on the card. It is just so gorgeous!

To finish the card panel, all you have to do is remove the word Hello and then ink up the flower plate again with the same color inks. Leave the card panel on the platen, but rotate it around so the bottom of the card is now the top of the card. Run it through the die cutting machine one more time and you will have a finished card panel.

The next thing we need to do is use the Spellbinder’s Essential Diamond Etched Dies to cut out the word Hello. I used the second largest die.

Don’t put your dies away yet. You’ll need to cut two more diamonds, but this time you’ll cut them from the Spellbinders Mahogony Color Essentials cardstock.

You’ll layer the two diamonds behind the “Hello” diamond and stager then so the top sticks out at the top about 1/4″ and the bottom sticks out at the bottom about 1/4″. This will leave a blank part on the right and left points of the diamond. Don’t adhere the diamond to the card front yet.

I am going to fill those blank spots in with gold mirrored cardstock. Simply cut another diamond out of the gold mirrored cardstock and then cut it in half with a trimmer. Layer the two pieced on top of each other and snip off the corner to create two mini triangles.

Align them on the right and left points of the diamond. Then add glue to the back of the diamond panel. You may notice the white on the back of the diamond panel. That is extra cardstock I adhered to it so it would stand out. You could also use foam tape or fun foam to pop up this element, or leave it out all together.

Once the glue is applied, turn the diamond over and put something heavy on it to let it dry. This is what it will look like. Can you see the gold corners on the left and right?

I decided to add some fashion oysters in two different sizes to draw the eye. Here is a look at the finished product. I made a second card in the same way using different colors of ink: mulberry and coastal.

Below are my affiliate links for the products I used to make these cards.

BetterPress Letterpress System by Spellbinder’s:  https://shrsl.com/4g7p6

Spellbinder’s Copperplate Everyday Sentiments:  https://shrsl.com/4g7q6

Spellbinders Mahogany Color Essentials Cardstock 8.5 x 11” – 10 Pack:  https://shrsl.com/4g7p9

Spellbinder’s BetterPress Mini Ink Sets and Reinkers:  https://shrsl.com/4g7pb

Spellbinder’s BetterPress Cotton Card Panels:  https://shrsl.com/4g7pc

Spellbinder’s Essential Diamond Etched Dies:  https://shrsl.com/4g7pe

Spellbinder’s Mirror Gold Cardstock 8 1/2″ x 11 – 10 Pack:  https://shrsl.com/4g7qi

Spellbinder’s Fashion Oyster Color Essentials Pearl Dots:  https://shrsl.com/4g7pf

Christmas Night

I love Christmas! The joy of knowing my Savior loved me enough to come into this world as a baby and live a sinless life and chose to die in my place is breathtaking. These beautiful Christmas cards feature the nativity: that wonderful event that brought peace and good tidings to all men.

Please find below a list of products used to make these cards. These are my affiliate links:

Paper Rose 6 x 6 paper pad Christmas Night: https://shrsl.com/4c9ue

hinana 7pcs/Set Rectangle Frame Metal Die Cuts, Scallops Stitched Nesting Tag Background Cutting Dies: https://amzn.to/47ORCdy

XMYXCRAFT 7Pcs/Set Rectangle Frame Metal Die Cuts, Stitched Rectangle Nesting Frame Tag Background Cutting Dies: https://amzn.to/3RAV85j

Essential Arches Etched DIes: https://shrsl.com/4c9ut

Fall and Christmas Cards With the Same Die (Updated)

This weekend, I took some time to make a handful of cards for Fall and Christmas using the Cozy Autumn A2 Wreath by Scrapbook.com. This die cuts a wreath of several types of leaves, which makes it perfect for Fall or Christmas! The die also includes a circle die which you can see in the photos above with the greetings on them. This circle die also has an embossing feature which puts an imprint of a circle inside the circle, which you can see in the card on the left in the image below. The wreath die also cuts tiny circles around the inside of the wreath. In the photo below, you can see that I chose to use the wreath in a different way for the card on the left. Instead of using it as a wreath, I simply cut the wreath in half and placed it under and around the rectangular cardstock. If you look closely, you’ll notice that I used the circle die to cut the circle with the Thanks You Are Awesome greeting on it. All of the greetings were heat embossed with embossing powder and a heat tool.

I chose to glue some pearls to each circle on the Christmas card, which you can see in the photo below. They were white, but I colored them red with an alcohol marker.

If you take a closer look at the die cut wreaths, you’ll see that I added some detail with a Wink of Stella Glitter Brush Pen in Gold to the leaves, which you can see in the photo below.

The gold splatter on the brown leaves in the Birthday card on the right is the Simon Hurley Gold Lunar Paste which you can get at Scrapbook.com or Amazon. I simply added some water to the paste and then used a paint brush to flick it onto the leaves.

The papers I chose included the Harvest smooth cardstock and Neutrals smooth carstock (also from Scrapbook.com) and the Mintay Golden Papers. The gold leaves you see in the background of the Christmas card were cut from Spellbinders Mirror Gold Cardstock with the same wreath die.

The greetings were stamped with an old Sizzix stamp set 560195 by Stephanie Barnard and then heat embossed with different colors of embossing powder.

If you’re interested in making these cards, please feel free to use my affiliate links below. They are free to use and any purchase you make using them will generate a small percentage of the sale to me (at no extra cost to you) so I can keep sharing my cards with you.

Scrapbook.com – Decorative Die Set – Cozy Autumn – A2 Wreath  https://shrsl.com/49xs4

Mintay Papers – Golden Days Collection – 6 x 6 Paper Pad  https://shrsl.com/49xs7

Scrapbook.com – Harvest – Smooth Cardstock Paper Pad – A2 – 4.25 x 5.5 – 40 Sheets https://shrsl.com/49xub

Scrapbook.com – Neutrals – Smooth Cardstock Paper Pad – A2 – 4.25 x 5.5 – 40 Sheets  https://shrsl.com/49xue

Zig Kuretake Wink of Stella Brush II, 3 bush pens (Glitter Clear & Glitter Gold & Glitter Silver)  https://amzn.to/4761U89  

Zig Kuretake Wink of Stella Brush II in Gold ONLY 1 brush pen https://shrsl.com/4a3cd

Lunar Paste – Ranger Ink – Simon Hurley – Slippery When Wet – Gold http://shrsl.com/4a3cq OR  https://amzn.to/47oQjS3

Spellbinders Mirror Gold Cardstock https://shrsl.com/4a3d1

Handmade Greeting Card for Fall with supplies from Dollar Tree and others (Updated)

Thanks for joining me today for this cute and adorable card. It is made using decorative cardstock from the Dollar Tree and Scrapbook.com. The links in this post are my affiliate links which are free to use and any purchases you make will help me earn a small percentage of the sale so I can continue to share these ideas with you. Thank you for your support! You can see below that I chose to add some dashed lines with a white gel pen around the birds and the yellow frame around the greeting. Which one do you like best?

Crafter's Square Decorative Cardstock from the Dollar Tree
Harvest Smooth Cardstock from Scrapbook.com

The images are cut out with scissors and the details were added with gel pens. The stitched edge on the red cardstock is made from the Stitched Mod Rectangle STAX Die-namics die from My Favorite Things.

Stitched edge created by My Favorite Things die

The inside of the card was decorated using images from the same decorative cardstock from Dollar Tree and the Harvest smooth cardstock from Scrapbook.com.

Celebrate Mother’s Day

Here is a handmade greeting card for Mother’s Day. Hope you enjoy it! I used the Our Love Song collection papers and an oldie but a goodie stamp from Hero Arts called, “Celebrate Everyday.” This card took less than ten minutes to put together, but I think it’s bright and cheerful and lots of fun.

Here is a list of supplies I used to make this card. I am an affiliate with Scrapbook.com so I will receive a small percentage of anything you buy using these links at no extra charge to you.

Bella Blvd Our Love Song Collection: https://shrsl.com/42e9e

Hero Arts Clear Poly CL498 Celebrate Everyday: no longer available.

Heart Ribbon: Dollar Tree

Happy Mother’s Day

Today, I have some inspiration for you. Perhaps you can use it to create a handmade greeting card for your mom on Mother’s Day. The products shown in the image are linked below in my affiliate links. I love the high contrast between the black background and colorful stripes. Here are a few things I love about my mom. She always has time for me no matter what. Even though I’m a grown woman, she still will put everything aside to talk to me or help me when I need her. She knows how to make me laugh and she isn’t afraid to laugh at herself. She gives unconditionally. She loves Jesus and that has blessed me immeasurably. She cares about others. She is kind. She is selfless. Happy Mother’s Day to all mothers out there. May your love and devotion return to you in waves and waves of many blessings.

Below is a list of the products. I am an Amazon and Scrapbook.com affiliate, so thank you for supporting me by using those free links below. Any purchases you make with these links will provide a small percentage of the sale to me at no extra charge to you.

Bella Blvd – Our Love Song Collection – 12 x 12 Double Sided Paper – Daily Details:  https://shrsl.com/42bjp

Bella Blvd – Our Love Song Collection – 12 x 12 Double Sided Paper – Borders: https://shrsl.com/42bjq

Fashion Oyster Color Essentials Pearl Dots:

https://shrsl.com/42bjx

https://shrsl.com/3vpk0


Simon Hurley Birthday Basics Stamp Set and Spellbinder’s Coordinating Dies

If your looking for a new stamp set to create birthday cards or decorations, the Simon Hurley Birthday Basics set from Ranger and the coordinating die set from Spellbinders are perfect. Both items can be purchased at Spellbinderspaperarts.com along with many other Ranger and Spellbinder’s products.

I’ve created three cards with these products: two very colorful and bright ones, and one more elegant and fancy. That’s what I love about stamp sets like this one, you can choose the style you want to create! Another great thing about this set is the balloons. There are two stamps for the balloons, one solid and one outline. You may use them separately or together.

With the coordinating dies from Spellbinders, you can create beautiful focal images of balloons for your birthday or celebration cards. I’ve used foam adhesive on my balloons to give the card on the left some dimension. I stamped the balloons with Versa Fine Clair ink in the colors summertime, cheerful, charming pink, verdant, and paradise. I used the color warm breeze to stamp the greeting: CELEBRATE. Finally, I finished the card by adding some white highlights with a white gel pen.

To create backgrounds for the focal images, I used the Deckled Rectangles LG die and the Essentials Arches die from Spellbinder’s. To add some interest to the backgrounds on these cards, I chose to emboss one background and stamp a pattern on the other (refer to the middle and last card in the image above). On the middle card, I used the confetti stamp from the Birthday Basics stamp set along with some Zig Clean Color brushes. For the last card (on the right), I used the Loops embossing folder from Spellbinders along with the Curved Borders Two die to create a background. The cardstock I used on these cards is the Color Essentials Cardstock from Spellbinders. They sell a pack of assorted colors, which makes it easy to create colorful cards.

For the last card on the right, I heat embossed the greeting with Ranger Holographic embossing powder. The birthday cake is also heat embossed in the holographic powder. Spectrum Noir alcohol markers were used to color the cake and candles.To finish off the card,I placed three self-adhesive pearls (from Spellbinder’s) on the card.

Please enjoy the video below:

Affiliate Links

These links are FREE for you to use and I will receive a small portion of any purchases you make using Amazon and Share a Sale links. As an Amazon Associate I earn from qualifying purchases.

Simon Hurley Birthday Basics Stamp and Die Set: https://shrsl.com/3vqcc

Simon Hurley Birthday Basics Stamp Set Only: https://shrsl.com/3vqcf

Spellbinders Color Essentials Cardstock Assorted Pack: https://shrsl.com/387n0

Spellbinders Tool in One: https://shrsl.com/38b28

Spellbinders Platinum 6 Machine: https://shrsl.com/3fh78

Spellbinders Deckled Rectangles LG Dies: https://shrsl.com/3voh1

Spellbinders Essential Arches Dies: https://shrsl.com/3voh2

Spellbinders Curved Borders Two Dies: https://shrsl.com/3voh3

Spellbinders Loops Embossing Folder: https://shrsl.com/3voh5

Spellbinders Fashion Oyster Self-Adhesive Pearls: https://shrsl.com/3vpk0

Neenah Solar White 110lb cardstock: https://amzn.to/3QwQOSI

Neenah Solar White 80lb cardstock: https://amzn.to/3CEnyn5

Zig Clean Color Watercolor Brush Markers: https://amzn.to/3bKg1VO

Ranger Archival Ink Jet Black: https://shrsl.com/3voh9

Versa Mark Stamp pad for embossing: https://amzn.to/2VhDzcy

Ranger Holographic Embossing Powder: https://amzn.to/3ivTBik

Tidy Tray to catch embossing powder: https://amzn.to/3t1gBX2

Miu Silicone Mat: https://amzn.to/3k3lheO

EK Success Craft Tweezers (reverse): https://amzn.to/3tFzPBS

Spectrum Noir Alcohol Markers: old markers are unavailable

We R Memory Keepers Precision Press Stamping Platform
https://amzn.to/3pmcItB

Versafine Clair Ink: https://www.imaginecrafts.com/versafine-clair