Supplies Needed:
White Cardstock (at least 65lb weight)
Patterned Paper or Stamps (acrylic or rubber) to decorate the card.
Ink to use with Stamps
Paper Trimmer or Scissors (Paper trimmer is recommended)-one that has a scoring and cutting blade
Bone Folder to crease the cards (the one liked here will not leave a shiny mark like the more inexpensive ones do)
The links above are my affiliate links. If you use them to make a purchase, I will receive a small portion of the sale at NO cost to you. Thank you for helping me share this wonderful hobby with others like yourself!
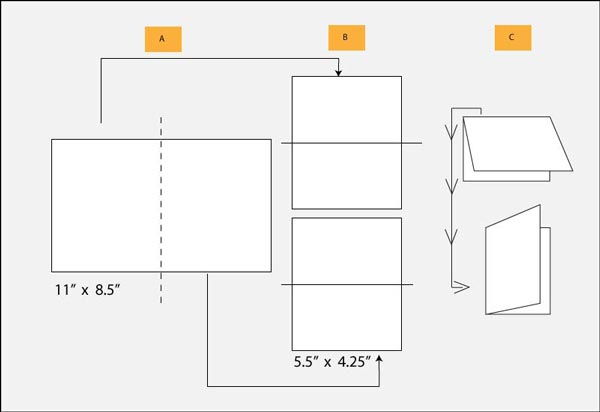
Steps to make an A2 size card (4.25″ x 5.5″):
A. Cut an 8.5″ x 11″ piece of white cardstock in half crosswise at 5.5 inches, which will make two pieces of 8.5″ x 5.5″ cardstock.
B. Take each of the two pieces of cardstock and fold them in half to make two cards that measure 4.25″ by 5.5″
C. The two cards can be decorated to create greeting cards. You have a choice of which orientation you prefer for the card, either portrait or landscape.
The image below demonstrates this process. The dotted lines are cut lines and the solid lines are fold lines.
Check out the video below to see an actual demonstration of how it’s done. Check out the eBooks below the video for more information.
Please consider taking a look at my ebook which provides detailed information about making greeting cards by hand, including information about products and techniques used in this wonderful, creative, fun-filled hobby! It’s great for beginner and intermediate makers!