
Today I am doing some faux embossing. To accomplish this look, I’m using some word dies from Spellbinders by Becca Feeken called, “Sweet Sayings Notecard Sentiments.” There are seven word dies in this die set and I’m using the word, “Hello.” These dies have a beautiful font with pretty flourishes on the ends of the capital letters. For the floral element on the card, I’m using another set by Spellbinders and Becca Feeken called, “Lyrical Layered Florals.” This is a stamp and die set. It has the word, “Happy Birthday” and several floral elements that can be used with the coordinating dies.
As the name of the set suggests, some of the stamps are meant to be layered over top of one another so you get more definition than one stamp alone would provide. To take advantage of this, I used two inks for the leaves and two inks for the florals: one light and one darker color from the same color family.
TIP: If you don’t have two inks from the same color family, you can double stamp the 2nd and 4th layers to make it darker and appear to be a darker shade of the same color.
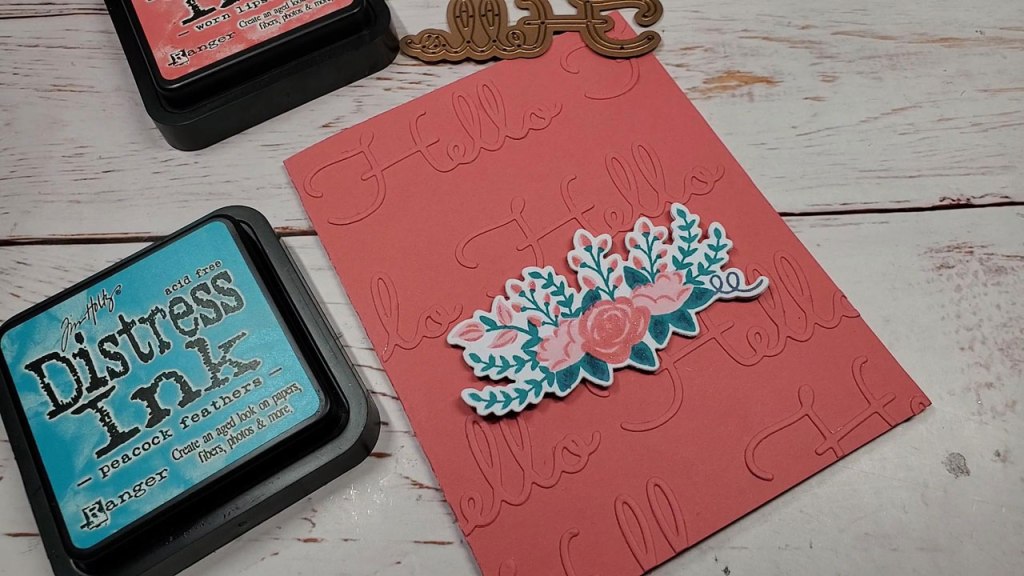
I chose a complimentary color scheme for this card in a red-orange and blue-green. Specifically, the color of the cardstock is Dahlia and it is from the color essentials cardstock from Spellbinders. You can buy it in a pack of assorted colors with 2 of each color or you can buy a pack of 10 of just that color. Since the cardstock is a red-orange color, the opposite of that is a blue-green. So, I wanted a blue-green ink. For the ink, I chose to use distress ink in the colors peacock feathers and stormy sky for the leaves and spun sugar and worn lipstick for the flowers, but you can use any ink you have.
After cutting out the word Hello several times, I glued it down to my card using Tombow Mono Liquid glue. Of course you can use double sided adhesive sheets or a Xyron sticker maker instead. It’s up to you. I wanted a repeating pattern design so I laid out the word diagonally from top to bottom in a staggered way and then filled in the gaps. It’s easier to understand if you watch the video below.
For the stamping, I used my precision press stamping platform. I do recommend using a stamping platform because these stamps are layering stamps and you may wish to stamp the image more than once in the same place. I used the Spellbinders color essentials cardstock in Snowdrift color to stamp on. Once the stamping is done, I used my Spellbinders Platinum die cutting machine with the coordinating die to cut out the floral swag and adhered it to my card. That’s it. A beautiful clean and simple card. Very elegant and pretty if I do say so myself!
Affiliate Links
These links are FREE for you to use and I will receive a small portion of any purchases you make using Amazon and Share a Sale links. As an Amazon Associate I earn from qualifying purchases.
Adhesive
Tombow Mono Liquid Adhesive: https://amzn.to/37DhjRI
Dies and Stamps*
Sweet Sayings Notecard Sentiments Dies: https://shrsl.com/38kmq
Lyrical Layered Florals Clear Stamp & Die Set: https://shrsl.com/38kms
Distress Ink
Stormy Sky: https://shrsl.com/38kn0
Peacock Feathers: https://shrsl.com/38kn2
Spun Sugar: https://shrsl.com/38kn4
Worn Lipstick: https://shrsl.com/38kn5
Cardstock
Assorted Pack Color Essentials Cardstock 8.5″ x 11″ – 20 Pack: https://shrsl.com/387n0 ( I used the Dahlia color from this pack) OR you can buy a pack of just the Dahlia: Dahlia Color Essentials Cardstock: https://shrsl.com/38knu
Snowdrift Color Essentials Cardstock: https://shrsl.com/38knh
Tools
Fiskars Sure Cut 9″ Paper Trimmer: https://amzn.to/2HkY02n
Platinum Die Cutting and Embossing Machine – 8.5″ Platform: https://shrsl.com/38b1y
Teflon bone folder (it is supposed to not leave a burnishing mark or shine on the paper: https://amzn.to/2QYdHE5
Tool ‘n One (to remove pieces from dies and die cut shapes): https://shrsl.com/38b28
We R Memory Keepers Precision Press Stamping Platform: https://amzn.to/3pmcItB
EK Success Craft Tweezers (reverse): https://amzn.to/3tFzPBS
Westcott Sewing Titanium Bonded Fine Cut Scissors, 2.5″: https://amzn.to/3cQ1hqw
As seen in the video, you can also use Zig clean color brushes. I showed the first floral element I created with these brushes, but I ended up using the distress ink instead. I included the colors here so you’d have a reference. Light Pink, Light Carmine, Turquoise Green, Persian Green.
