
Hello crafty friends. I’m so excited to share my project with you today because Spellbinders invited me to create a project with some of their new dies! They sent me the new beautiful die set by Becca Feeken called, “Flourished Sonata Notecard“ from the Sweet Serenade Notecard Collection. Now, these dies can create four inch notecards if you use the score line insert included in the set, but I decided to use them at their full length to create a large slimline. The size of my card today is a bit bigger than a standard slimline as it is 8.5″ by 4.25″, so you may want to make your own envelope for it out of a 12″ x 12″ piece of paper or cardstock, which I demonstrate in the video below. If you are not into making your own envelopes, you can make the card 8.5″ x 4″ instead and use a store bought envelope.
The first card I made is pictured here and I chose to use blues with teals and a touch of purple. Feel free to use whatever colors you like, for example, white and silver is always so classy and reminds me of a wedding. The cardstock is from Spellbinders’ Color Essentials Cardstoc3k Assorted Pack. I used:
- Cosmic Sky for the card base
- Teal Topaz for the greeting and the middle layer of the Christmas tree (from “Kaleidoscope Christmas Tree“ die set)
- Waterfall for the card insert
- Lilac Blossom for the bottom layer of the Christmas tree.

The “Flourished Sonata Notecard“ dies can be used several ways. As shown above, I used the intricate die to cut into my front panel. There is an outer rim die that comes with it which will cut out the piece as well as a die to cut out the center of it too, but I didn’t use those on my first card seen above. You’ll see that in the second card. For this one, I also used the etched die set from 2020 called “Kaleidoscope Christmas Tree” from the Sparkling Christmas Collection. This creates the layered Christmas Tree you can see in the center of the card above and below. The tree is adhered to the inside of the card as its outline is cut out of the front panel. Now, for the greeting, I used a third etched die set called, “Season’s Greetings, Deer“ back from 2019, but available at Spellbinders now. To top it all off, I used some clear rhinestones on the Christmas tree. It’s fairly simple, really, and most crafters would find it easy to complete. Check out the video below to see the steps and my affiliate links for the products are beneath the video-they are free to use and any purchase you make helps me because I will receive a small percentage of the sale. Thanks for your support!
Now for the matching gift tags. I used the decorative frame rim and decorative frame top dies in the “Flourished Sonata Notecard“ set to create the top layer on the gift tags. Don’t you just love the flourish on the top and bottom of that piece? The snowflakes and letters are dies from the August 2020 small die of the month club called, “Sitting Pretty.” To coordinate with the card, I used the same colors of cardstock (Teal Topaz and Cosmic Sky), and cut them to 2.5″ x 3.5″ with my paper trimmer. The silver and white ribbon was something I had in my supplies…probably from Walmart.

Looking at the picture now, I think I should have added some clear rhinestones to the centers of the snowflakes! Small oversight on my part, which you can easily remedy on your own!
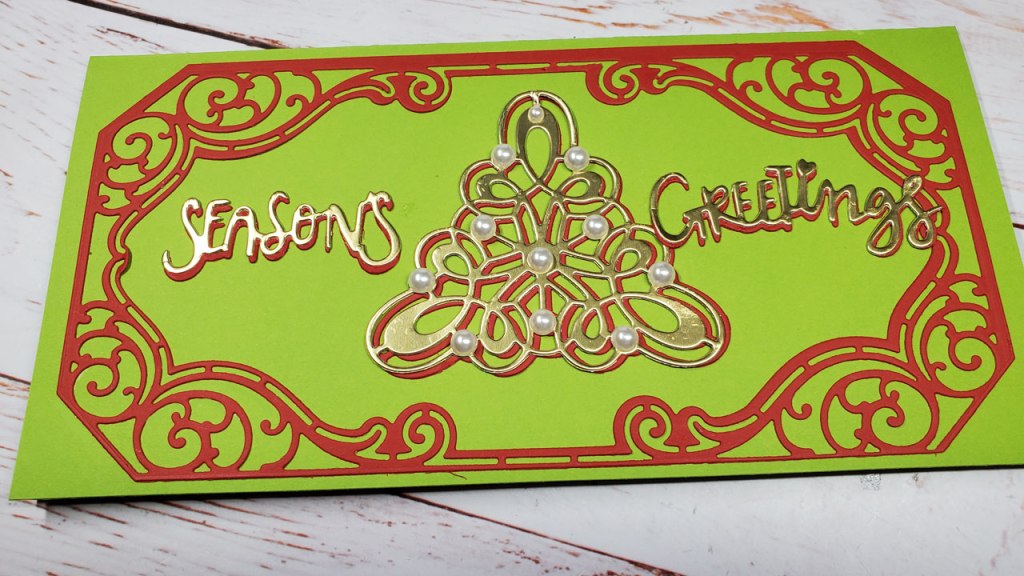
On to the next card. This one is a traditional red and green with some gold. I used the Pomegranate and Rainforest from the Spellbinders’ Color Essentials Cardstock Assorted Pack as well as the Mirror Gold Cardstock. This time, I used the Outer Rim die from the “Flourished Sonata Notecard“ die set to cut out the intricate pattern instead of inlaying it on the front panel. I used some Tombow Mono Multi Liquid glue to adhere it to the front of the Rainforest card base. I used the same dies mentioned above to cut out the Christmas tree and the greetings. For the Christmas tree, I only used the top and bottom dies to create the layered tree. To finish it off, I used some self-adhesive pearls. The top pearl is smaller than the rest. I hope you enjoyed these projects! Affiliate links below.
Affiliate Links:
These links are FREE for you to use and I will receive a small portion of any purchases you make using Amazon and Share a Sale links. As an Amazon Associate I earn from qualifying purchases.
ADHESIVES
Tombow Mono Liquid Adhesive: https://amzn.to/37DhjRI
Scrapbook Adhesives with two refills: https://amzn.to/3hvCBVF
Scrapbook.com – Clear Double Sided Adhesive Roll – 1/4 Inch x 81 Feet – Permanent – 1 Roll:
https://shrsl.com/38b24
DIES
Flourished Sonata Notecard Etched Dies from Sweet Serenade Notecards Collection by Becca Feeken : https://shrsl.com/387mo
Kaleidoscope Christmas Tree Etched Dies from Sparkling Christmas Collection:
https://shrsl.com/387qa
Season’s Greetings, Deer Etched Die Set: https://shrsl.com/38b1x
Sitting Pretty – Small Die of the Month Club: https://shrsl.com/38b6x
CARDSTOCK
Assorted Pack Color Essentials Cardstock 8.5″ x 11″ – 20 Pack: https://shrsl.com/387n0
Mirror Gold Cardstock 8 1/2″ x 11 – 10 Pack: https://shrsl.com/38b1w
TOOLS
Fiskars Sure Cut 9″ Paper Trimmer: https://amzn.to/2HkY02n
Fiskars Sure Cut 12 inch paper trimmer (comes with scoring and cutting blade):
Fiskars Sure Cut 12 inch paper trimmer (comes with scoring and cutting blade):
https://amzn.to/3fFmgxO
Platinum Die Cutting and Embossing Machine – 8.5″ Platform: https://shrsl.com/38b1y
Teflon bone folder (it is supposed to not leave a burnishing mark or shine on the paper: https://amzn.to/2QYdHE5
Journey Scoring Board: https://shrsl.com/38b21
Tool ‘n One (to remove pieces from dies and die cut shapes): https://shrsl.com/38b28
