
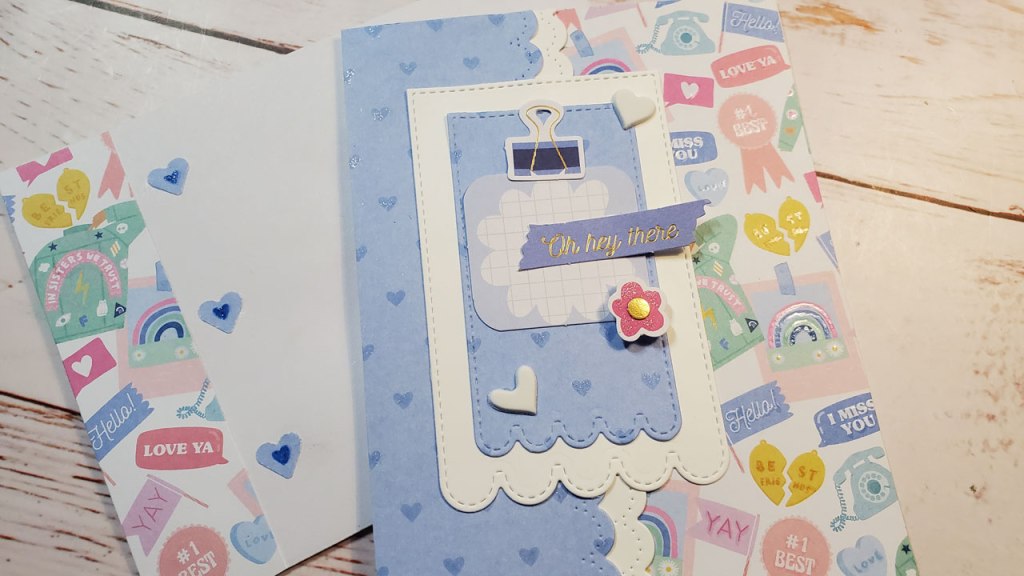
Today, I’m making a hello card. I’m using supplies from a monthly subscription card kit by Spellbinders. The kits are available as stand alone purchases if the don’t sell out, but they will cost more per unit than if you purchased the subscription. Of course, you can always follow the layout and use your own pattern paper to make a similar card. You’ll need to choose two pieces of pattern paper: one that is monochromatic like the blue one below (it only uses blue colors, one lighter and one darker) and one that is bold and busy, but has the same color as the monochromatic piece. Use the dies listed below to cut out the tags and put the scallop border on the edge of the pattern paper and white cardstock. Then, you’ll have to decorate the tag any way you’d like.
Affiliate links are below the video and here for your convenience. Here is what you’ll need:
- Spellbinders April 2021 Card Kit of the Month (sold out)
- Avery Elle Dotted Borders Die
- Poppystamps Festival Tags Dies or a similar tag making die
- Glitter Brush and Markers
- Sakura Glaze Pen
- Small heart punch
I chose two pieced of patterned paper from the kit. One was a mono-chromatic color scheme so it made a perfect background paper. The second was more bold with lots of colors and images. Here’s what to do next:
- Trim the background piece to 2 inches
- Trim the bold piece to 2.5 inches
- Adhere the bold piece to the front of the card on the right side
- Use the Avery Elle Dotted Borders Die to cut a scalloped edge on the background piece
- Use the same die to cut a scalloped edge out of white cardstock
- Adhere those two scalloped border pieces to each other so the white one sticks out
- Adhere the scalloped pieces to the left side of the card, overlapping the bold piece you already adhered to the card
- Use the largest Poppystamps Festival Tag Die to cut a tag of white cardstock
- Use the next largest Poppystamps Festival Tag Die to cut a tag of the background piece and one from the bold piece
- Adhere the background tag to the cardstock tag
- Decorate the front of the card with the die cut shapes as seen in the video below
- Decorate the inside of the card as seen in the video below
Affiliate Links
(I receive a portion of the sale on any purchase you make using the Amazon and Share a Sale links below)
Spellbinders Card Kit of the Month Subscription
https://shrsl.com/2ti8z The kit can be purchased as a standalone item, but the price is higher than you would pay if you subscribe to the monthly kit. You can cancel anytime. Free shipping! If they sell out, they are gone forever.
Adhesive
Tombow Mono Liquid Adhesive: https://amzn.to/37DhjRI
Die Cutting
Poppystamps.com Festival Tag Die: https://www.poppystamps.com/1589-Festival-Tags-craft-die_p_662.html or
https://www.franticstamper.com/Poppy-Stamps–Die–Festival-Tags_p_134575.html
Avery Elle Dotted Borders Die (for snowbank): https://amzn.to/36Ctcqj
Paper
4 x 6 Notepad paper: https://amzn.to/3g2lqLx
White Cardstock: https://amzn.to/3vxUw2z
Pens
Sakura Glaze Pen: https://amzn.to/3cFPyIU
Zig Wink of Stella Glitter Brush Pen: https://shrsl.com/2kljf or https://amzn.to/2Htkssm
Zig Wink of Stella Glitter Markers: https://amzn.to/3ofSbXp
Tools
Small Heart Paper Punch: I have a very old one. Not available anymore. There are tons on amazon or online or at a craft store.
Corner Rounder: There are many on the market. The Xacto one I used in the video is unavailable.
Fiskars Sure Cut 9″ Paper Trimmer: https://amzn.to/2HkY02n
We R Memory Keepers Tool Set (includes precision tweezers and die pick (also called brad setter) as well as othter tools) If you buy just the two separately, it will cost you almost as much as this whole tool set: https://amzn.to/38m2Kky
OR you can buy just the tweezers:
EK Success Craft Tweezers (reverse): https://amzn.to/3tFzPBS
