
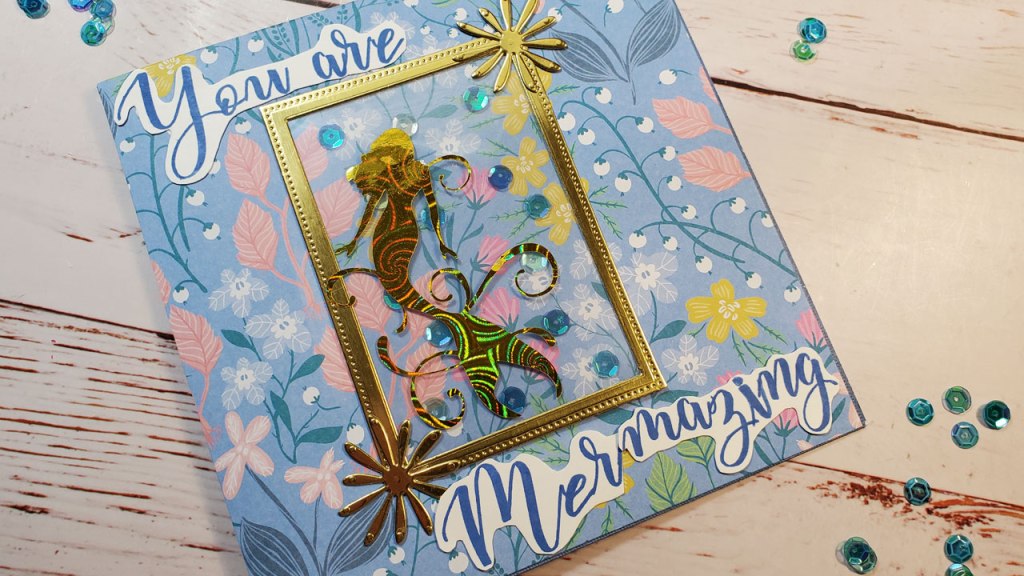
Mother’s Day is approaching! Here is a mermaid card for your magnificent mom. It is a mermaid card with a play on the word amazing and mermaid. I used the greeting, “You are Mermazing!” You could say, “Mermazing Mom” or “You mermaze me!” Of course, it can be used as an appreciation card too! How about, “Just swimming by to say Thank You!” or “Wishing you oceans of joy!” The possibilities are endless. To make this card, I used some of my own supplies and supplies from the Spellbinders April 2021 Card Kit of the Month, “Sincerely Yours.”
If you get the kit, you’ll still need additional items to make this card. Affiliate links are below the video:
- 12″ x 12″ cardstock (I used textured hoping it would create a stronger card base, but that is not necessary)
- Gold foil paper (I purchased mine at the dollar tree, but a similar version is available at Amazon – see link below)
- Gold vellum
- Mermaid die or use an electronic cutting machine
- Rectangle Dies
- Acetate or Transparency Film or use the plastic packaging from inside the kit
- Kelly Creates Bouncy Letter Alphabet Stamps
Here’s how to make the card:
- Cut the 12″ x 12″ cardstock into two pieces at the 6 inch mark. Put one piece aside for later.
- Score the 12″ x 6″ piece at 6″ to make a 6″x 6″ square card base.
- Adhere the pattern paper from the card kit (as seen in the video below) to the front of the card base.
- Use two rectangle dies to cut a frame out of the gold cardstock that comes in the kit.
- Use the larger of the two rectangle dies to cut out a rectangle of acetate or transparency film.
- Adhere the acetate to the back of the gold frame to create a “window”.
- Adhere the sequins that came in the kit to decorate the front of the card, but only on the spot where the frame covers.
- Adhere the “window” with the gold frame to the front of the card base, covering the sequins.
- Use a mermaid die or electronic cutting machine and some gold, holographic paper to cut out a mermaid that is a little smaller than the “window”.
- Adhere your mermaid to the front, left side of the window.
- Use the flower dies that came in the kit to cut two flowers out of the gold cardstock and adhere them to the top, right and bottom, left of the “window”.
- Add a greeting of your choice to the front of the card.
- Decorate the inside with additional pattern paper from the kit.
This is a fun card to make and even “funner” to receive. As always, feel free to improvise and change things based on your likes and dislikes, the supplies you have, and to fit your purpose. Most of all, have fun and enjoy! Check out the video below and if you are interested in making this card yourself, or one like it, check out the affiliate links below to get the products you’ll need. Have a great day!
Affiliate Links
(I receive a portion of the sale on any purchase you make using the Amazon and Share a Sale links below)
Spellbinders Card Kit of the Month Subscription
https://shrsl.com/2ti8z The kit can be purchased as a standalone item, but the price is higher than you would pay if you subscribe to the monthly kit. You can cancel anytime. Free shipping!
Adhesive
Tombow Mono Liquid Adhesive: https://amzn.to/37DhjRI
Die Cutting
My Favorite Things – Die-namics – Pierced Rectangle Stax:
https://www.franticstamper.com/My-Favorite-Things–Die-namics–Pierced-Rectangle-Stax_p_106905.html Never used this site. Use at your own risk.
The card kit I used today came with some dies. I used the flower die to cut out them out in gold cardstock, which also came in the kit. I used a Spellbinders Platinum Machine to cut them:
Spellbinders Platinum 8.5 Inch Platform Cutting Machine + Die, White: https://amzn.to/394vL5O
I used a Silhouette Cameo Electronic Cutting Machine to cut out the mermaid and the pink letters for the greeting, which I chose not to use in the end: https://amzn.to/3dYJWfj $299 at the time of this post.
Paper
4 x 6 Notepad paper: https://amzn.to/3g2lqLx (Used to keep my working surface clean and to press down on the stickers so they would adhere)
Paper Junkie Gold Vellum: https://amzn.to/37XTeDT (For the mermaid on the inside of the card)
Gold Holographic Paper: Dollar Tree – here is an alternative, which I have not tried, so you are on your own here: https://amzn.to/3vocftf
Transperancy Film: https://amzn.to/2QstqeB (Used to create transparent window)
12 x 12 Textured Cardstock: https://amzn.to/3tYPdsM (Not the brand I used, but what I could find on Amazon).
Stamping
Kelly Creates Alphabet Stamps (Bouncy): https://amzn.to/32SHArR
Memento Dew Drop Ink in Danube Blue: https://amzn.to/3vpkt4p OR get 4 for the price of 2: https://amzn.to/3sW1qgx
We R Memory Keepers Precision Press Stamping Platform
https://amzn.to/3pmcItB
Tools
Fiskars Sure Cut 12 inch paper trimmer (comes with scoring and cutting blade):
https://amzn.to/3fFmgxO
We R Memory Keepers Tool Set (includes precision tweezers and die pick (also called brad setter) as well as othter tools) If you buy just the two separately, it will cost you almost as much as this whole tool set: https://amzn.to/38m2Kky
OR you can buy just the tweezers:
EK Success Craft Tweezers (reverse): https://amzn.to/3tFzPBS
We R Memory Keepers Precision Press Stamping Platform
https://amzn.to/3pmcItB
Westcott Sewing Titanium Bonded Fine Cut Scissors, 2.5″: https://amzn.to/3cQ1hqw
Westcott 8″ Titanium Bonded Scissors, 2 Scissors, Gray/Yellow: https://amzn.to/3x7jS9o (This is a two pack and the blades have a coating so they don’t stick as bad when you are cutting into adhesive like foam tape)
The card kit I used today came with some dies. I used one of the flowers to die to cut it out in gold cardstock, which also came in the kit. I used a Spellbinders Platinum Machine to cut them:
Spellbinders Platinum 8.5 Inch Platform Cutting Machine + Die, White: https://amzn.to/394vL5O
Lawn Fawn Fawndamentals Stamp Shammy: https://amzn.to/3snbrmJ ( I used a regualr chamois that I had originally bought for my car to dry it after a wash. You can see it in the video. I use it to wipe the ink off of my precision press stamping tool. It was yellow).
Marvy Uchida Jewel Picker (used to set center of flowers): https://amzn.to/3qXNodH
