
To make this Mother’s Day card, I chose the Gerbera Daisy stamp from Inkadinkado. Whichever stamp you choose, be sure to use one that is a solid stamp (or color in an outline stamp).
Stamp this image twice on the same cardstock in the same orientation and using the same color ink. Leave enough space between them to cut one out. You may even want to write an arrow at the top of your page so you will not forget which direction is the top of the stamped image, as you can see in the image below.

You can use any kind of ink for this technique. Chose one that goes well with the stamp you are using. Be sure to keep the cut out one in the same orientation as the other one, in other words, don’t rotate it around. In the above image, you can see that I am checking the cut out image against the one on the cardstock to make sure they are going the same direction.
Cut out one of the flowers and set aside. Create a 3-D effect by using a die to cut out the center of the other stamped flower. In this case, I’m using a letter “M” die, but you can be creative an use any kind of die that fits in the center of your stamped image. To make the letter “M” look 3-D, you’ll cut it out of plan cardstock four more times and adhere all those layers together. See example in the image below.
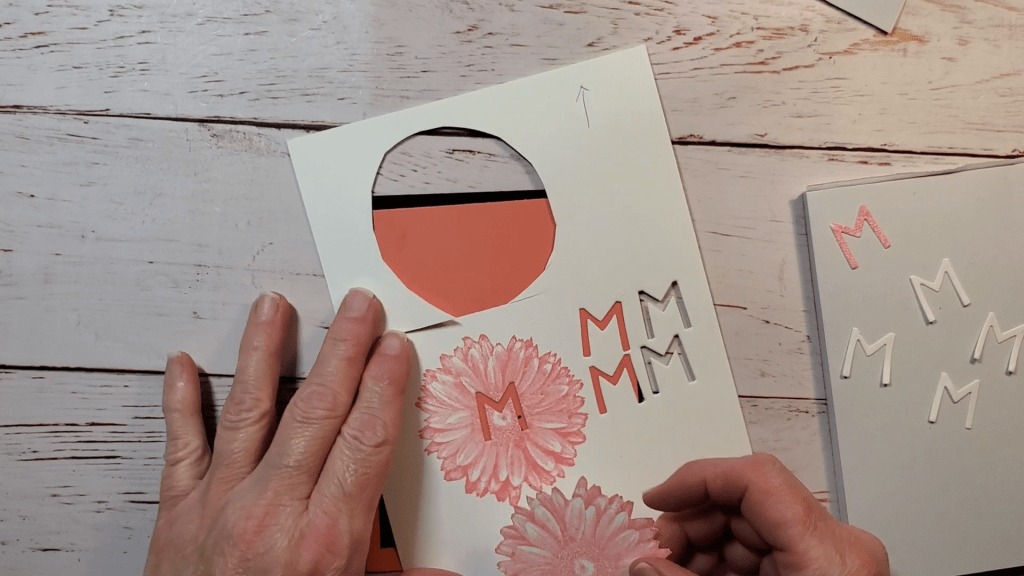
Last, adhere the first die cut (the one you did from the stamped image) on the top of those layers of M’s. Be careful not to smudge the top “M” because the image on it must remain in tact for the 3-D effect to work. Adhere the three-dimensional “M” to the stamped image you cut out (not the one with the “M” already cut out of it). Make sure you place it so that it matches the image-it’s kind of like a puzzle. I used the stamped image with the “M” cut out of it to match up with the one I cut out so I would know the orientation of the flower (which is the top, bottom, right, and left side) to help me place the “M”. I demonstrate this in the video below.
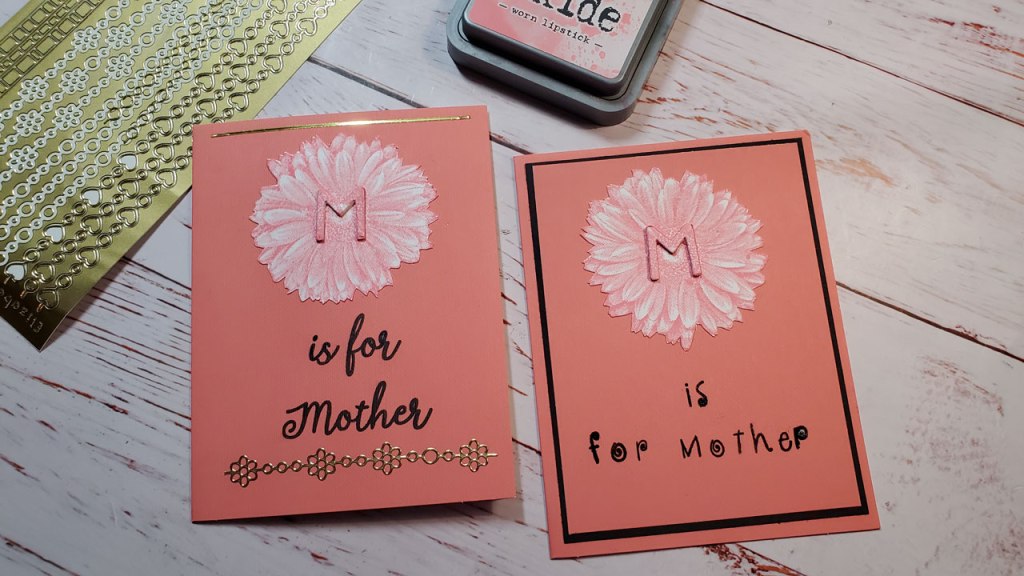
Finally, decorate your card with a greeting and a finishing touches. I used some peel-off border stickers to bling it up and I used a letter stamp set to place the greeting, “is for Mother” below the flower. The 3-D M makes the front of the card say, “M is for Mother”. I also decorated the inside of the card with the same flower stamp and peel-off border stickers. Have fun making this card for your mom!
Affiliate Links
(I receive a portion of the sale on any purchase you make using the Amazon and Share a Sale links below)
Adhesive
Tombow Mono Liquid Adhesive: https://amzn.to/37DhjRI
Xyron Adhesive Eraser: https://amzn.to/37uk9c1
Scrapbook Adhesives Easy Runner Grand: https://amzn.to/3mA0jjO
Die Cutting
Sizzix Thinlits Dies Alphanumeric, Cutout Upper, 3/4-Inch Tall: https://amzn.to/33gUDUg
Spellbinders Platinum 8.5 Inch Platform Cutting Machine + Die, White: https://amzn.to/394vL5O
Magic Mat: https://shrsl.com/2ycoa The Standard Magic Mat is compatible with the following machines when using a standard platform and a standard cutting plate:
Sizzix Big Shot
Sizzix Big Shot Plus*
Sizzix Big Shot Foldaway
Sizzix Big Shot Express
Sizzix Big Kick
Sizzix Vagabond and Vagabond 2*
Spellbinders Platinum*
Spellbinders Platinum 6*
Crafter’s Companion – Gemini*
Crafter’s Companion – Gemini Jr*
We R Memory Keepers Revolution*
Ink
Versa Fine Black Onyx Ink for inside greeting: https://amzn.to/36exdAI
Distress Oxide Ink in Worn Lipstick: https://amzn.to/3tlNaxA
Paper/Cardstock
4 x 6 Notepad paper: https://amzn.to/3g2lqLx (Used to keep my working surface clean and to press down on the stickers so they would adhere)
Neenah Solar White Classic Crest 80lb: https://amzn.to/3nL2wuA
Stamps/Stickers
Inkadinkado Pink Gerbera Daisy Wood Stamp: https://amzn.to/3tjzHq8
Hero Arts CL141 Clear Stamps, Fanciful Swirl Alphabet: https://amzn.to/3xPkz7B
Peel-off Border Stickers: (not what I used, but an alternative that has the straight lines and some circles instead of flowers): https://amzn.to/3b2DYYQ
Tools
Fiskars Sure Cut 9″ Paper Trimmer: https://amzn.to/2HkY02n
We R Memory Keepers Tool Set (includes precision tweezers and die pick (also called brad setter) as well as othter tools) If you buy just the two separately, it will cost you almost as much as this whole tool set: https://amzn.to/38m2Kky
OR you can buy just the tweezers:
EK Success Craft Tweezers (reverse): https://amzn.to/3tFzPBS
We R Memory Keepers Precision Press Stamping Platform
https://amzn.to/3pmcItB
Nicapa StandardGrip Cutting Mat for Silhouette Cameo (12×12 inch,3 Mats): https://amzn.to/3eh4sq9 (I cut these down to fit in my precision press stamping platform).
Lawn Fawn Fawndamentals Stamp Shammy: https://amzn.to/3snbrmJ ( I used a regualr chamois that I had originally bought for my car to dry it after a wash. It is the yellow colored cloth you see in the video).
I used a Silhouette Cameo Electronic Cutting Machine with the Silhouette pens to write the greeting on the first cards. Here is a link to a bundle with the cutting machine and the pens as well as other items: https://amzn.to/3te97yM
Westcott Sewing Titanium Bonded Fine Cut Scissors, 2.5″: https://amzn.to/3cQ1hqw
Bone Folder/Creasing Tool: https://amzn.to/3xIcMZf
Teflon bone folder-it is supposed to not leave a burnishing mark or shine on the paper: https://amzn.to/2QYdHE5 I didn’t use this one on this project.
