Today’s card is lovely and elegant, if I do say so myself! The light purple colors of the pattern papers are highlighted with the gold accents. It is an easy to make card, requiring only the ability to use a paper trimmer to measure out and cut the paper to fit the card base. The paper an die cut shapes are from the Spellbinder’s Card Kit of the Month for July 2021 called, Damask Daydream. To see how this card is made, watch the video below.
Affiliate Links (I receive a portion of the sale on any purchase you make using the Amazon and Share a Sale links below at no extra cost to you)
Nicapa Standard Grip Cutting Mat (12×12 inch,3 Mats): https://amzn.to/30C3i26 (I trimmed these down to fit inside my stamping platform so it would hold my paper and cards in place)
The card for today uses patterned paper that is reminiscent of a multimedia project such as an art journal or collage. The effect, in my opinion, is always unique and interesting as well as beautiful. I used that theme to create the card using supplies from the Spellbinder’s July 2021 card kit of the month called, “Damask Daydream” as well as my own tools and supplies.
Multimedia is fun because you can play with your supplies and get your hands into it. Don’t be afraid to get ink or glue on your hands. Be a kid again and just have fun with it! As you can see from the video below that I used repetition in my design by having the die cut flower appear three times in a line on the card. This is a common way to create interest in your card. After die cutting the flower, I used some Nuvo drops in bright gold to add some shine to the flowers here and there. Of course, I used my fingers to add it because that is half the fun of making art-getting messy!
I hope you’ll choose to give this card a try and don’t be afraid to play around with what you have. Even if you don’t have the same supplies seen in the video, look around in your craft supplies and see what alternatives you can come up with. Most of all, have fun and be fearless in your creativity!
To see how I made the card, watch the video on YouTube, which you can see below. I’ve posted an additional video below the YouTube video showing how I decorated the inside of the card.
Affiliate Links (I receive a portion of the sale on any purchase you make using the Amazon and Share a Sale links below at no extra cost to you)
Birthday cards must be the most popular kind of greeting card. At least it seems that way. In honor of that, I have assembled some of my birthday cards for you below. Please feel free to click on the images to see the demonstration videos for these cards. I hope you will find one you like and give it a try. Card making is such a fun and rewarding hobby. It lets you explore your creativity and bring joy to someone else too! Beware, though, once you start, you may not be able to stop!
Today, I’m using some watercolor markers called “Clean Color Real Brush” by Zig to color some stamped images. I used a triadic color scheme with yellow-orange, violet, and turquoise blue to color in the flowers and the flower cup. To give the images some life, I created some shading by putting down the turquoise green on half of the flower centers and then mixing the ink with some water and using a paint brush to add the lighter color to finish coloring in the flower centers. I used a yellow and an orange marker to color the flower petals. I didn’t use water with these two colors. Instead, I colored the base of the petals with the orange marker and then used the yellow marker to pull out the orange to the rest of the petal, giving a yellow-orange color for the flower petals. Don’t forget to clean your yellow marker of the orange ink once your are done by simply coloring on a blank piece of paper until you see only yellow.
For the flower cup, I used deep violet and light violet. I used a flicking motion to color the right and left edge of the flower cup which left pointy ends on each stoke and an area in the middle of the cup that was not colored. For that area, I used the light violet, blending between the two colors with a violet marker. This technique makes the cup appear rounded and real to life.
Finally, I heat embossed a sentiment on the flower cup with silver embossing powder. Please enjoy the video below:
Affiliate Links (I receive a portion of the sale on any purchase you make using the Amazon and Share a Sale links below)
Spellbinders Card Kit of the Month Subscription https://shrsl.com/2ti8z This will not link to the kit featured in this video, just he subscription plan. This kit is available here: https://shrsl.com/306nf I do not believe you can buy the stamp set separately, but you can also buy other parts of the kit separately, which are not featured in this video:
Ranger Archival Ink (safe to use with watercolors or waterbased markers/pens): https://amzn.to/3bB67FG
Markers Zig Clean Color Brush Pens: https://amzn.to/3bKg1VO Colors used: deep violet, light violet, yellow, orange, turquoise green (this is a triadic color scheme) emerald green for the “leaves” or butterfly wings. Colors shown but not used: violet
We R Memory Keepers Tool Set (includes precision tweezers and die pick (also called brad setter) as well as othter tools) If you buy just the two separately, it will cost you almost as much as this whole tool set: https://amzn.to/38m2Kky
OR you can buy just the tweezers: EK Success Craft Tweezers (reverse): https://amzn.to/3tFzPBS
Nicapa Standard Grip Cutting Mat (12×12 inch,3 Mats): https://amzn.to/30C3i26 This is the sticky mat you see inside the stamping platform. I trimmed these down to fit in the stamping platform.
This is an easy handmade card that anyone can make. I used supplies from the April 2021 card kit of the month from Spellbinders, but you can use the layout and your own supplies to create a similar card. Here’s how I made it:
Trim the pattern paper to 4″ x 5.25″
Adhere the paper to the card base (a piece of cardstock cut at 5.5″ and scored at 4.25″
Trim the flowers off the green rectangular paper
Adhere the green rectangular paper to the bottom right of the front of the card
Adhere the tag that says, “lovely day” to the green rectangular paper
Stamp the words “have a” above the “lovely day” tag
Decorate the inside of the card and the envelope with the leftover pattern paper
Check out the video below to see the card being made:
Spellbinders Card Kit of the Month Subscription https://shrsl.com/2ti8z This will not link to the kit featured in this video, just he subscription plan.
We R Memory Keepers Tool Set (includes precision tweezers and die pick (also called brad setter) as well as othter tools) If you buy just the two separately, it will cost you almost as much as this whole tool set: https://amzn.to/38m2Kky
OR you can buy just the tweezers: EK Success Craft Tweezers (reverse): https://amzn.to/3tFzPBS
I did a bible journaling video on Hebrews 11, known as the faith chapter. I wrote the word faith in big block letters and drew images of heaven on earth that will happen in the thousand year reign of Christ on earth. It will be a beautiful time and if you don’t know Jesus, you need to. Tell Him you’re sorry for your sins, mean it, turn from them, and believe that he loves you and died to pay for your sins so you could be reconciled to Him. Then, you’ll be saved and born again. It will be a miracle and you will be changed. Read the bible; start with the book of John, and pray for understanding and guidance.
Here’s another clean and simple card for you. I made two cards that are almost identical. The only difference is the bows on the cards. One was made with elastic string from my local dollar store and the other was made from ribbon. Lately, I’ve been having fun creating cards that have subtle differences. Another option you have with this card is to cut the frame from a different color cardstock or the pattern paper I used for the dandelion.
The supplies I used to make the card mostly came from the May 2021 card kit of the month by Simon Says Stamp called, “Dandelion Messages.” The kit is currently sold out, but I have linked to the individual supplies below the video. In addition to the supplies from the kit, I also used a die from Simon Says Stamp called, “Frames.”
Affiliate Links (I receive a portion of the sale on any purchase you make using the Amazon and Share a Sale links below)
Nicapa Standard Grip Cutting Mat (12×12 inch,3 Mats): https://amzn.to/30C3i26 ( I cut these down with scissors to fit in my We R Memory Keepers Precision Press Stamping Platform so my cardstock would stay put when I stamp on it)
We R Memory Keepers Tool Set (includes precision tweezers and die pick (also called brad setter) as well as othter tools) If you buy just the two separately, it will cost you almost as much as this whole tool set: https://amzn.to/38m2Kky
OR you can buy just the tweezers: EK Success Craft Tweezers (reverse): https://amzn.to/3tFzPBS
Lately, I’ve been enjoying making cards that do not require a lot of extra steps. This card is a clean and simple card. The main card panel was created using a 3-D embossing folder by Simon Says Stamp called, “Dandelion Wish” on a rose gold cardstock. To add a greeting, I heat embossed the words, “Sending You Peace” on another strip of the rose gold cardstock. That’s it! Quick, easy, and simple. Anyone can do it! Why not give it at try?
Affiliate Links (I receive a portion of the sale on any purchase you make using the Amazon and Share a Sale links below)
We R Memory Keepers Tool Set (includes precision tweezers and die pick (also called brad setter) as well as othter tools) If you buy just the two separately, it will cost you almost as much as this whole tool set: https://amzn.to/38m2Kky
OR you can buy just the tweezers: EK Success Craft Tweezers (reverse): https://amzn.to/3tFzPBS
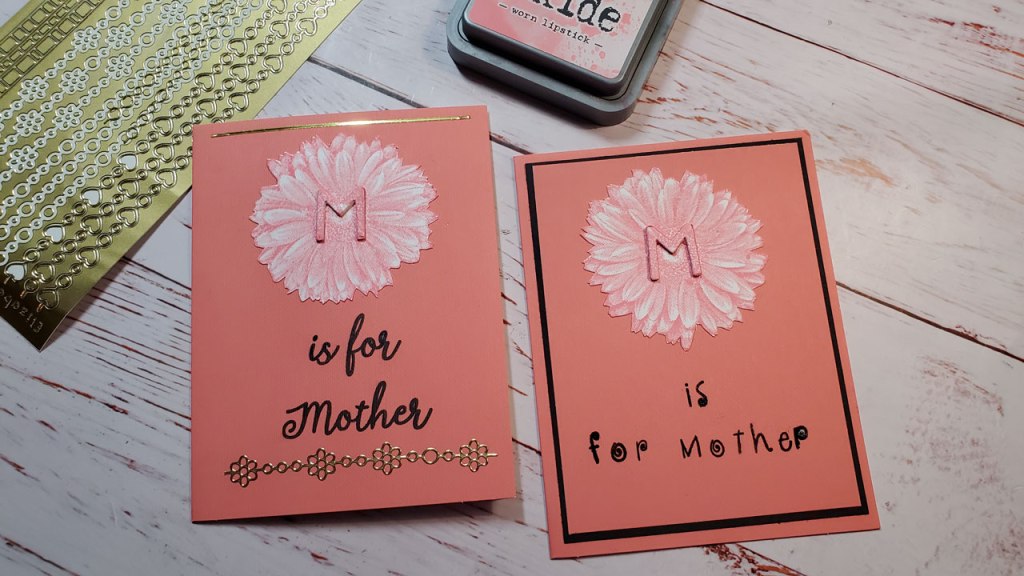
To make this Mother’s Day card, I chose the Gerbera Daisy stamp from Inkadinkado. Whichever stamp you choose, be sure to use one that is a solid stamp (or color in an outline stamp).
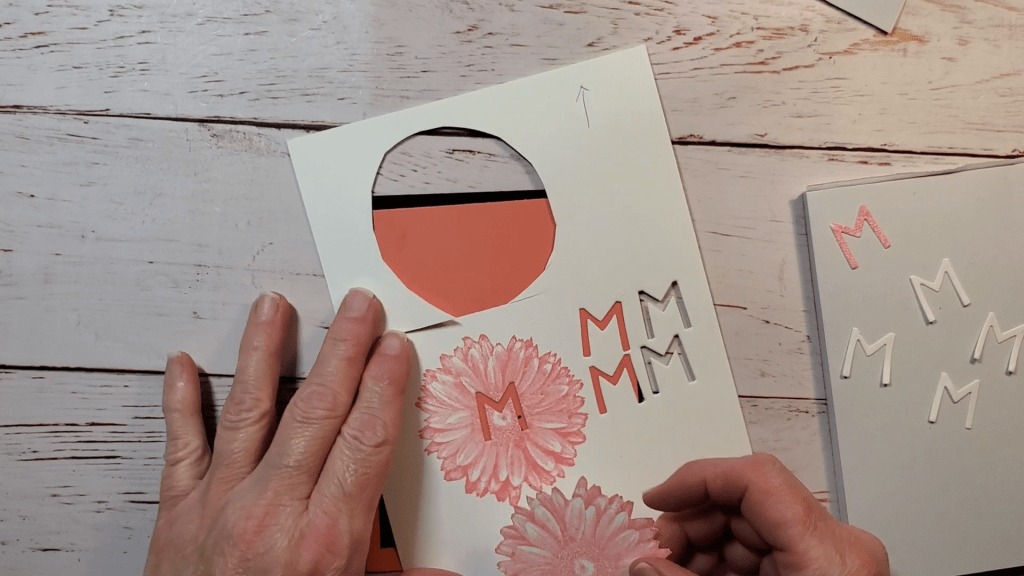
Stamp this image twice on the same cardstock in the same orientation and using the same color ink. Leave enough space between them to cut one out. You may even want to write an arrow at the top of your page so you will not forget which direction is the top of the stamped image, as you can see in the image below.
You can use any kind of ink for this technique. Chose one that goes well with the stamp you are using. Be sure to keep the cut out one in the same orientation as the other one, in other words, don’t rotate it around. In the above image, you can see that I am checking the cut out image against the one on the cardstock to make sure they are going the same direction.
Cut out one of the flowers and set aside. Create a 3-D effect by using a die to cut out the center of the other stamped flower. In this case, I’m using a letter “M” die, but you can be creative an use any kind of die that fits in the center of your stamped image. To make the letter “M” look 3-D, you’ll cut it out of plan cardstock four more times and adhere all those layers together. See example in the image below.
Last, adhere the first die cut (the one you did from the stamped image) on the top of those layers of M’s. Be careful not to smudge the top “M” because the image on it must remain in tact for the 3-D effect to work. Adhere the three-dimensional “M” to the stamped image you cut out (not the one with the “M” already cut out of it). Make sure you place it so that it matches the image-it’s kind of like a puzzle. I used the stamped image with the “M” cut out of it to match up with the one I cut out so I would know the orientation of the flower (which is the top, bottom, right, and left side) to help me place the “M”. I demonstrate this in the video below.
Finally, decorate your card with a greeting and a finishing touches. I used some peel-off border stickers to bling it up and I used a letter stamp set to place the greeting, “is for Mother” below the flower. The 3-D M makes the front of the card say, “M is for Mother”. I also decorated the inside of the card with the same flower stamp and peel-off border stickers. Have fun making this card for your mom!
Affiliate Links (I receive a portion of the sale on any purchase you make using the Amazon and Share a Sale links below)
Magic Mat: https://shrsl.com/2ycoa The Standard Magic Mat is compatible with the following machines when using a standard platform and a standard cutting plate:
Sizzix Big Shot Sizzix Big Shot Plus* Sizzix Big Shot Foldaway Sizzix Big Shot Express Sizzix Big Kick Sizzix Vagabond and Vagabond 2* Spellbinders Platinum* Spellbinders Platinum 6* Crafter’s Companion – Gemini* Crafter’s Companion – Gemini Jr* We R Memory Keepers Revolution*
Paper/Cardstock 4 x 6 Notepad paper: https://amzn.to/3g2lqLx (Used to keep my working surface clean and to press down on the stickers so they would adhere)
Peel-off Border Stickers: (not what I used, but an alternative that has the straight lines and some circles instead of flowers): https://amzn.to/3b2DYYQ
We R Memory Keepers Tool Set (includes precision tweezers and die pick (also called brad setter) as well as othter tools) If you buy just the two separately, it will cost you almost as much as this whole tool set: https://amzn.to/38m2Kky
OR you can buy just the tweezers: EK Success Craft Tweezers (reverse): https://amzn.to/3tFzPBS
Nicapa StandardGrip Cutting Mat for Silhouette Cameo (12×12 inch,3 Mats): https://amzn.to/3eh4sq9 (I cut these down to fit in my precision press stamping platform).
Lawn Fawn Fawndamentals Stamp Shammy: https://amzn.to/3snbrmJ ( I used a regualr chamois that I had originally bought for my car to dry it after a wash. It is the yellow colored cloth you see in the video).
I used a Silhouette Cameo Electronic Cutting Machine with the Silhouette pens to write the greeting on the first cards. Here is a link to a bundle with the cutting machine and the pens as well as other items: https://amzn.to/3te97yM
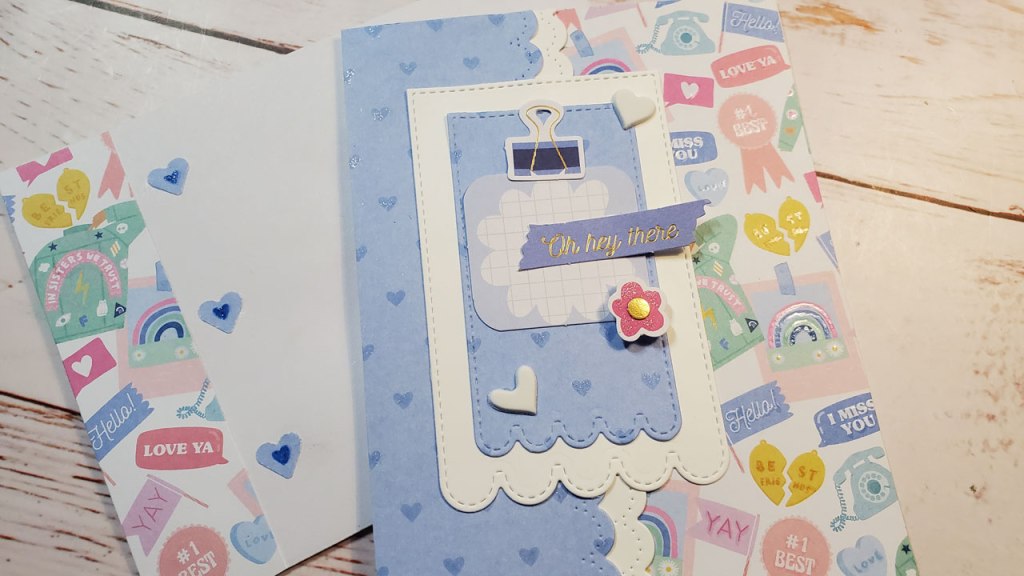
Today, I’m making a hello card. I’m using supplies from a monthly subscription card kit by Spellbinders. The kits are available as stand alone purchases if the don’t sell out, but they will cost more per unit than if you purchased the subscription. Of course, you can always follow the layout and use your own pattern paper to make a similar card. You’ll need to choose two pieces of pattern paper: one that is monochromatic like the blue one below (it only uses blue colors, one lighter and one darker) and one that is bold and busy, but has the same color as the monochromatic piece. Use the dies listed below to cut out the tags and put the scallop border on the edge of the pattern paper and white cardstock. Then, you’ll have to decorate the tag any way you’d like.
Affiliate links are below the video and here for your convenience. Here is what you’ll need:
Spellbinders April 2021 Card Kit of the Month (sold out)
I chose two pieced of patterned paper from the kit. One was a mono-chromatic color scheme so it made a perfect background paper. The second was more bold with lots of colors and images. Here’s what to do next:
Trim the background piece to 2 inches
Trim the bold piece to 2.5 inches
Adhere the bold piece to the front of the card on the right side
Use the Avery Elle Dotted Borders Die to cut a scalloped edge on the background piece
Use the same die to cut a scalloped edge out of white cardstock
Adhere those two scalloped border pieces to each other so the white one sticks out
Adhere the scalloped pieces to the left side of the card, overlapping the bold piece you already adhered to the card
Use the largest Poppystamps Festival Tag Die to cut a tag of white cardstock
Use the next largest Poppystamps Festival Tag Die to cut a tag of the background piece and one from the bold piece
Adhere the background tag to the cardstock tag
Decorate the front of the card with the die cut shapes as seen in the video below
Decorate the inside of the card as seen in the video below
Affiliate Links (I receive a portion of the sale on any purchase you make using the Amazon and Share a Sale links below)
Spellbinders Card Kit of the Month Subscription https://shrsl.com/2ti8z The kit can be purchased as a standalone item, but the price is higher than you would pay if you subscribe to the monthly kit. You can cancel anytime. Free shipping! If they sell out, they are gone forever.
We R Memory Keepers Tool Set (includes precision tweezers and die pick (also called brad setter) as well as othter tools) If you buy just the two separately, it will cost you almost as much as this whole tool set: https://amzn.to/38m2Kky
OR you can buy just the tweezers: EK Success Craft Tweezers (reverse): https://amzn.to/3tFzPBS