Layered Greeting Card | SCT Sampler September 2022

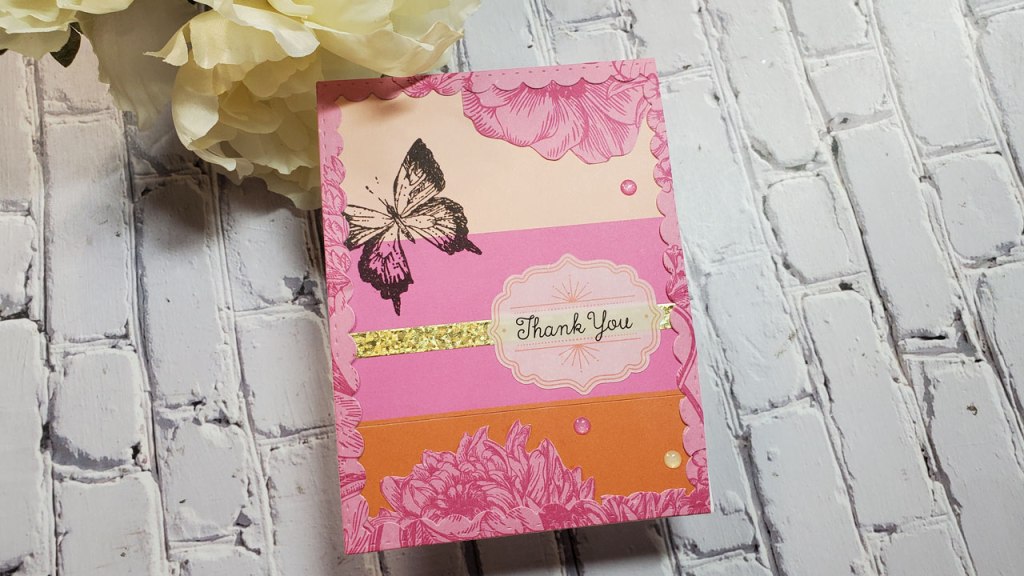
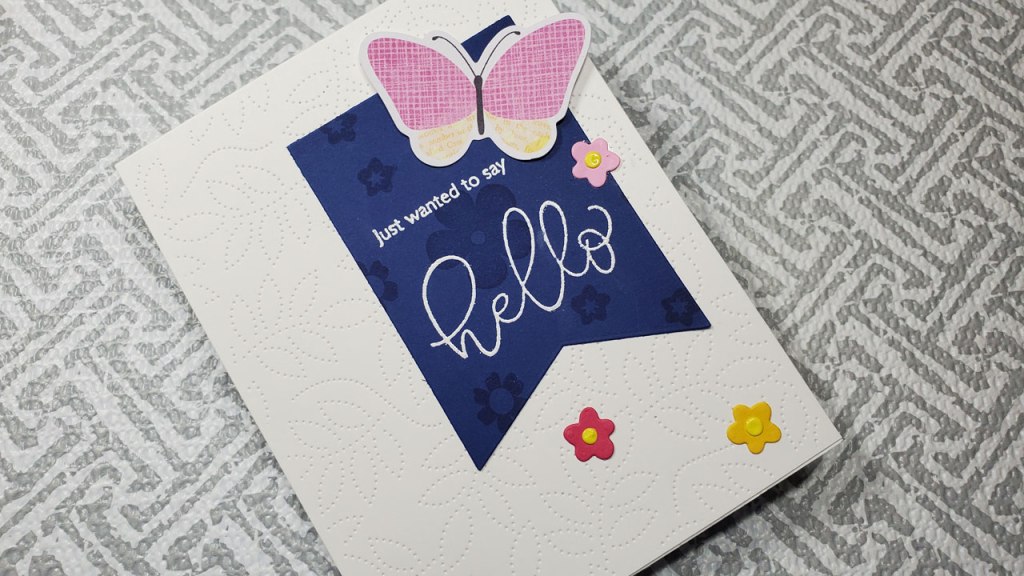
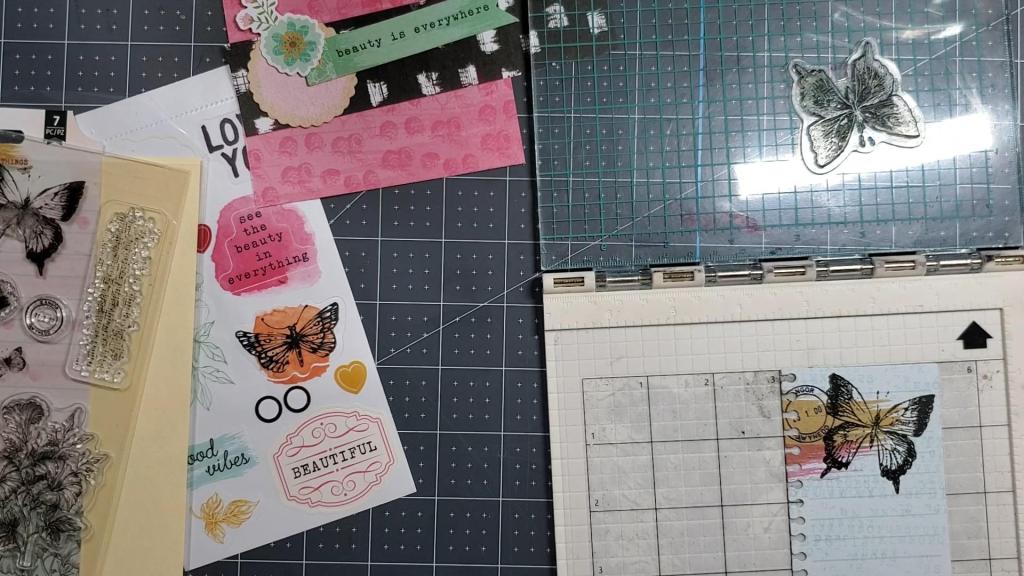
The cards I’ve been making with the SCT Sampler this September involve a lot of layering and a definite multi-media look, which were inspired by the products in the kit. Specifically, the Beautiful Things collection by BoBunny. You can see the products on the card in the image below. Also included in the kit are samples from the Simple Stories collection Let’s Go, which has a travel theme. I’ll save that for later. Keep in mind that the subscription to the SCT Sampler provides samples of items from the collections. Therefore, not everyone will get the exact same papers or ephemera. As far as I know, the stamps and dies are the same for everyone. It is a great way to build up your supplies if you are just starting out, but it’s also a wonderful way to get fresh inspiration each month regardless of where you are in this hobby.

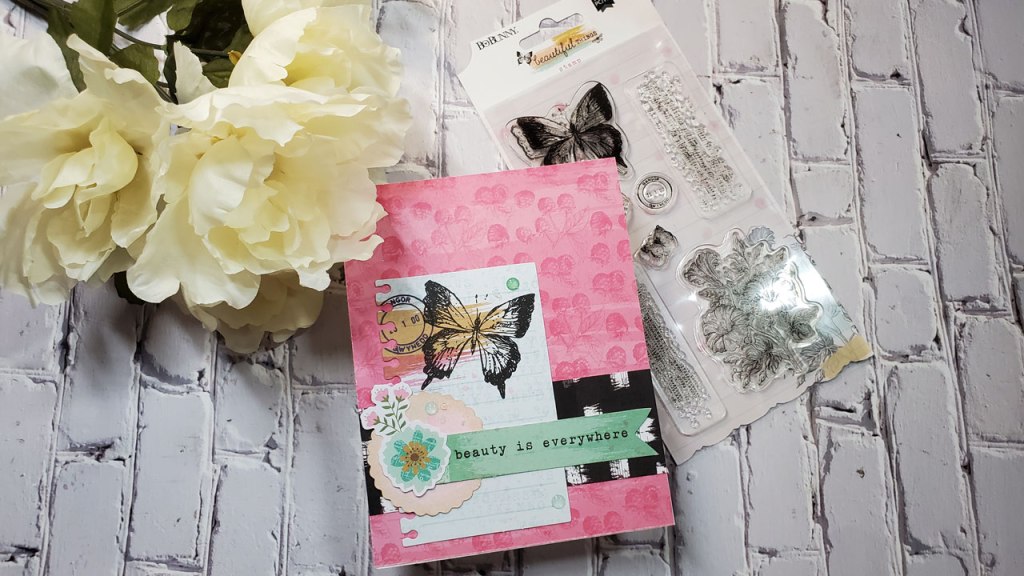
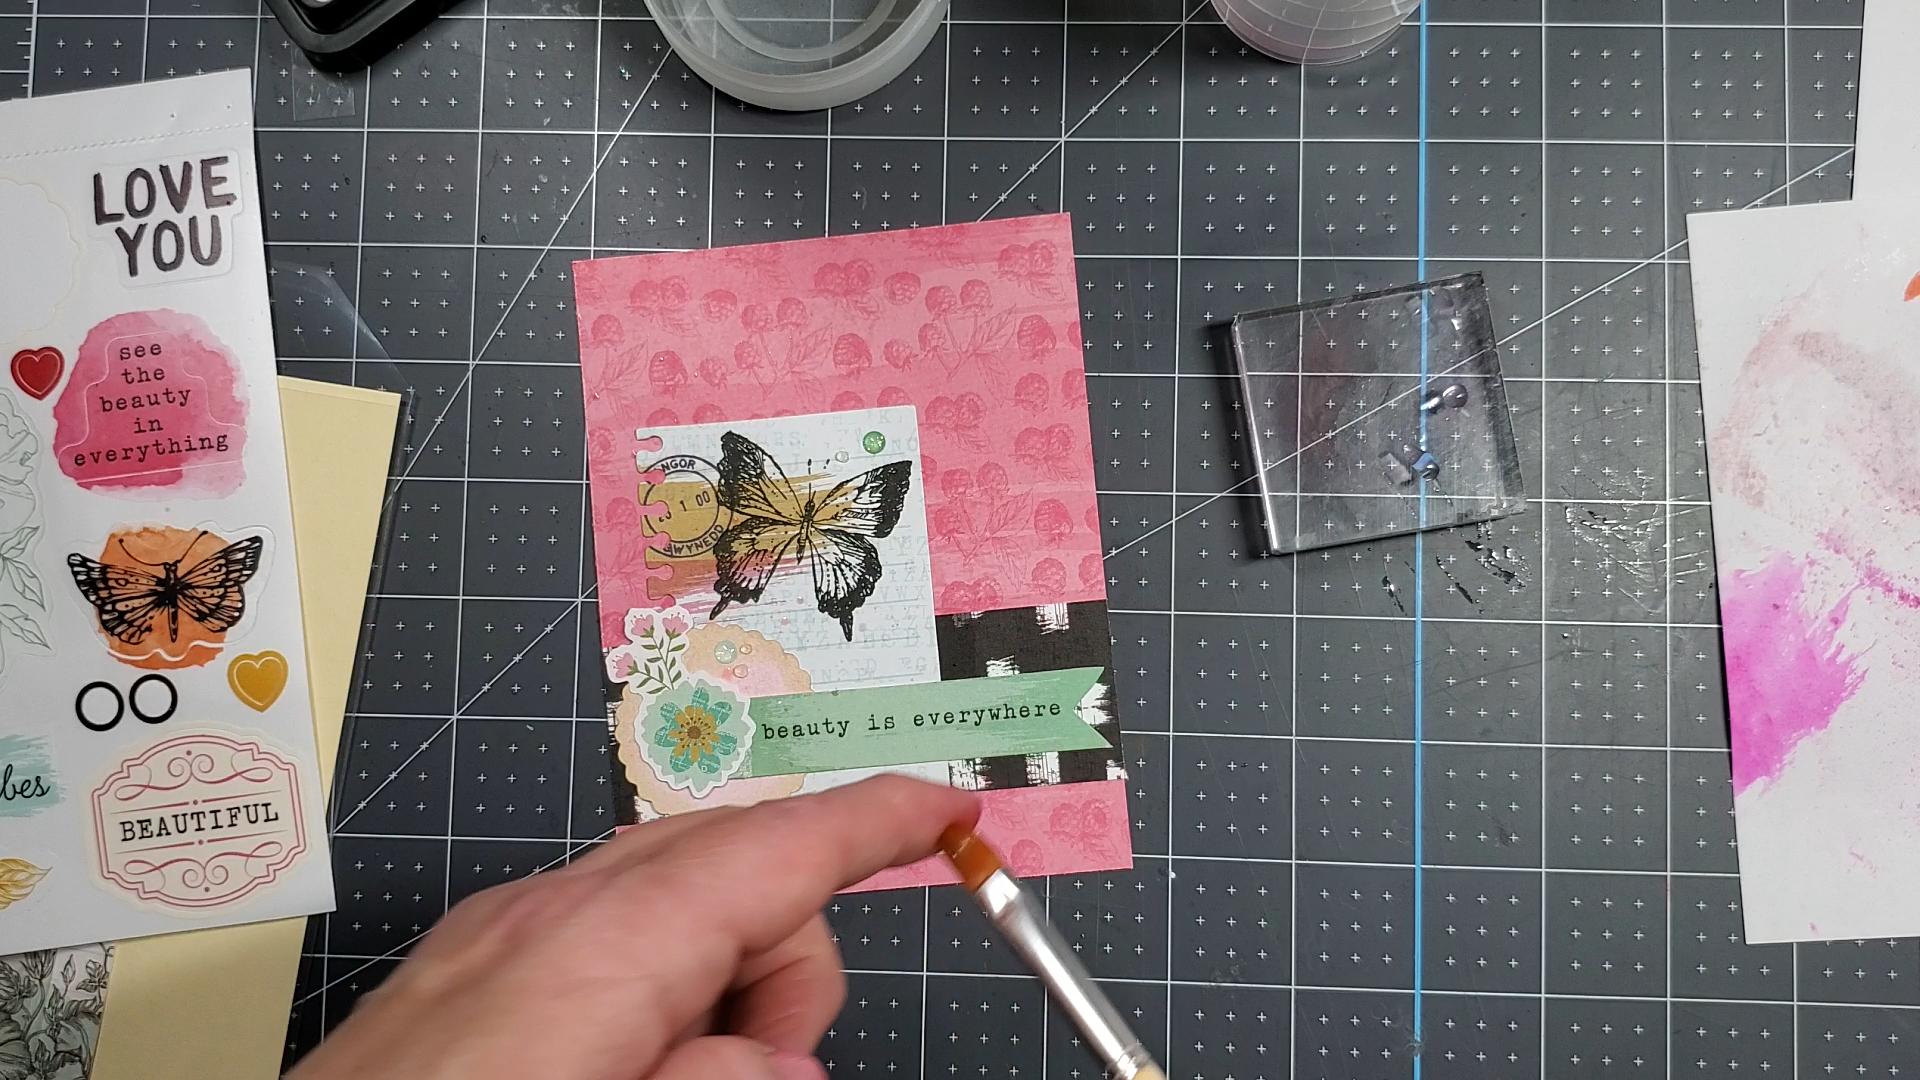
Today, you can see I’m using pink and black as my main colors with splashes of green and tan. The paper is from the BoBunny collection mentioned above. It’s called, “Painterly,” and it’s a 12″ x 12″ sheet of paper. The front side features raspberries and the back side is the black and white pattern you see. I simply cut a 1.5″ x 5.5″ strip off of the sheet and flipped it over before adhering it to the 4.25″ by 5.5″ piece for the background.

I used some Versa Fine Onyx Black ink to stamp the butterfly using my Stamping Platform by We R Memory Keepers, which I love. It’s small enough to make it easy to work with and it has hinges that allow me to use clear or cling stamps without having to remove anything or switch anything around.

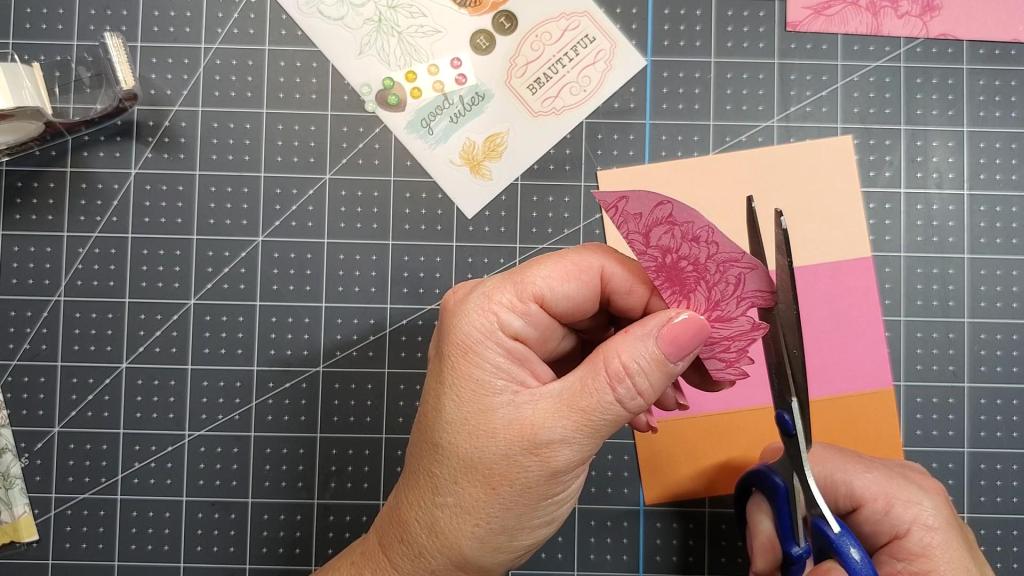
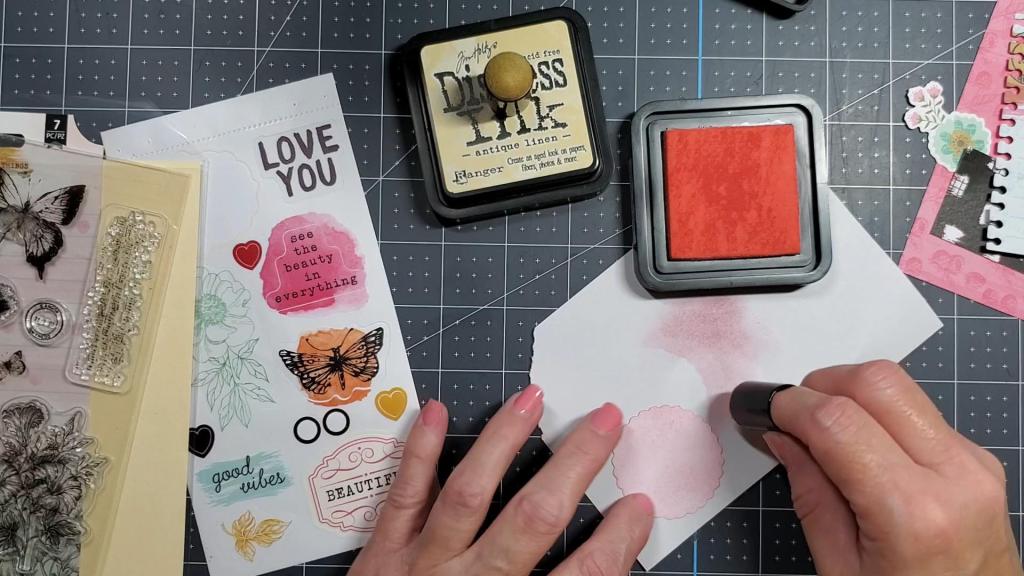
Next, I am adding some distress ink to the back of a piece of ephemera. I didn’t like the image of the insect on the front, so I repurposed it! This is the Spun Sugar. I’ll go around the edges with the Antique Linen.

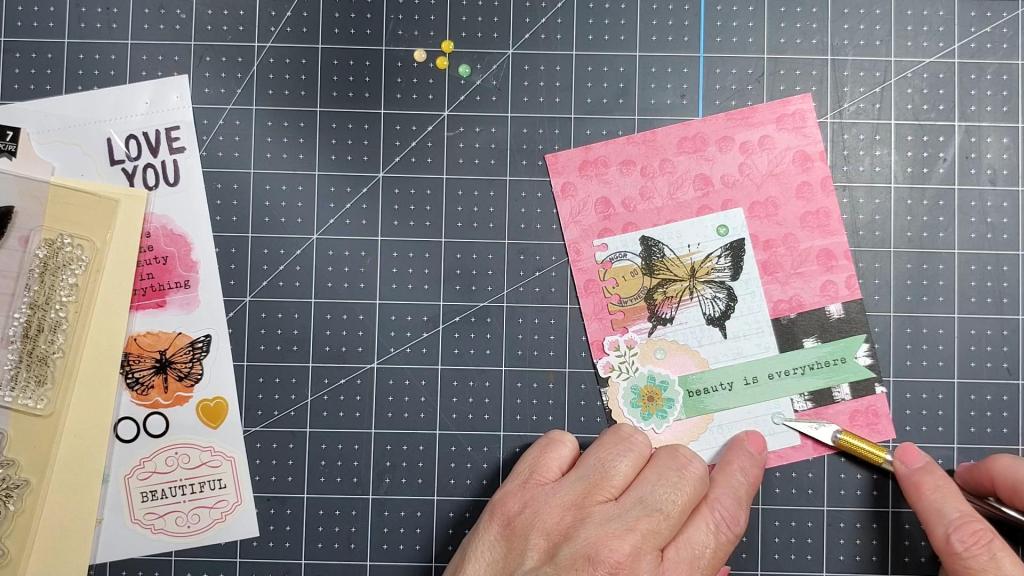
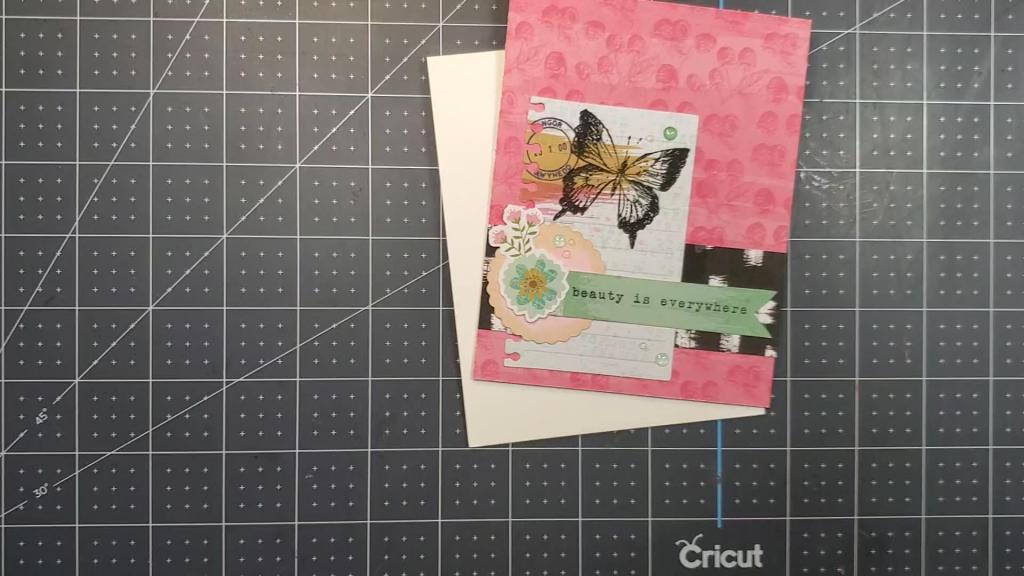
Next, I’ll assemble the card by layering the pieces on top of each other in a visually appealing way.

Then, I’ll adhere everything down and add some of those little enamel dots.

I did choose to add some splashes of ink…a very light shade of pink and some pops of color in the shade of “Snowflake”.

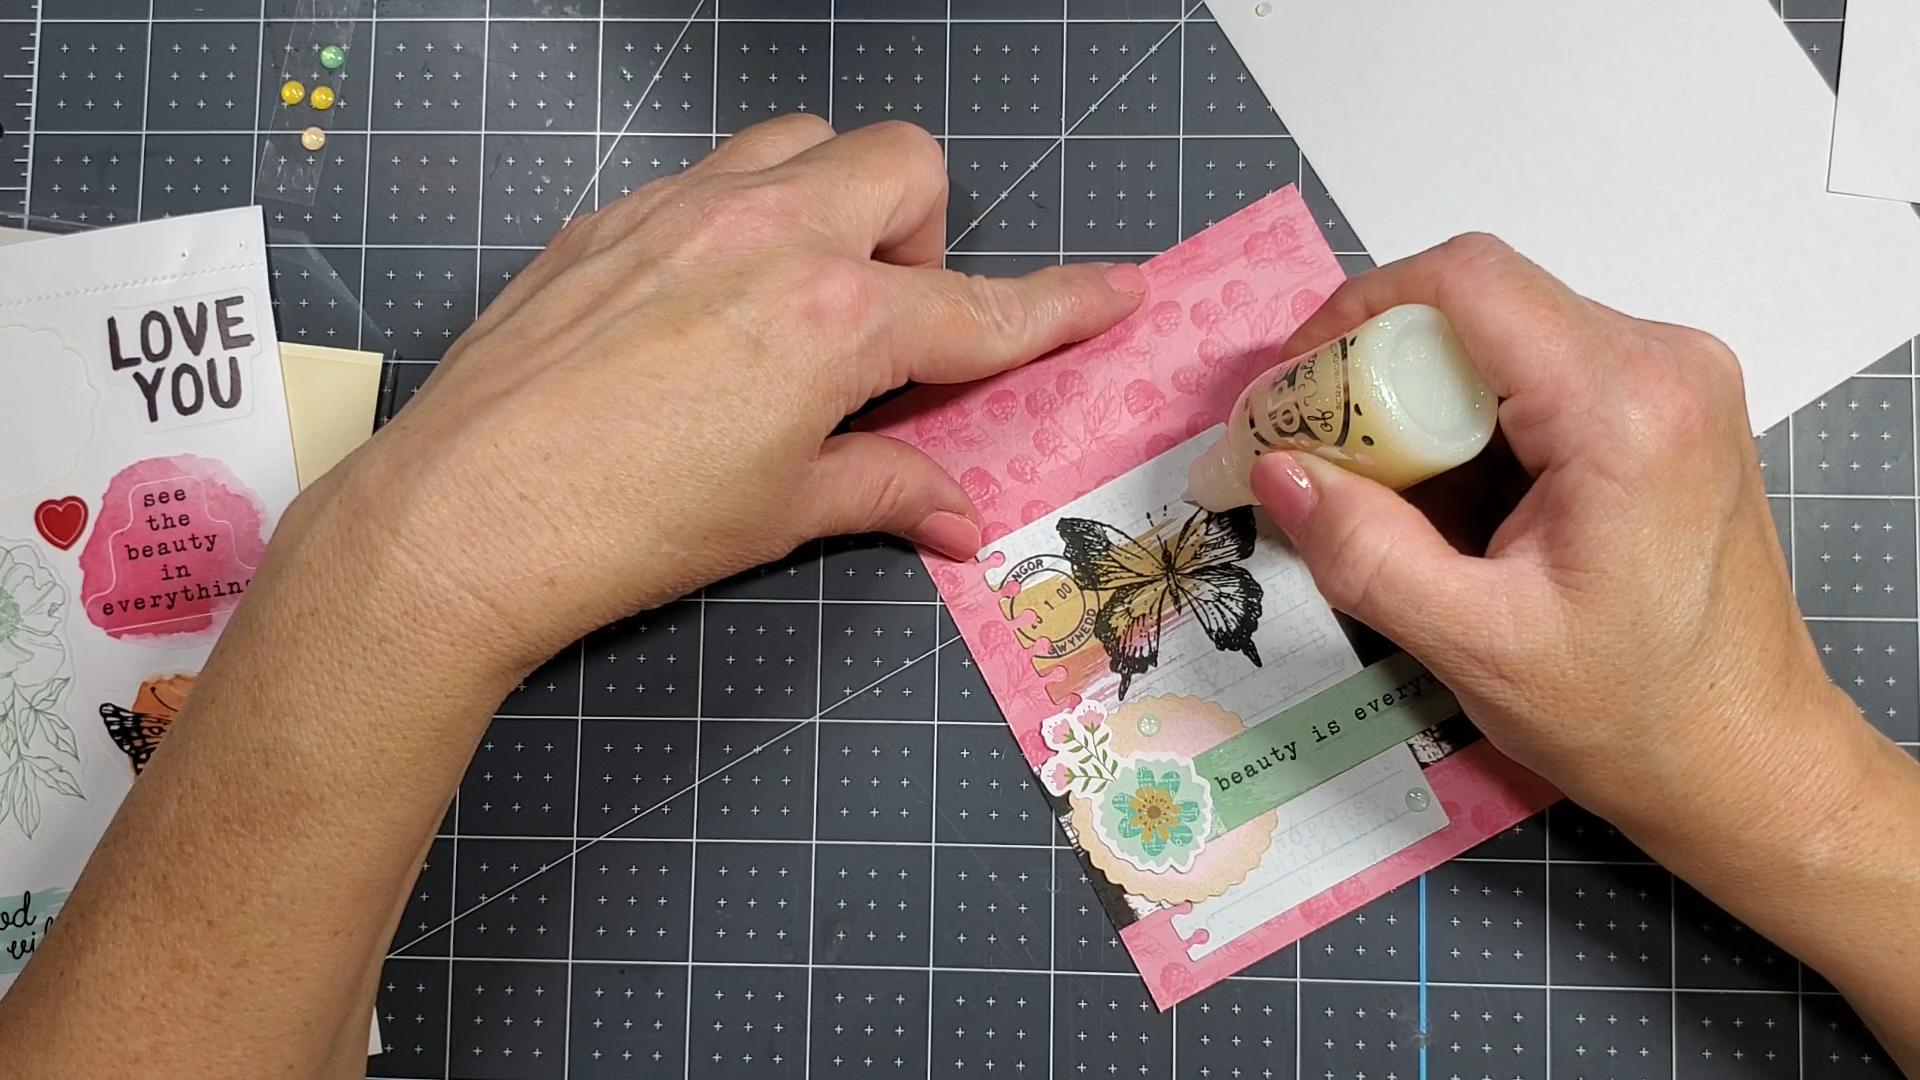
Finally, it was time to adhere the card to the cardbase, which is 110lb cardstock by Neenah…the solar white.

I hope this post inspire you to create a beautiful thing!

Here is the video and below that are the links to the products I used:

Affiliate Links
These links are FREE for you to use and I will receive a small portion of any purchases you make using Amazon and Share a Sale links. As an Amazon Associate I earn from qualifying purchases.

Link to subscribe to the SCT Sampler: https://scrapbookandcards.com/sct-sampler/ (I’m not an affiliate with SCT. I just subscribe to the sampler with my own money).

Link to BoBunny Beautiful Things Collection: https://shrsl.com/3pf8i

BoBunny – Beautiful Things Collection – 12 x 12 Double Sided Paper – Painterly: https://shrsl.com/3px7w

BoBunny – Beautiful Things Collection – Clear Acrylic Stamps: https://shrsl.com/3phw9

BoBunny – Beautiful Things Collection – Enamel Dots: https://shrsl.com/3phwd

Scrapbook.com – Pops of Color – Glitter – Snowflake – 1oz: https://shrsl.com/3px8u

Finger Sponge Daubers with Storage Container: https://amzn.to/3UJglKb

Versa Fine Black Onyx Ink for stamping butterfly: https://amzn.to/36exdAI

Distress Ink Spun Sugar: https://shrsl.com/3px98

Distress Ink Antique Linen: https://shrsl.com/3px9c

We R Memory Keepers Precision Press Stamping Platform
https://amzn.to/3pmcItB

Thank You Card with BoBunny and Simple Stories from the SCT Sampler for June 2022

Hello fellow cardmakers and papercrafters! Today’s card was created using supplies from the SCT Sampler subscription kit for June 2022. This is a collection of samples from two or three craft companies delivered to your door each month. The price is very reasonable considered you get so many goodies in the monthly kit. I decided to go with this kit because it is more economical for me and it’s nice to have supplies from various craft companies since I tend to usually stick to what I know. So this forces me to try new things and it sparks my creativity anew each month. What better way is there to get going? It is such fun!

This month’s samples are from BoBunny’s, “Beautiful Things” collection and Simple Stories, “Let’s Go” collection. SInce this kit is a sampler, each person will receive slightly different pieces as the collections are broken up and packaged for the subscribers. For example, any 12 x 12 sheet are cut down and distributed to the subscribers orders, so not everyone gets the same pages.

With today’s card, I used pattern paper from both collections, the floral one is called, “Memorable” from BoBunny and the solid color block one is called, “Come Fly With Me” from Simple Stories.

I fussy cut the flowers from the pattern paper as well as the scalloped frame (which was cut with a die).

The stamped butterfly, enamel dots, and Thank You sticker is from the Bo Bunny collection. The gold washi tape is from amazon. I used VersaFine onyx black ink on the butterfly,

That’s it. Simple, easy, and fun! It look rather mixed media in my opinion. What do you think?

Affiliate Links
These links are FREE for you to use and I will receive a small portion of any purchases you make using Amazon and Share a Sale links. As an Amazon Associate I earn from qualifying purchases.

Link to subscribe to the SCT Sampler: https://scrapbookandcards.com/sct-sampler/ (I’m not an affiliate with SCT. I just subscribe to the sampler with my own money).

Link to BoBunny Beautiful Things Collection: https://shrsl.com/3pf8i

BoBunny – Beautiful Things Collection – 12 x 12 Double Sided Paper – Memorable: https://shrsl.com/3phw3

BoBunny – Beautiful Things Collection – Clear Acrylic Stamps: https://shrsl.com/3phw9

BoBunny – Beautiful Things Collection – Enamel Dots: https://shrsl.com/3phwd

Link to Simple Stories Let’s Go Collection: https://shrsl.com/3pf8n

Simple Stories – Let’s Go Collection – 12 x 12 Double Sided Paper – Come Fly With Me: https://shrsl.com/3phw5

Spellbinders Tool in One: https://shrsl.com/3phwy

WashiTape in multiple colors (gold, etc): https://amzn.to/3eZw6MH

Embossed Rectangular Frame Dies Scallop Edge Inverted: https://amzn.to/3UgZiie

Versa Fine Black Onyx Ink for inside greeting: https://amzn.to/36exdAI

We R Memory Keepers Precision Press Stamping Platform
https://amzn.to/3pmcItB

Snowman Christmas Card

Today’s card features a very cute snowman stamp from Colorado Craft Company called, “Sweetest Snowman Mini.” It is an outline stamp, which means you can color it. Now, I know what you are thinking. Snowmen are white, why do we need to color them. Well, you can bring them to life by using either cool grey colors or ice blue colors.

You can color inside the snowman or make a sort of halo around him, which is what I’ve done with this one. It’s very light, but you can see it.

I used my Spectrum Noir alcohol markers on this project, but you can use any coloring medium you have. Specifically, I colored the snowman and snow with TB1. The red scarf with DR3 and DR7. The green hat with JG3 and JG5. The brown arms with TN7. I used a black gel pen for the eyes, nose, and mouth. To create a scene of falling snow, I’ve added varying sizes of dots of the blue(TB1) on the area around the snowman. I decided to create a shaker card by using some tag dies from Amazon.com and some fake iridescent snow. Shaker cards are lots of fun. When you shake the card, the enclosed snow will bounce around…almost like a snow globe. To entrap the snow, I used some clear plastic from some product packaging. You can use acetate sheets, also known as transparency film. If you are unfamiliar with shaker cards you can check out either video below to see one being made:

Shaker Card for Valentine’s Day or any Special Occasion – YouTube

Mother’s Day Shaker Card with Inlaid Die Cuts – YouTube

The greeting is from the Ranger Letter it stamp LEC63087. I stamped it with versmark ink and heat embossed it with some black embossing powder and a heat tool.

To embellish the card, self-adhesive snowflakes were added to the card as well as a bow of silver and white. The background was created using an embossing folder from Altanew called, “Ribbon Waves.” I used the Hero Arts unicorn ink to add some white highlights to the embossed background by lightly swiping the inkpad over the surface of the background…just enough to color the raised portion. Finally, the silver border was created using the Zig wink of stella brush marker in silver color.

There is no video for this card today, but it is fairly simple to make and assemble. I hope you give it a try.

Affiliate Links
These links are FREE for you to use and I will receive a small portion of any purchases you make using Amazon and Share a Sale links. As an Amazon Associate I earn from qualifying purchases

Colorado Craft Company Snowman stamps and die: https://shrsl.com/3nhmi

Ranger LEC63087 Letter It Clear Set 4″X6″ STAMP, Christmas: https://amzn.to/3vTrU6y

Spellbinders Platinum 6 Machine: https://shrsl.com/3fh78 (Small one)

Tag Dies from Amazon: https://amzn.to/3SGLVqY

Scrapbook.com Foam Adhesive strips: https://shrsl.com/3nhn1

Fake Snow: https://amzn.to/3zQGSeZ

Altenew – Embossing Folder – 3D – Ribbon Waves: https://shrsl.com/36xon

Hero Arts Unicorn Pigment Ink: https://shrsl.com/3nhor or https://amzn.to/3p7wwCr

Kuretake ZIG Wink of Stella Brush (Gold, Silver, Gl. Clear): https://amzn.to/3p7wB95

VersaMark for embossing: https://amzn.to/39k9uRz

Heat Tool for Heat Embossing, comes with 4 embossing powders: https://amzn.to/2LIstw2

Neenah Solar White Classic Crest 110lb Cardstock (for the card base): https://amzn.to/3ljFvfv

Neenah Classic Crest Solar White 80lb cardstock for the stamped snowman and shaker: https://amzn.to/3kQtBdn

Teflon bone folder (it is supposed to not leave a burnishing mark or shine on the paper: https://amzn.to/2QYdHE5

Fiskars Sure Cut 9″ Paper Trimmer: https://amzn.to/2HkY02n

Christmas with Diamonds…Solid Hot Foil Plate Diamonds

Today, I’m making a Christmas card with the new Spellbinders release called, “Glimmer Greetings Collection.” The Glimmer Essentials Solid Diamond Hot Foil Plate creates a beautiful and stunning center point for any card you’d like to make, for any occasion. I used it in coordination with the Essential Diamonds Etched die set to create the dimensional diamonds on the center of my card. The crossed lines on the background were created using the Crossed Lines Cardfront hot foil plate, also from the Glimmer Greetings collection. The beautiful flowers are from the Simply Perfect Layered Blooms Etched dies from the Simply Perfect collection.

The colors I chose for the card seen above were based on the fact that I wanted to use the alabaster cardstock from Spellbinders color essentials line and the glimmer hot foil in blush color. The two colors go well together. The blush looks more like a bronze color against the alabaster cardstock. For the flowers I chose a dark red, which I think really goes well with the bronze and alabaster. I chose a mirrored green cardstock for the greeting: Merry Christmas, which were cut with the Create a Christmas Sentiment Etched Dies. I decided to layer the words on top of each other by cutting out each word three times from the alabaster cardstock. I glued them together and then topped it with the green mirrored word.

The diamond center piece was created by first hot foiling the diamond with the solid diamond hot foil plate on alabaster cardstock. I then used the solid diamond dies to cut out several diamonds from the foiled piece. You can see them stacked together in the photo below.

I needed to use the smallest diamond for the very center and then in order to get a larger diamond to surround the small one, I skipped the next size die and went to the third largest diamond. This created a frame instead of a diamond. I did this again to create the next frame. In all, I used three of the dies from the set which created four layers. I adhered the bottom layer (the largest diamond frame) directly to the card. For the remaining layers, I used foam tape to pop them up. I had to use one layer of foam tape on the second diamond frame and two layers of foam tape on the third diamond frame. For the smallest diamond shape, I used three layers of foam tape. This way, you get some stacked diamonds for the center piece of your card. If this is too confusing, please check out my YouTube video for clarification and a demonstration.

VIDEO

Affiliate Links
These links are FREE for you to use and I will receive a small portion of any purchases you make using Amazon and Share a Sale links. As an Amazon Associate I earn from qualifying purchases

Spellbinders Platinum 6 Machine: https://shrsl.com/3fh78 (Small one)

Spellbinders Glimmer Hot Foil Machine: https://shrsl.com/3j5no

Spellbinders Glimmer Greetings Collection: https://shrsl.com/3makc

Spellbinders Glimmer Hot Foil in Blush color: https://shrsl.com/3j5np

Spellbinders Glimmer Hot Foil in other colors (bundles are at the bottom): https://shrsl.com/3makz

Spellbinders Glimmer Essential Solid Diamond Hot Foil Plate: https://shrsl.com/3mp3v

Spellbinders Essential Diamonds Etched Dies: https://shrsl.com/3malh

Spellbinders Glimmer Hot Foil Plate Crossed Lines Cardfront: https://shrsl.com/3mal6

Spellbinders Simply Perfect Layered Blooms Etched Dies: https://shrsl.com/3mp3o

Spellbinders Die Set Create a Christmas Sentiment Etched Dies: https://shrsl.com/3malk

Spellbinders Alabaster Color Essentials Cardstock: https://shrsl.com/3cvzb

Scrapbook.com – Dotted Refillable Adhesive Roller – Dot Tape Runner – 49 Feet https://shrsl.com/3jvms

Spellbinders Tool in One: https://shrsl.com/38b28

Tombow Mono Liquid Adhesive: http://shrsl.com/1xnef

Teflon bone folder (it is supposed to not leave a burnishing mark or shine on the paper: https://amzn.to/2QYdHE5

Fiskars Sure Cut 9″ Paper Trimmer: https://amzn.to/2HkY02n

Coloring on Foil: Christmas in July

I’ve been enjoying making Christmas cards in July, as I do every year! The new release from Spellbinder’s, “Glimmer Greetings” collection has been an inspiration in this creative process. Today, I’m using the Glimmer Essential Solid Arch Hot Foil Plate and the Glimmer Essential Solid Diamond Hot Foil Plate. They have some dies that coordinate with these hot foil plates so you can cut them out and create backgrounds or frames for them. Below are the two cards I made with the solid arch hot foil plate. Stay tuned for the cards with the solid diamond hot foil plate.

You can see that I colored the flowers. I used Faber Castell Pitt Artist pen pens to color over the silver foil on the purple card. The color will dry and be fairly permanent. I wouldn’t rub it or handle it excessively, but it will stay put while you prepare and send it as well as when the recipient opens it and displays it. I tried using alcohol markers, but the look wasn’t the same. However, I did use alcohol markers to color the flowers on the green card because it was foiled on cardstock.

I used silver and gold foil with the hot plates and then cut out some cardstock by hand to create mats for the arches with purple and green cardstock. This would have been easier and looked better if I had used the coordinating dies: Essential Diamonds Etched Dies and the Essential Arches Etched Dies, but I did not have them to use so I just used my scissors.

You’ll notice that there are images on the arches. This was achieved through two different methods. On the purple card, I first foiled the solid arch in silver and then I foiled the flowers with the “Blooming Ornament” hot plate and purple foil from Spellbinders on the same piece of cardstock. The green card was created by first foiling the image onto a separate piece of cardstock and then using that same foil on a different piece of cardstock with the solid hot plate. That way, the negative of the image you foiled first, will show inside the solid arch. The white lines in the gold arch was created using the “Crossed Lines Cardfront” hot plate, which you can see below, with gold foil negative piece.

The greeting, Merry Christmas, was cut with a Spellbinders die set called, “Create A Christmas Sentiment Etched Dies.” I cut the green on from green and black cardstock. The black serves as a shadow for the green words. I did not do this for the purple one.

Check out the video below to see how these cards were made:

Affiliate Links
These links are FREE for you to use and I will receive a small portion of any purchases you make using Amazon and Share a Sale links. As an Amazon Associate I earn from qualifying purchases

Spellbinders Platinum 6 Machine: https://shrsl.com/3fh78 (Small one)

Spellbinders Glimmer Hot Foil Machine: https://shrsl.com/3j5no

Spellbinders Glimmer Greetings Collection: https://shrsl.com/3makc

Spellbinders Glimmer Hot Foil (bundles are at the bottom): https://shrsl.com/3makz

Spellbinders Glimmer Hot Foil Plate Crossed Lines Cardfront: https://shrsl.com/3mal6

Spellbinders Glimmer Hot Foil Plate Solid Arch: https://shrsl.com/3mitv

Spellbinders Glimmer Hot Foil Plate Blooming Ornament: https://shrsl.com/3malf

Spellbinders Essential Arches Etched Dies: https://shrsl.com/3mitx

Spellbinders Die Set Create a Christmas Sentiment Etched Dies: https://shrsl.com/3malk

Astrobrights Color Cardstock 651b: https://amzn.to/3PtseAq

Hammermil 60ld smooth cardstock in white: https://amzn.to/3b2vPqz

Faber Castel Pitt Artists Brush Pens (Set of 24): https://amzn.to/3b6rN0a

Scrapbook.com – Dotted Refillable Adhesive Roller – Dot Tape Runner – 49 Feet https://shrsl.com/3jvms

Spellbinders Tool in One: https://shrsl.com/38b28

Tim Holtz 9.5″ Kushgrip scissors (with black handle): https://shrsl.com/2wvtp Or https://amzn.to/3O2g6G0

Tombow Mono Liquid Adhesive: http://shrsl.com/1xnef

Teflon bone folder (it is supposed to not leave a burnishing mark or shine on the paper: https://amzn.to/2QYdHE5

Fiskars Sure Cut 9″ Paper Trimmer: https://amzn.to/2HkY02n

Christmas in July with Spellbinders Glimmer Greetings Collection

It’s been a while. Life has taken me away from this wonderful hobby I so enjoy, but it is good to be back. I have some Christmas cards today. They feature the new products by Spellbinders released this July 14 called, “Glimmer Greetings Collection.” There are several products in this release that all coordinate with each other. I am using the “Crossed Lines Cardfront” glimmer plate today, which is so versatile. You can use it to create stunning backgrounds and so much more. Here’s a look at the first two. All products used are linked at the bottom of this post.

With the above cards, I foiled the cards using the Spellbinders Hot Foil System. There are many colors of foil you can choose from. I decided to use the gold on the red card and the green on the light green cards The flowers you see on the green card come from the die set called, “Christmas Blooms” released last year. The flowers on the red card were created using the glimmer hot plate, “Blooming Ornament.” I chose to cut out the flower portion of the ornament to use on this red card. BTW, it does come with dies to cut out the entire ornament once it’s foiled. You can see that the cards above both have a diamond in the center. I used the Essential Diamonds Etched Dies to create those diamond frames for the cards. The red card features a shiny green diamond that has been popped up with foam tape. The green card has a gold diamond frame which is adhered to the inside of the card. The diamond opening on the front panel was cut with the larger of the two diamond dies I used for this card. The diamonds themselves were cut from gold and gold mirrored cardstock as were the words Merry Christmas…which is from the die set, “Create a Christmas Sentiment Etched Dies.”

I had so much fun foiling with the different colors of foil and color cardstock. I made several cards, but had to put the rest of the card fronts that I made away for later due to time constraints. Some feature a tone on tone look, such as the purple foil on the purple(ish) cardstock or the green foil on green cardstock…and you can see in the photo below. Here’s a look at the pretty card fronts.

Below are more cards I made with the Crossed Lines Cardfront glimmer hot plate as well as some previous products from Spellbinders.

The above card was made with the die set, “Christmas Tree Topiary” from last year and the words are from the small die of the month for August 2020 called, “Sitting Pretty.” Another option for the words would be heat embossing them or using texture paste through a letter stencil if this product is no longer available.

I used red and gold mirrored cardstock for the word MERRY, the flowers, and the ornaments on this tree. I used green mirrored cardstock for the word CHRISTMAS. The ribbon was created by cutting a strip of gold cardstock and then cutting equal lengths off both ends to create the fish tail portions of the ribbon. The middle strip is about 2 inches long. The end pieces are about 1 inch long each. To make it look like an undulating ribbon, you simply adhere the two fishtail pieces a bit below the middle piece.

The cards below also feature the Crossed Lines Cardfront glimmer hot plate, but the trees were made with the die, “Kaleidoscope Christmas Tree” from 2020, which is a layer die with three layers. However, you can use any image or die cut shape you have to decorate the open center of these cards. I used glitter cardstock to cut out the trees. The dark blue card has blue, purple, and silver layers for the Christmas tree. The light blue card has only one layer of gold glitter cardstock. The words and banners were cut with the die, “One Kind Word Alphabet Collage” from 2019. Of course you can feel free to use any letter dies you have. The banner from this die set was cut in half and trimmed on the ends so it would fit on the card.

Please enjoy the video below and check out the links to the products listed under it.

Affiliate Links
These links are FREE for you to use and I will receive a small portion of any purchases you make using Amazon and Share a Sale links. As an Amazon Associate I earn from qualifying purchases

Spellbinders Platinum 6 Machine: https://shrsl.com/3fh78 (Small one)

Spellbinders Glimmer Hot Foil Machine: https://shrsl.com/3j5no

Spellbinders Glimmer Greetings Collection: https://shrsl.com/3makc

Spellbinders Glimmer Hot Foil (bundles are at the bottom): https://shrsl.com/3makz

Spellbinders Glimmer Hot Foil Plate Crossed Lines Cardfront: https://shrsl.com/3mal6

Spellbinders Glimmer Hot Foil Plate Blooming Ornament: https://shrsl.com/3malf

Spellbinders Die Set Essential Diamonds Etched Dies: https://shrsl.com/3malh

Spellbinders Die Set Create a Christmas Sentiment Etched Dies: https://shrsl.com/3malk

Spellbinders Die Set Christmas Blooms: https://shrsl.com/3malq

Spellbinders Die Set Kaleidoscope Christmas Tree: https://amzn.to/3ojP01T

Neenah Solar White Classic Crest 110lb Cardstock (for the card base): https://amzn.to/3ljFvfv

Astrobrights Color Cardstock 651b: https://amzn.to/3PtseAq

Scrapbook.com – Dotted Refillable Adhesive Roller – Dot Tape Runner – 49 Feet https://shrsl.com/3jvms

Spellbinders Tool in One: https://shrsl.com/38b28

Coture Creations Electric Eraser: https://amzn.to/3PJ8sRp

Tim Holtz 9.5″ Kushgrip scissors (with black handle): https://shrsl.com/2wvtp Or https://amzn.to/3O2g6G0

Tombow Mono Liquid Adhesive: http://shrsl.com/1xnef

Teflon bone folder (it is supposed to not leave a burnishing mark or shine on the paper: https://amzn.to/2QYdHE5

Fiskars Sure Cut 9″ Paper Trimmer: https://amzn.to/2HkY02n

Birthday Celebrations Release by Spellbinders

Birthday’s are so much fun! I bet birthday cards are the number one card people make and purchase, but I could be wrong. Spellbinders is celebrating their birthday with a new release called, “Birthday Celebrations.” They were kind enough to send me some to demonstrate for you.

They have many products in this collection: stamps, dies, stencils, and glimmer hot foil plates to name a few. Head on over and check it out here: Spellbinders Birthday Celebrations Collection ( I receive a small portion of any purchase you make at no extra cost to you…thanks for your support!)

I’ve made three cards using some of these supplies. The first one is my favorite, which features a glimmer hot foil plate of birthday candles. I used the mini rainbow stripes hot glimmer foil to create a colorful birthday card.

The next two cards feature the new collection as well as some recent products from Spellbinders. I even used some of the thin metal dies to foil with, which you can see on the teal and pink card below:

The how to videos are linked below:

Sweet Thank You Card

Today’s card is an easy to make handmade card. I used supplies from the May 2022 SCT Sampler, which is a monthly subscription of samples from two papercrafting companies. I used a sheet of 6″ x 6″ patterened paper from the kit with a floral pattern and cut it to an A2 size (4.25″ x 5.5″). I adhered it to a blank note card the same size. Then, I used the dies that came in the kit to cut out the word “Sweet” and the background for it. I adhered the word to the background and then to the card. You can call it done here or you can embellish the front and inside of the card, which is what I chose to do.

I added some hearts around the word sweet and I stamped the word, “You’re” so the card reads, “You’re Sweet.” You can add any words you like. I then used some sparkly glimmery spray (tattered angels brand of glimmer mist) to add some gold outline to the flowers on the patterened paper. For the inside of the card, I used the left-over piece of patterened paper and cut it it to fit the inside of the card. I used some alcohol markers to color the floral pattern after I adhered it to the inside of the card.

Enjoy the video below:

Affiliate Links
These links are FREE for you to use and I will receive a small portion of any purchases you make using Amazon and Share a Sale links. As an Amazon Associate I earn from qualifying purchases.

Link to subscribe to the SCT Sampler: https://scrapbookandcards.com/sct-sampler/ (I’m not an affiliate with SCT. I just subscribe to the sampler with my own money).

American Crafts Sweet Rush collection by Vicki Boutin: https://shrsl.com/3jblz

Spectrum Noir Alcohol Markers in the colors PP1 and TN1 for the flowers and TN4 for the background to the word die cut.

Kingston Crafts Stamp Set: on hsn but sold out

Memento Dew Drop Ink in Potters Clay: https://amzn.to/3xaBWBx

We R Memory Keepers Precision Press Stamping Platform
https://amzn.to/3pmcItB

Nicapa Standard Grip Cutting Mat (12×12 inch,3 Mats): https://amzn.to/30C3i26
(I cut these into 4 pieces and use them in my stamping platform…linked above)

Pick Up Tool (Rhinestone Picker): https://amzn.to/3O1zjaP (Comes with tweezers and rhinestones as well as the wax tip pick up tools)

Scrapbook Adhesives by 3L 3L EZ Runner Permanent Adhesive, Value Pack:
https://amzn.to/3c0Uvg4 (THIS IS THE ONE WITH REFILLS)

Tombow Mono Liquid Adhesive: https://amzn.to/37DhjRI

EK Success Craft Tweezers (reverse): https://amzn.to/3tFzPBS

Tattered Angels Glimmer Mist in Walnut Gold: unavailable

Happy Memorial Day!

Thank you seems like it’s not a big enough word for those who have sacrificed everything for us, but they deserve our thanks and our gratitude. May blessings and peace rest on you today and especially on the families who have given all so we may be free.

As a Christian, this not only makes me think of lost soldiers, but also of my precious Jesus – who gave all so we could have eternal life! If you don’t know him, please take some time to talk to him and repent and ask him to be your savior. You will never regret it!

BTW: DaySpring is having a sale! Customers can take $20 off any order of $60 or more and receive free shipping sitewide with code MEMORIAL. This sale is valid through Tuesday, May 31st. There are banners and text links available in the affiliate networks now. Check out the sale and direct your audience to https://www.dayspring.com/memorial-day-sale

Hello Card – Clean and Simple Design

My card for today is in the style known as clean and simple. There is a lot of “white-space”. This term can be confusing. It doesn’t mean there is a lot of the color white (although in my card for today, that is the case). It simply means a large area without any pictures or prints. It’s basically the background. Here are some examples:

I truly love this style. It lends itself to pretty or elegant cards. In my opinion, there are a few things you should keep in mind when doing the clean and simple style:

The white space doesn’t have to be white.

The focus should be the shining star. Everything else should support it, but not detract from it.

The background should be cohesive, but it doesn’t have to be bland. In my card, I chose to use a background die to imprint a leaf design. It doesn’t detract from the main focus of the card however. No fancy, bold, bright patterns or designs here!

Use elements to guide your viewer’s eye to where you want them to go. On my card I used the tiny, colorful flowers to create a triangle that causes the viewer’s eye to go from the butterfly to the sentiment to the inside of the card.

Enjoy the video below to see a demonstration of the card being made:

Affiliate Links
These links are FREE for you to use and I will receive a small portion of any purchases you make using Amazon and Share a Sale links. As an Amazon Associate I earn from qualifying purchases.

Link to subscribe to the SCT Sampler: https://scrapbookandcards.com/sct-sampler/ (I’m not an affiliate with SCT. I just subscribe to the sampler with my own money).

American Crafts Sweet Rush collection by Vicki Boutin: https://shrsl.com/3jblz

Background Dies from Amazon- CutDIES: https://amzn.to/3wM7oEL

Scrapbook.com Banner Dies: https://shrsl.com/3jbyk

StudioLight Basic Wishes Clear Stamp set: https://amzn.to/3MOlAUy

Scrapbook.com Pops of Color Gloss Sunshine: https://shrsl.com/3jbyq

Kingston Crafts Spring Stamps and Ink Pad Bundle:
https://www.hsn.com/products/kingston-crafts-spring-stamps-and-ink-pad-bundle/9819014

VersaMark for embossing: https://amzn.to/39k9uRz

We R Memory Keepers Precision Press Stamping Platform
https://amzn.to/3pmcItB

Nicapa Standard Grip Cutting Mat (12×12 inch,3 Mats): https://amzn.to/30C3i26
(I cut these into 4 pieces and use them in my stamping platform…linked above)

Judikins Opaque White Embossing Powder: https://amzn.to/3a9O4pl

Anti-static pouch: https://amzn.to/3cgrTk5

Tidy Tray to catch embossing powder: https://amzn.to/3t1gBX2

Heat Tool for Heat Embossing, comes with 4 embossing powders: https://amzn.to/2LIstw2

Anti-static pouch: https://amzn.to/3cgrTk5

Expo Erasers: https://amzn.to/3sTh2nI

Scrapbook.com – Clear Double Sided Adhesive Roll – 1/4 Inch x 81 Feet – Permanent – 1 Roll: https://shrsl.com/3atfh

Tombow Mono Liquid Adhesive: https://amzn.to/37DhjRI

EK Success Craft Tweezers (reverse): https://amzn.to/3tFzPBS