
Today, I’m making a Christmas card with the new Spellbinders release called, “Glimmer Greetings Collection.” The Glimmer Essentials Solid Diamond Hot Foil Plate creates a beautiful and stunning center point for any card you’d like to make, for any occasion. I used it in coordination with the Essential Diamonds Etched die set to create the dimensional diamonds on the center of my card. The crossed lines on the background were created using the Crossed Lines Cardfront hot foil plate, also from the Glimmer Greetings collection. The beautiful flowers are from the Simply Perfect Layered Blooms Etched dies from the Simply Perfect collection.
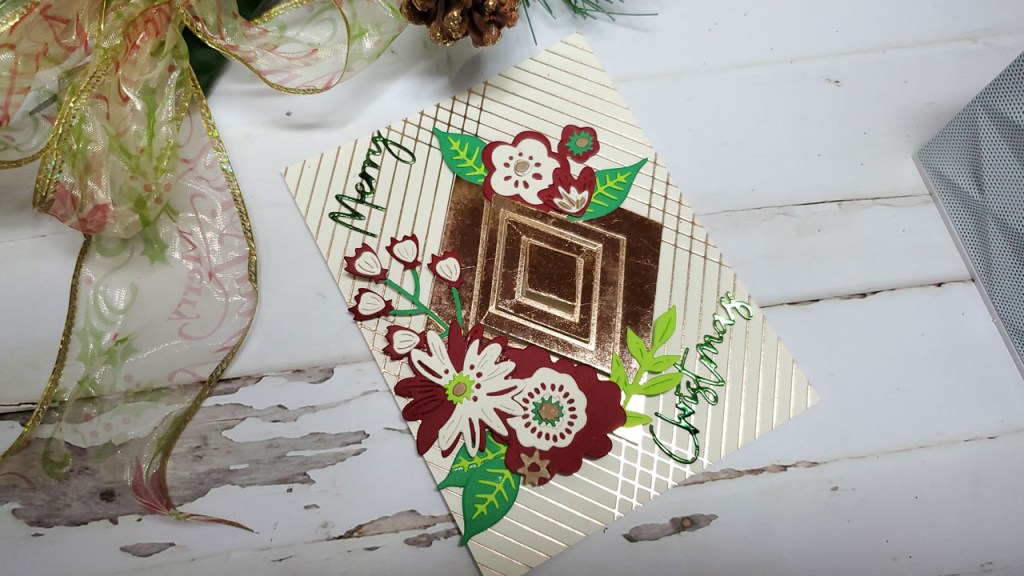
The colors I chose for the card seen above were based on the fact that I wanted to use the alabaster cardstock from Spellbinders color essentials line and the glimmer hot foil in blush color. The two colors go well together. The blush looks more like a bronze color against the alabaster cardstock. For the flowers I chose a dark red, which I think really goes well with the bronze and alabaster. I chose a mirrored green cardstock for the greeting: Merry Christmas, which were cut with the Create a Christmas Sentiment Etched Dies. I decided to layer the words on top of each other by cutting out each word three times from the alabaster cardstock. I glued them together and then topped it with the green mirrored word.
The diamond center piece was created by first hot foiling the diamond with the solid diamond hot foil plate on alabaster cardstock. I then used the solid diamond dies to cut out several diamonds from the foiled piece. You can see them stacked together in the photo below.
I needed to use the smallest diamond for the very center and then in order to get a larger diamond to surround the small one, I skipped the next size die and went to the third largest diamond. This created a frame instead of a diamond. I did this again to create the next frame. In all, I used three of the dies from the set which created four layers. I adhered the bottom layer (the largest diamond frame) directly to the card. For the remaining layers, I used foam tape to pop them up. I had to use one layer of foam tape on the second diamond frame and two layers of foam tape on the third diamond frame. For the smallest diamond shape, I used three layers of foam tape. This way, you get some stacked diamonds for the center piece of your card. If this is too confusing, please check out my YouTube video for clarification and a demonstration.
VIDEO
Affiliate Links
These links are FREE for you to use and I will receive a small portion of any purchases you make using Amazon and Share a Sale links. As an Amazon Associate I earn from qualifying purchases
Spellbinders Platinum 6 Machine: https://shrsl.com/3fh78 (Small one)
Spellbinders Glimmer Hot Foil Machine: https://shrsl.com/3j5no
Spellbinders Glimmer Greetings Collection: https://shrsl.com/3makc
Spellbinders Glimmer Hot Foil in Blush color: https://shrsl.com/3j5np
Spellbinders Glimmer Hot Foil in other colors (bundles are at the bottom): https://shrsl.com/3makz
Spellbinders Glimmer Essential Solid Diamond Hot Foil Plate: https://shrsl.com/3mp3v
Spellbinders Essential Diamonds Etched Dies: https://shrsl.com/3malh
Spellbinders Glimmer Hot Foil Plate Crossed Lines Cardfront: https://shrsl.com/3mal6
Spellbinders Simply Perfect Layered Blooms Etched Dies: https://shrsl.com/3mp3o
Spellbinders Die Set Create a Christmas Sentiment Etched Dies: https://shrsl.com/3malk
Spellbinders Alabaster Color Essentials Cardstock: https://shrsl.com/3cvzb
Scrapbook.com – Dotted Refillable Adhesive Roller – Dot Tape Runner – 49 Feet https://shrsl.com/3jvms
Spellbinders Tool in One: https://shrsl.com/38b28
Tombow Mono Liquid Adhesive: http://shrsl.com/1xnef
Teflon bone folder (it is supposed to not leave a burnishing mark or shine on the paper: https://amzn.to/2QYdHE5
Fiskars Sure Cut 9″ Paper Trimmer: https://amzn.to/2HkY02n
