
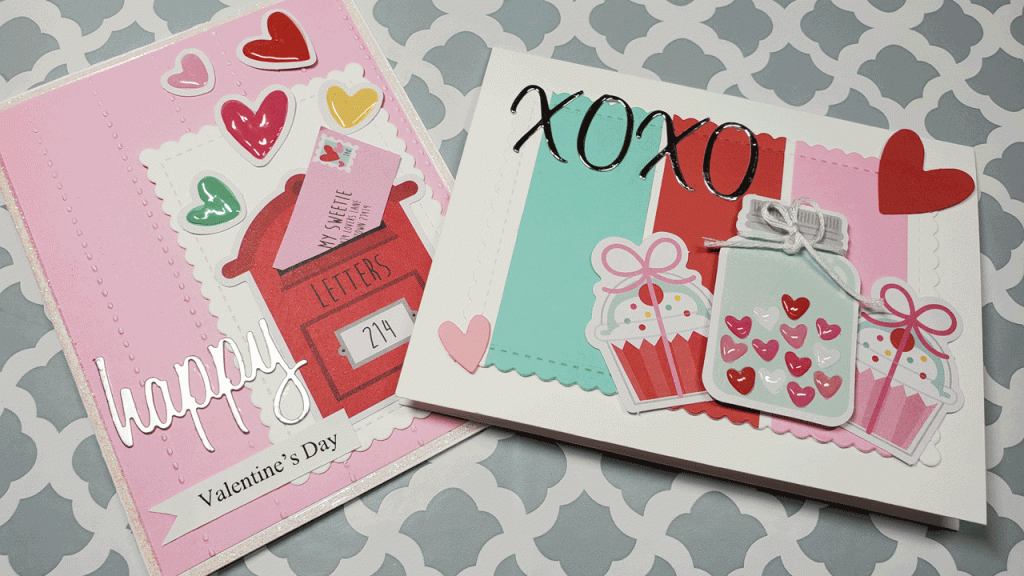
Today’s cards are a continuation of the cards from my previous post. I’m using the same ephemera pack from Doodlebug Designs called, “Love Notes.” These cards are very cute! You can see the video demonstration of them being made on YouTube.
You’ll need these supplies:
- 110lb cardstock in white for the cardbase
- 80lb cardstock in white for the front panels
- pink cardstock
- red cardstock
- light green cardstock
- silver mirrored cardstock for the die cut word, “happy”
- silver frosted cardstock for the die cut letters, “xoxo”
- die cut shapes from Doodlebug Designs, Inc. ephemeral pack called, “Love Notes” or other valentines day die cut shapes
- Cricut Cuddlebug embossing folder called, “Fabric Swatches Set” or some other embossing folder with a simple design for the pink cardstock on the first card
- adhesive
- Nuvo Crystal Drops in Morning Dew or Glossy Accents to add shine and dimension to the hearts on both cards
- Dress My Craft Stitched Scalloped Rectangle Dies to cut out the white panel on the first card and the striped panel on the second card or any rectangle die that you’d like to use
- Sizzix Celebration Words Script Dies
- Sizzix Alpha Numeric Script Dies
- Die cutting machine
- Adhesive
- String
- Paper Trimmer or Scissors
- Stamped or Printed greeting, “Valentine’s Day”
- Potato Sack
OK. That last item (potato sack) sounds weird. But it’s not! Let me explain. I’m going to use it to add texture to the white panel on the first card. Can you see the texture on it in this picture?

That texture makes a smooth white surface look more interesting and catches the eye! I’ll just trim it down with a stitched scalloped rectangle die and it will serve as a mat for my focal image, which is a cute little mail box. Behind that, I’ll place the front panel, which is a pink piece of cardstock that I’ve embossed with a Cricut embossing folder called, “Fabric Swatches Set” which just puts some stitched, vertical lines in the cardstock. I”ll trim that down to 5.25″ by 4″. I’ll use a craft knife to cut a slit in the mailbox and put the cute little envelope die cut shape in it. To add more visuals, I’ll place several hearts in various colors and sizes above the mailbox and use some Crystal Nuvo Drops in Morning Dew to add some shine and dimension to them (Glossy Accents would work here, too!) You can see all of this in the image below.
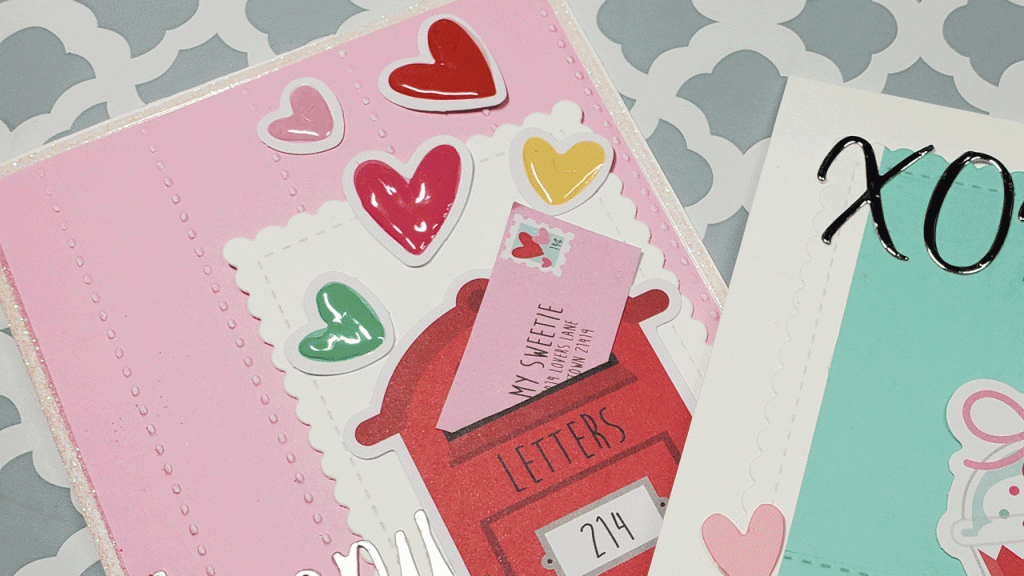
For the greeting, I’ll use a word die to cut out the word happy from some frosted silver cardstock. Since I didn’t have a stamp for the words, “Valentine’s Day,” I just typed it in a word processor and printed it on some lightweight cardstock and then used my paper trimmer to cut it out and some scissors to add a fish tail to it. I also added some glitter border stickers around the edges of the first card, which you can get from Love from Lizi. It’s a company in the U.K., so be aware that you’ll pay extra shipping and fees if you decide to order it.

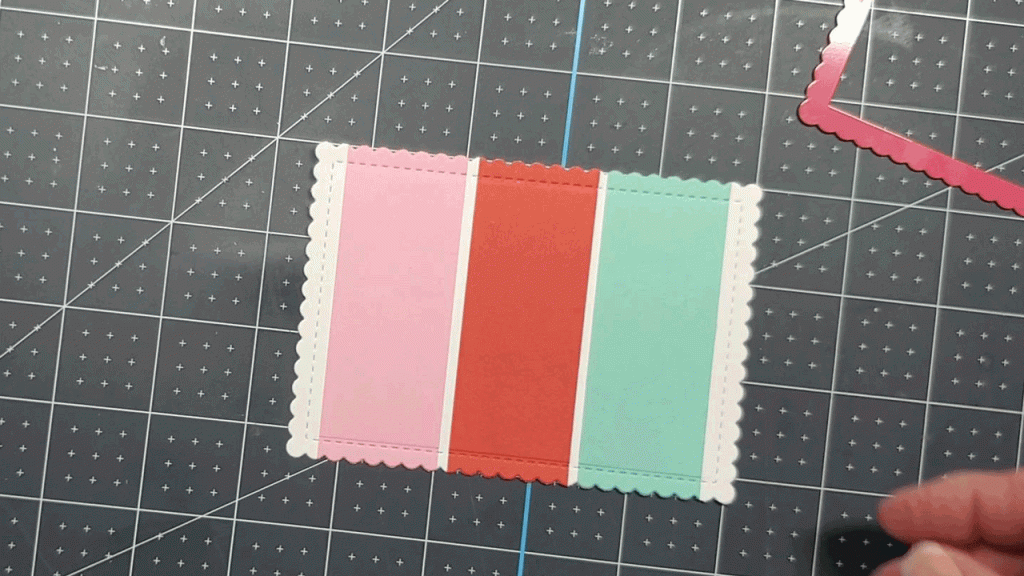
For the second card, I simply cut the red, pink, and light green cardstock into 1.25″ x 4.25″ strips and adhered them to a piece of 5.5″ x 4.25″ lightweight (80lb) white cardstock. I used the stitched scalloped rectangle die to cut them out and then adhered that to my card base (110lb cardstock).

Now all that’s left to do is adhere that panel to the front of my card base and decorate the card with the focal images. Of course, I used some foam adhesive to pop up the candy jar and tied a bow around it using some string.
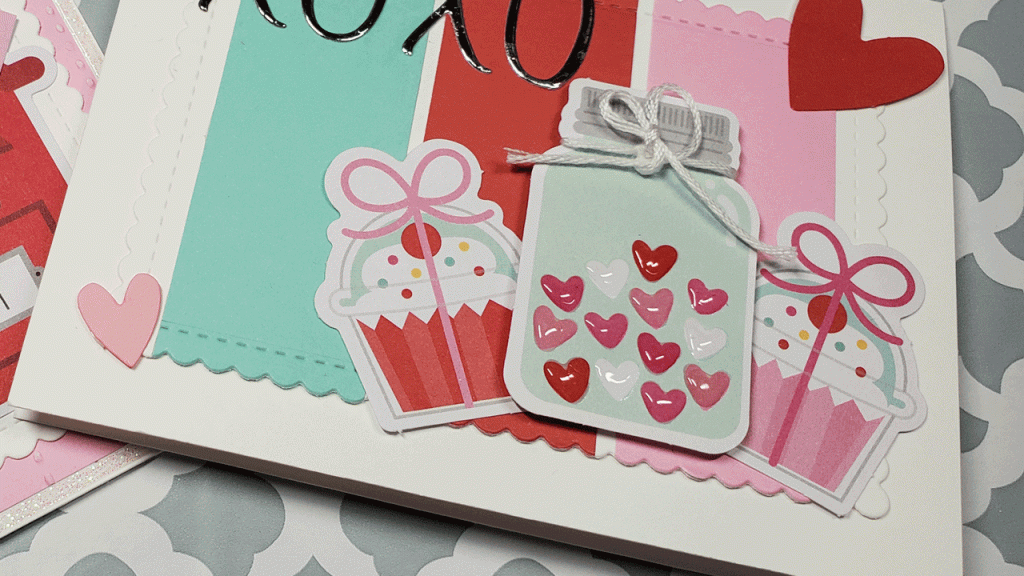
Then, I adhered two hearts, one red and one pink to opposite corners of the front panel. Finally, I die cut the letters XOXO from some silver mirrored cardstock and adhered them to the top, left of my front panel. Viola, I’m done! Unless, of course, you’d like to decorate the inside. You know I decorated the inside, right? You can see the inside of the cards in the YouTube video below. The affiliate links for the products I used are below the video.
Affiliate Links
(I receive a portion of the sale on any purchase you make using the Amazon and Share a Sale links below at no extra cost to you!)
Adhesive
Tombow Mono Liquid Adhesive: https://amzn.to/37DhjRI
Clear Double Sided Adhesive Roll – 1/4 Inch x 81 Feet: https://shrsl.com/3atfh
Scrapbook Adhesives Tape Runner Permanent: https://amzn.to/3Knfx8r
Dies / Die Cut Shapes / Die Cutting Machine
Doodlebug Designs, Inc. Love Notes Die Cut Shapes: (out of print, but still available here)- https://www.craftdirect.com/love-notes-odds-ends-doodlebug-design.html
Spellbinders Platinum 6 Die Cutting Machine: https://shrsl.com/3atf4
Sizzix Celebration Words Script: https://amzn.to/3fljPPv
Sizzix Alpha Numeric Script(1 inch tall): https://amzn.to/3fy1Oxq
Dress My Craft Stitched Scalloped Rectangle Dies: https://shrsl.com/3cj7r
Scrapbook.com Magic Mat for die cutting: https://shrsl.com/3cj80
Embellishments
Nuvo Crystal Drops in Morning Dew (Clear): https://shrsl.com/3c985
Love From Lizi Peel Off Border Stickers: https://www.lovefromlizi.com/straight-peel-off-stickers-clear-iridescent-glitter.html (These are from the U.K. and will cost extra for shipping and fees).
Embossing
Cricut Cuttlebug Embossing Folder: Fabric Swatches Set: unavailable. Use any embossing folder you have that adds a simple design to the pink cardstock.
I used a potato sack to add texture to the front panel on the first card.
Paper/Cardstock
Neenah Solar White Classic Crest 110lb Cardstock (for the card base): https://amzn.to/3ljFvfv
Neenah Classic Crest Solar White 80lb cardstock: https://amzn.to/3kQtBdn
Peppermint – Smooth Cardstock Paper Pad – A2 – 4.25 x 5.5 – 40 Sheets: https://shrsl.com/3c96v
Tonic Studios Craft Perfect Silver Cardstock: not available-here is an alternative that is similar to what I used: https://shrsl.com/3cj8y
Tools
Fiskars Sure Cut 9″ Paper Trimmer: https://amzn.to/2WzlUhq
EK Success Craft Tweezers (reverse): https://amzn.to/3tFzPBS
