Kissing with a Stencil

pinkhugskissesheartsthumbnailOh my! That sounds a little strange :0)  Don’t get too worried, it is not as weird as you might think (ha, ha). It is a simple stamping technique used to add texture and interest to a plain image.  It is a three step process:

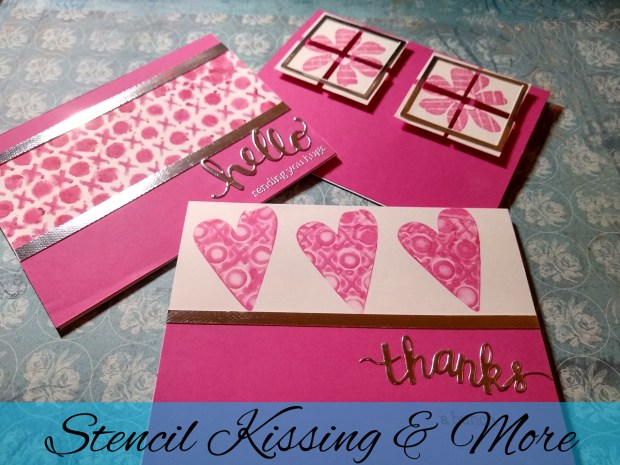
Step 1: Ink up a plain, solid stamp. I used a heart shaped stamp by Hero Arts.

Step 2: Stamp it on a stencil that is a pattern. I used a Kaisercraft stencil.

Step 3: Stamp onto another piece of paper to see the beautiful texture created by the stencil.

Watch the video of the process below:

SUPPLIES:

I am an Amazon.com and Scrabook.com affiliate. The links are free for you to use. If you click on them and make a purchase, I will receive a small percentage of the sale. Thank you for your support :0)

Speedball Brayer at DickBlick.com for less

Hero Arts D2657 Small Solid Heart Rubber Stamp (unavailable -see the two alternatives beneath this)

Heart Stamp approx. 2X2 https://www.123stitch.com/item/Waffle-Flower-DT-Mix-Clear-Stamp/WFL-271031

Heart Stamp 2X2 https://www.123stitch.com/item/Impression-Obsession-Modern-Heart-Solid-Cling-Stamp/IO-D20412-CLG

Kaiser 12X12 Love Stencil:  http://shrsl.com/1ltcv

Square Dies:  http://shrsl.com/1ltex

Tonic Studios Mirror Cardstock:  http://shrsl.com/1ltf1

Quick and Easy Greeting Card with Patterned Paper and Foam Stickers

quickeasythumb

Patterned paper and stickers go a long way when you need a quick and easy DIY greeting card! Plus, it’s a great way to use up any leftover supplies. Since it’s spring, I chose some colors that fit the theme, namely lavender and spring green. To “pretty” the paper up a bit and provide more definition between the pattern and solid color, I punched a heart border using an American Crafts border punch system. Adding a thin strip of white cardstock under the heart border makes them stand out. Although I used white here, you can choose any color that coordinates with the stickers and paper you are using. Each of the three flower stickers have white dots on them which echo the dots on the patterned paper. The only thing left to do is adhere everything to the card base. I chose a heavy cardstock because my stickers were made of foam and therefore a bit heavier than traditional stickers. That’s it! You’re done ;0)

Enjoy the video below. Most of the products I used on this card were from my leftover supplies, so I can’t link them for you. Feel free to rummage through  your stash and find what works for you. Don’t be limited by flowers. If you’re making a card for a child, you can use animal stickers. Your imagination is the only limit here!

However, the tools and basic supplies are linked below in the affiliate links. They are free for you to use, and I will receive a small percentage of the sale of any of the products you may purchase.

Alternate border punch

Similar patterned paper for spring:  SBC_db-5676_0


Welcome to my blog!

My first post

Greetings everyone!  I’m starting this blog as a way to share my cardmaking experiences with others.  I believe anyone with a desire to create beautiful cards can make them.  When I began making cards about three years ago, I had a lot to learn.  There are lots of resources online for beginning cardmakers, but many are too comprehensive or not comprehensive enough for beginners.

I was so excited to try all the amazing techniques I saw online when I first began, but this excitement only caused me to purchase supplies I didn’t really need at that time.  It was overwhelming and were it not for my love of cardmaking, I would have given up.  Starting out with basic supplies and using some basic techniques is the way to go.  Perhaps my experiences can help you start a wonderful journey into cardmaking with less bumps in the road than I had.