Embossing: Dry and Heat

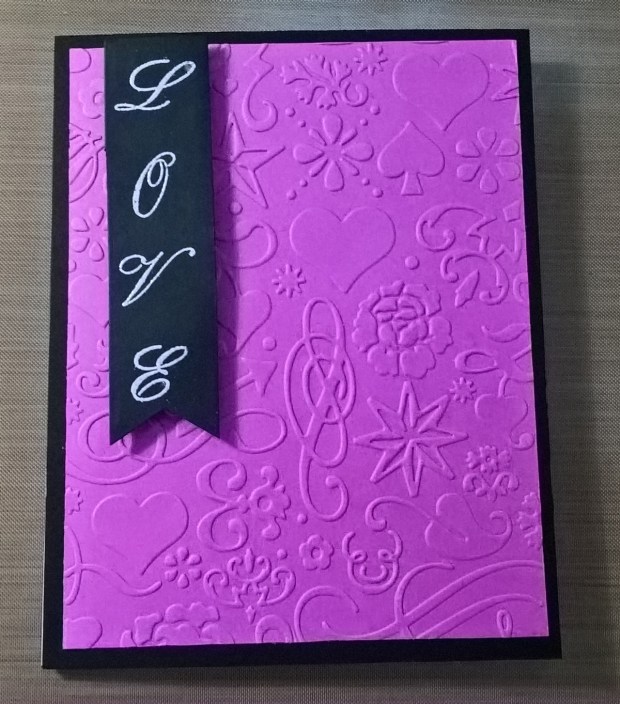
Today’s card is made using dry and heat embossing.  Embossing is creating a raised layer.  It can be done in many ways with varied tools.  The most popular for dry embossing is an embossing folder with pre-designed images which is run through a machine that presses the design into the paper.  Many companies make these machines, including the Cricut® Cuttlebug™, Sizzix® Big Shot, We R Memory Keepers® Evolution Advance and more.  Most can also be used with dies to cut out images and designs.  For heat embossing, embossing powder is used with a heat gun.  Below is a card which displays both dry and heat embossing.  The word, “LOVE” on the card has been heat embossed with a light purple embossing powder.  The purple background has been dry embossed with a Cricut® Cuttlebug™ embossing folder called, “Smitten” by Anna Griffin®.  Take a peek at my YouTube video below showing how this card was made.

purplelove

Products I used on this card:

Cricut Cuttlebug:  http://amzn.to/2rFjAYa

Art C Stamp and Die set: http://amzn.to/2qlzZNu

Versa Mark Embossing Pad: http://amzn.to/2qlGy2w

Hampton Art Embossing Powder: http://amzn.to/2rnkVTI

Darice Heat Gun: http://amzn.to/2qpoggd

AdTech Crafter’s Tape: http://amzn.to/2qlirkR

3D Pop Dots-square: http://amzn.to/2rEXi98

Neenah Creative Collection Classics Specialty Cardstock Starter Kit, 8 X 8 Inches, 72 Count (46406-01): http://amzn.to/2qlfqAR

Anna Griffin Cricut Embossing Folder: “Smitten”

Acrylic Stamp Alphabet Letters (not the one I used, but with capital letters): http://amzn.to/2qlImsm

Heart Stencil Valentine’s Day Card

Hello,

My second Valentine’s Day card this season is made with a heart stencil I created with a paper punch and transparency sheet.  The idea for the card came to me when I was thinking about how love should dictate our actions always…hence the greeting:  “Let LOVE reign in your heart this Valentine’s Day!”  I used Memento dye ink in the color Rose Bud to stencil in the hearts on the card and Memento Tuxedo Black for stamping the image.  The stamp set is a very cute set called, “Spring Short Stack” by Stampendous.  To color the image, Spectrum Noir alcohol markers were used.  As a finishing touch, a Zig Wink of Stella clear glitter pen was used to add some shine to the hearts.  Finally, for the greeting, I hand lettered the sentiments.  Hand lettering is fun to do and you can turn what looks like messy handwriting into neat handwriting by adding dots or lines to the edges of the letters.  I used dots in this card.  Using a fine tip pen or marker to write the letters and a bold tip to add the dots or lines produces a better result.  I used Faber Castell PITT Artist pens.  Another tip to make letters look neater:  always start writing from the top when printing.  Enjoy my YouTube video on the card beneath the picture.  Thanks for watching!

vdayreign

Products I used:

Martha Stewart Crafts Mount with Foam:  http://amzn.to/2r794s0

Memento Dye Ink Dew Drop in Tuxedo Black and Rosebud color: http://amzn.to/2r7aRNH

Spring Short Stack Stamp Set by Stampendous:  http://amzn.to/2r5pyPr

Black Faber-Castell Pitt Artist Pen Fine Tip:
http://amzn.to/2r71FZS

Spellbinders S4-114 Nestabilities Circle Dies:  http://amzn.to/2qspE1C

Acetate:  http://amzn.to/2r5kbjg

Heart shaped craft punch (not the one I used, but similar):  http://amzn.to/2qoIXcM

Finger Sponge Daubers:

40 pack with storage case:  http://amzn.to/2qomvAz

10 pack WITHOUT storage case:  http://amzn.to/2qssoMB

Spectrum Noir Alcohol Markers Yellows:  http://amzn.to/2qllHAN

Spectrum Noir Alcohol Markers Brights (contains the BP3):  http://amzn.to/2rqAhqu

Spectrum Noir Alcohol Markers Lights (contains the BP1):  http://amzn.to/2qosxBz

Spectrum Noir Alcohol Markers Pinks (contain the BP2):  http://amzn.to/2r796Ae

Black Faber-Castell Pitt Artist Pen Superfine Point (used to write the letters):  http://amzn.to/2rZEO0t

Black Faber-Castell Pitt Artist Pen Fine Point(used to add dots to the letters):  http://amzn.to/2qotJob

Middle Purple Pink Faber-Castell Pitt Artist Pen Superfine:  http://amzn.to/2qozP8j

Middle Purple Pink Faber-Castell Pitt Artist Pen Brush:  http://amzn.to/2rI7AFw

Valentine’s Day Card

Love is in the air. Here is my first Valentine’s card…more to come.  This one was made using pattern paper from Colorbok called, “Rosewood,” and a stamp set by Recollections called, “Craft it Valentine” which I purchased at Michael’s last year.  I stamped the letters twice with my We R Memory Keepers Precision Press Stamping Tool and cut out the second set, which I “popped up” by adhering them to the first with mini foam square adhesive.  Enjoy my YouTube video below.
vdaycard2

vdaysupplies

Products I used:

Colorbok Paperpack:   Rosewood – available in store only at Walmart

Craft-It Valentine Stamp Set by Recollections at Michaels: unavailable, but here is one that is similar: http://amzn.to/2saRII9

X-acto Knife: http://amzn.to/2s1665D

Neenah Solar White 110lb cardstock: http://amzn.to/2rWpgKW

Neenah Solar White Super Smooth 80lb Cardstock: http://amzn.to/2r6Ptbp

Versa Fine Black Onyx Ink(mini pad):  http://amzn.to/2qo9Ptt

Versa Fine Black Onyx Ink (regular size):  http://amzn.to/2s47bdQ

Memento Dew Drop Dye Ink in Rhubarb Stalk:   http://amzn.to/2ruMquL

Post-it Tape:   http://amzn.to/2rZrHw1

We R Memory Keepers Precision Press Stamping Tool:  https://www.scrapbook.com/store/ac-663007.html

Baby Wipes (to clean stamps):  http://amzn.to/2qoy3E4

3D Pop Dots-square: http://amzn.to/2rEXi98

Self Healing Cutting Mat:  (not the one I used, but comparable) http://amzn.to/2qs0XT6

Plus Glue Tape:  http://amzn.to/2qoAnLt

Inkadinkado Stamp-A-Ma-Jig Stamp Positioner:  http://amzn.to/2r20uKV

Art Alternatives Chamois-5″x7″:  http://amzn.to/2rM8zoe

Zig Memory System Writer Dual-Tip Markers, Multicolor, 8-Pack:  http://amzn.to/2r236IH

Fiskars Stamp Block Set(didn’t use this brand, but it is comparable):  http://amzn.to/2rHzW2q


Magical Birthday Unicorn Card

This card was made using the free stamp set I received from Simon Says Stamp© for my birthday.  I had to order something on their website, but the stamp set was free!  I stamped the unicorn, rainbow, and greeting using the We R Memory Keepers© Precision Press Stamping Tool.  This tool is a lot like the MISTI©, but it is open on the bottom and left so a larger piece of paper can be used with it.  I colored the images with Spectrum Noir© alcohol markers. When that was done, I went over the unicorn and cloud with the clear Zig© Wink of Stella glitter marker to make them dazzle.  For the card base, I chose a pink cardstock.  Some little girl is going to love this card!  Enjoy the video below the image.

magicalbirthdayweb

Products I used on this card:

Memento Dye ink Dew Drop in Black Onyx:  http://amzn.to/2qlhlW5

We R Memory Keepers Precision Press Stamping Tool:  https://www.scrapbook.com/store/ac-663007.html

Simon Says Stamp Magical Birthday Stamp Set:  https://www.simonsaysstamp.com/product?id=346876

Wooden Ruler:  http://amzn.to/2qUV840

Spectrum Noir Alcohol Markers:

Complete Set:  http://amzn.to/2qpf4IO

24 pack of Light colors:  http://amzn.to/2qUIXE7

Zig Wink of Stella Glitter Brush Marker:  http://amzn.to/2rWcRXi

Heart Banner Birthday

This birthday card features a cute banner with hearts in the center of each pennant.  I chose to write a letter inside each heart to spell, “Happy Birthday!”  The supplies used to create this card are Neenah© Solar White cardstock in 80lb weight for the front panel and 110lb weight for the card base.  The orange mat is Neenah© Astrobright paper.  To stamp the heart banner, I used a rubber stamp by Craftsmart© from Michael’s©.  Instead of using a stamp pad to ink the stamp, I colored each pennant with a Zig© Clean Color Real Brush Marker from Kuretake©.  This way I was able to use the colors of the rainbow to stamp the banner!  These markers are watercolor markers, but I did not use water with them.  Instead, I colored the birthday cake by using a light and dark color to blend and highlight in order to make the cake appear more rounded.  Next, I used a clear stamp set from Oriental Trading© Company which I ordered online to stamp the birthday cake.  Finally, I used a Snow Marker by Marvy Uchida© to add the icing.  This marker is unique, because when it is dry, a heat gun can be used to puff it up.  It may not be easy to see in the photo below, but the icing is puffy and has texture.  This marker can be used to add snow to a card or puff up images of marshmallows.  I’m sure there are lots more things it can be used for!  Please check out the YouTube video below to see the card being made.

heart_banner_bday

Products I used:

Neenah Solar White Super Smooth 80lb Cardstock:  http://amzn.to/2r6Ptbp

Neenah Astrobrights 75 sheets:  http://amzn.to/2qo6eMi

Zig Clean Color Real Brush Markers by Kuretake:

24 pack:  http://amzn.to/2s4Hito

12 pack:  http://amzn.to/2r4xsZp

Heart Banner Rubber Stamp:  unavailable online but here is a similar item from Hero Arts:  http://amzn.to/2qrWKig

Oriental Trading Company Stamp Set with Birthday Cake: unavailable

Ranger Archival Ink Jet Black:  http://amzn.to/2rq3HFB

Fiskars Stamp Block Set(didn’t use this brand, but it is comparable):  http://amzn.to/2rHzW2q

Papermate Mechanical Pencil:  http://amzn.to/2qrYJTJ

Marvy Uchida Snow Marker:  http://amzn.to/2qoan2L

“Illustrated Cardmaking for Beginners” e-book Announcement!

I’ve written an e-book called, “Illustrated Cardmaking for Beginners” which I am selling on Amazon. It’s $2.99 or FREE for Kindle Unlimited Subscribers. You’ll find lots of great tips, techniques and information as well as step by step instructions for making your first handmade greeting card. With all the information about many of the products cardmakers use, it will help you make informed buying choices. Check it out at my author page on Amazon.
coverforwordpress

In addition to the e-book, I started a YouTube channel. Come visit me at YouTube. The channel is called, “Greeting Star” of course. Currently, only two posts exist. They’re slide shows of some of the cards I’ve created in the past couple of years, but I hope to put up some videos soon. Leave me a comment and tell me which types of techniques or cards you’d like demonstrated.

I hope you enjoy the content I’ve created for you!

Fall

Fall is a beautiful time of year.  I love the cooler weather and the delicious foods we get to enjoy.  Below is a fall card made with the Lawn Fawn® stamp set called “Happy Harvest” and the coordinating dies.  I chose not to put a border or mat on the front panel.  Instead, I simply adhered it to my card.

scarecrow
I made the background using Tim Holtz® distress ink in tumbled glass for the sky and scattered straw for the ground. I stamped the corn stalks using Memento Dew Drop ink in the color Pear Tart by Tsukineko®. The clouds were created using a masking technique. I used yellow stickies to cut out a few cloud shapes and stuck them to my page before inking the sky using the tumbled glass distress ink. Once I removed them, I had clouds!  The images were colored with Zig® Memory System Brush Markers by Kuretake.  I used two shades, a darker and a lighter, of each color in order to get the shading on the images.  The fence was created with a die from Cottage Cutz® by Scrapping Cottage called Picket Fence Border. The greeting is also from the Lawn Fawn stamps.  I stamped it in a black ink, but went over it with a Sakura® glaze pen in black to make it stand out.

Neenah Solar White 110lb cardstock: http://amzn.to/2rWpgKW

Tim Holtz Distress Ink Pad, Tumbled Glass:  http://amzn.to/2s4hX3N

Tim Holtz Distress Ink Pad, Scattered Straw: http://amzn.to/2qsIpTe

Lawn Fawn Stamp Set:  http://amzn.to/2s4I7mP

Lawn Fawn Matching Die Set: http://amzn.to/2rcOd6B

Fiskars Stamp Block Set: http://amzn.to/2rHzW2q

Tsukineko Memento Dew Drop in Pear Tart:  http://amzn.to/2ruSGCz

Post-it Notes, 3 in x 3 in, Canary Yellow, 6 Pads/Pack:  http://amzn.to/2sazEhd

Finger Sponge Daubers:

40 pack with storage case:  http://amzn.to/2qomvAz

10 pack WITHOUT storage case:  http://amzn.to/2qssoMB

Zig Clean Color Real Brush Markers(I used the memory system, but the clean color are better for blending):

24 pack:  http://amzn.to/2s4h8YB

60 pack(almost 3X the markers for just 2X the price):  http://amzn.to/2qsqvjF

Sakura Glaze Pens:  http://amzn.to/2ruLGFX

Cottage Cutz Picket Fence Border Die:  http://amzn.to/2qpNtw3


Digital Stamp Freebie

Hello,

Welcome to my blog.  I enjoy creating handmade cards.  From time to time, I like to use digital art on my cards.  Below is an image of a flower I created.  Please feel free to download it and use in your personal art.  To do this, right click on the image and select, “Save image as” and then choose the folder you want to save it in.  Never use “Copy image” because the quality of the image will be degraded if you resize it before printing it.  Also, if you plan to color it, you will want to use a laser printer so the ink will not run when it comes into contact with the medium with which you choose to color the flower.  I have read that some people set ink jet images with a heat gun and it doesn’t run when coloring it, but I never had any luck with that method. Below the flower is an image of a card I made using this flower.

denteddaisy

bday

This clean and simple card was made by inserting the flower image three times into a Word 2013 document with landscape orientation. I then resized two of the flowers.  I arranged them at the bottom, left edge of the page as you can see above. I used a font from fontsquirrel.com called Alex Brush to type in the Happy Birthday greeting. I grouped all of the images and the  greeting so I could copy and place three more like it on the 8.5″ x 11″ page.  This way, when printed, I could cut them apart to make four card panels.  I printed the page on 80lb Neenah Solar White cardstock with my laser printer. The flowers were colored with Spectrum Noir alcohol markers. For the petals on the large flower, I used two shades of pink (pp1 and pp2) and for the centers of the flowers, I used a citrus yellow and orange (ct1 and or1).  For the petals on the smaller flower, I used only one shade of pink (pp1), but I went over the base of the petals a few times with it to make it appear a bit darker than the end of the petals.

Here is another card I made using the same digital stamp:

bday2

Welcome to my blog!

My first post

Greetings everyone!  I’m starting this blog as a way to share my cardmaking experiences with others.  I believe anyone with a desire to create beautiful cards can make them.  When I began making cards about three years ago, I had a lot to learn.  There are lots of resources online for beginning cardmakers, but many are too comprehensive or not comprehensive enough for beginners.

I was so excited to try all the amazing techniques I saw online when I first began, but this excitement only caused me to purchase supplies I didn’t really need at that time.  It was overwhelming and were it not for my love of cardmaking, I would have given up.  Starting out with basic supplies and using some basic techniques is the way to go.  Perhaps my experiences can help you start a wonderful journey into cardmaking with less bumps in the road than I had.