
Today, I have a freebie for you to help you celebrate Mother’s Day! Below is a wreath I created on Adobe Illustrator. To capture the image, right click on the image and select, “Save image as” and then choose the folder you want to save it in. Never use “Copy image” because the quality of the image will be degraded if you resize it before printing it. Also, if you plan to color it, you will want to use a laser printer so the ink will not run when it comes into contact with the medium with which you choose to color the flower. I have read that some people set ink jet images with a heat gun and it doesn’t run when coloring it, but I never had any luck with that method. Enjoy! Don’t forget to check out the Mother’s Day shaker card below this post :0)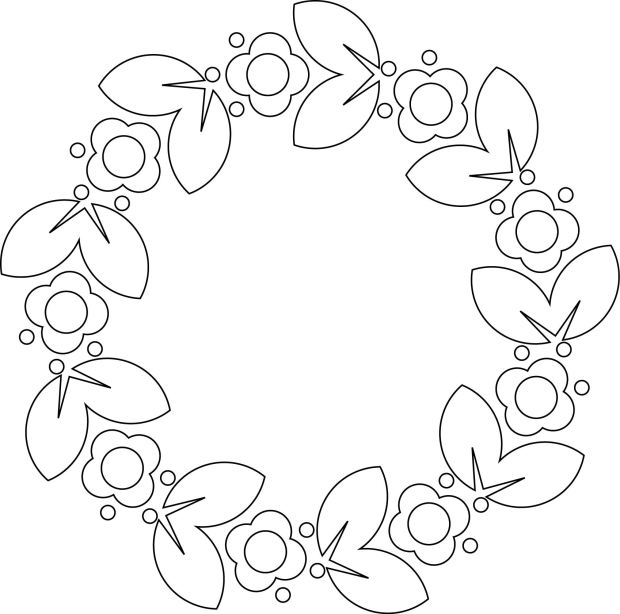
Category: Uncategorized
Mother’s Day Shaker Card with Inlaid Die Cuts
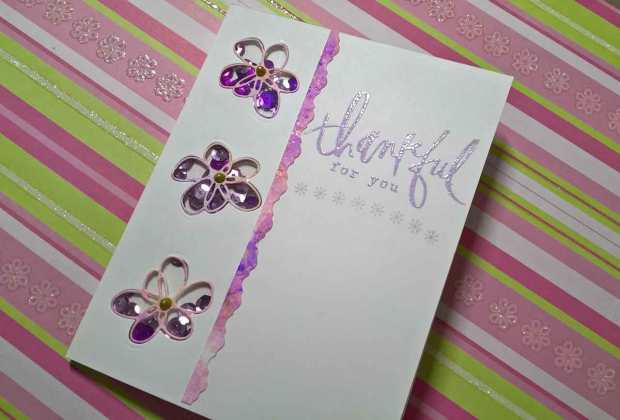 Welcome to my blog. I love making greeting cards by hand. Today I have a Mother’s Day card for you. Using a flower die cut, I created three openings on the front panel of my card. These will be the “windows” for my shaker card. Then, using the same die cut, I cut out three flowers from pink cardstock. On the back of the front panel, I adhered a piece of acetate large enough to cover the flower openings. When dry, I turned the card over and adhered the pink die cuts inside the flower openings I had created earlier on the front panel. Turning the card over, I placed some foam tape around the openings of the flower and the rest of my front panel. Now, here comes the sequins. Fill the “well” created by the foam tape with three different colors (or one if you wish) of sequins. Remove the release tape from the foam tape and adhere it to the front of your folded card panel. To dress up the front of the card, I cut a strip of watercolored paper with a fancy edged rotary blade…this one was a Fiskars Victorian style blade…and adhered it to the front of my card. Finally, I used Versa Mark ink to stamp a greeting and embossed it with heat embossing powder. I hope you enjoy the video below as well as a list of the products used on this card:

To create the watercolor strip I used on the card, I used a wet on wet watercolor technique with some pearlescent watercolors by Yasimoto. First, I laid down some clean water on my watercolor paper. Then, I dabbed on the three different colors of watercolor on the paper and allowed them to run together along their edges. I used pinks and purples. Then, I used some of the Zig clean color real brush markers in violet and light violet to flick on some splashes of color. To do this, I colored the Zig markers on a clear acrylic block and used a wet paintbrush to flick the color onto the paper. Finally, I sprayed some Tattered Angles glimmer mist in autumn gold onto the page. ONce it was dry, I used a Fiskar’s rotary trimmer with a Victorian blade to cut the strip of paper for my card.
The products I used on this card:
Elizabeth Craft Designs Happy Flowers Die set #1325: https://amzn.to/2GrQbrU or at http://shrsl.com/1ibau
Cricut Cuttlebug: https://amzn.to/2GbyptT
Fiskars Rotary Trimmer: goo.gl/GgpxZG
Fiskars Victorian Blade: https://amzn.to/2KusnTF
Glossy Accents: https://amzn.to/2GfhHFK
Hampton Arts Embossing Powder: https://amzn.to/2GdpO9G
Strathmore Watercolor Paper: https://amzn.to/2GwiF3S
Zig Clean Color Real Brush Markers: https://amzn.to/2Gfdp1h
Yasimoto Pearlescent Watercolors: https://amzn.to/2KseZ29
Heidi Swapp Magnolia Lane Stamps by American Crafts: https://amzn.to/2rgem2T
Foam Tape in bulk: https://amzn.to/2HFXg9L (I’ve never used this brand, but couldn’t find link to the one I used on this card).
Sequins in bulk: https://amzn.to/2JFznLS


Easter Card with Watercolor Egg Wreath
There is nothing like Easter that makes me think about color. Instead of just coloring some real eggs this Easter, I decided to break out my oval die set to make some paper eggs. First, I used some watercolor markers to color a sheet of watercolor paper with the colors of the rainbow, only in lighter version to make them feel more “Eastery”. Then, I used my oval dies to cut out a bunch of “eggs”. I also used some flower dies from Elizabeth Craft Designs to create some flowers out of the same watercolor paper. Then, I used some stickers (border stickers from Hot of the Press/Paper Wishes, and Easter stickers from Walmart) to decorate the eggs. Putting it all together in a wreath makes a beautiful focal image for an Easter Card. I used a sheet of textured cardstock the size of 12 X 12 cut to 12 X 6 and scored at 3″ and 6″ to create a gate fold card. I adhered the wreath to only the right side of the front of the card so the card opens on the wreath side. Enjoy the card and the video:
Products I used on this card:


Stained Glass Window Card with Maymay Made It heART Scripture Stamp
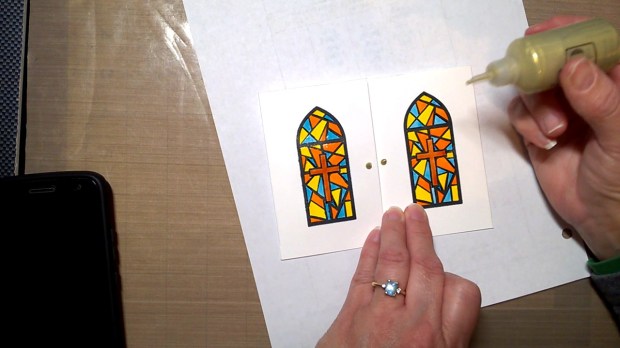
Stained glass is so beautiful! I’ve wanted to do a stained glass card for a long time, so I’m so thankful that Maymay Made It produced one. It is a color laying stamp, but on this card I only used the outline stamp with some Sakura Glaze pens to color in the section of the window. The inside of the card features cute little faces from a Stampabilities stamp set called “Stick Family” I purchases at hobby lobby a while ago. Can’t find it for purchase, but they do have some stick family stickers for sale. Check out the YouTube video to see the card being made and like and subscribe!
Products I used on this card:
Maymay Made It heart Scripture Stamp Set: https://www.maymaymadeit.com/pages/search-results-page?q=layered+stained+glass+window
 https://www.hobbylobby.com/Scrapbook-Paper-Crafts/Stickers/Stick-Family-Stickers/p/18958


Color Before Foiling with Distress Ink
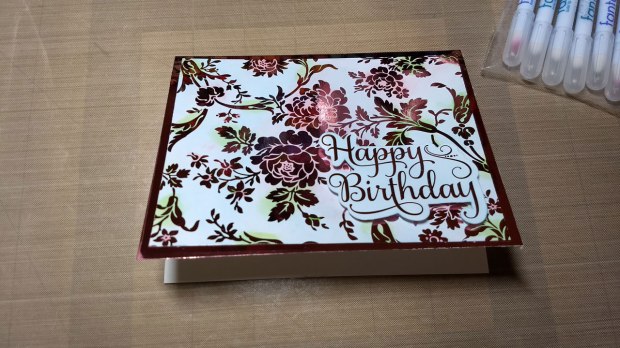
I love foiling! The result is simply gorgeous. Coloring before foiling, however, takes it to a whole new level. In the following card, I applied distress ink using fingertip sponge daubers to a pre-printed toner image before foiling it with a pretty pinkish/magenta foil. As you can see, the results were beautiful. :0) I used images designed by Anna Griffin along with her Minc machine, which I purchased through HSN. However, you can also use a regular laminator to foil. If you can’t find the Anna Griffin images, I know that Gina K Designs also does these. She calls them foil mates. I linked them below. However, if you have a laser printer that prints with a toner cartridge, then you can print your own images and foil those!!! I did this for a birthday card and I plan to blog it soon, so check back often for it.


Create Your Own Background for Simon Says Stamp Wednesday Challenge
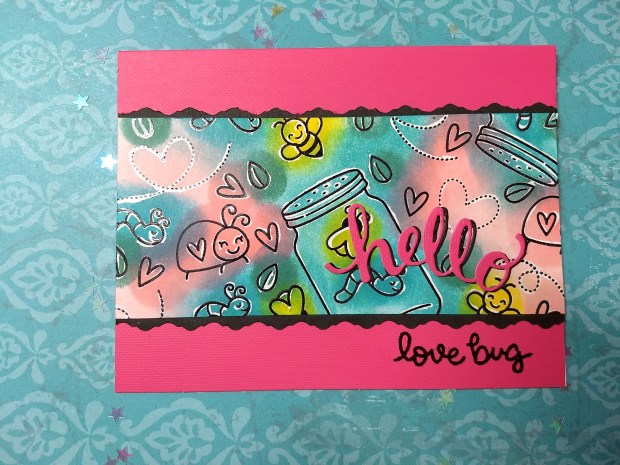
 Today I have a card featuring the Lawn Fawn Bugs and Kisses stamp set. First, I created a background with these adorable little images. When creating a background, it is a good idea to choose a stamp set that had large, medium, and small images so you can create balance on your project and fill up empty space with the smaller images. Second, I traced the lines with a Sakura Glaze pen in clear ink. You could just heat emboss them with a clear embossing powder. After the ink was dry, I used fingertip sponge daubers and Distress Ink to color my images. The Glaze pen resisted the color so the black lines were still visible after applying the Distress Ink. What a cute background! Third, I matted my background image with black cardstock that had been trimmed with a victorian edged blade to give more interest to the card and make it a bit more fancy. Fourth, I adhered the panel to my card-base, which was a pre-cut and folded card from a set I purchased at Michael’s over the holiday. You can find it on Amazon too. Fifth, I cut out the word hello using the Hero Arts Stamp and Cut “Hello” set from another card of the same color which I can use to make a second card after removing the die cut from it. I matted the colored hello die cut with a black hello die cut to create a shadow for the word. This makes it more defined against that busy background. Finally, I heat embossed the bottom sentiment, “love bug” in black embossing powder. You can find a list of supplies below the YouTube video. I am an Amazon affiliate. Enjoy!


Valentine’s Day card with Spectrum Noir Alcohol Markers on Vellum
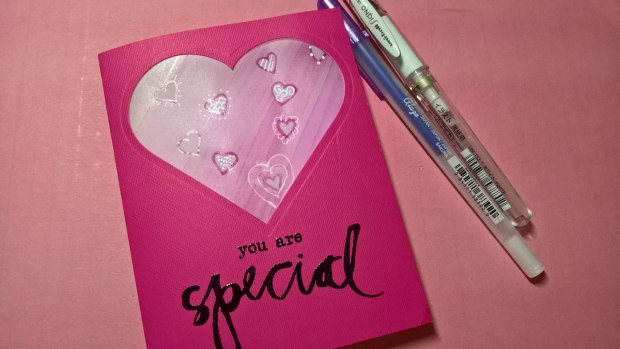
Happy Early Valentine’s Day! Today I have a subtraction technique with alcohol markers on vellum. First, I laid down some color on my vellum after cutting it to the size I needed. Then I used a heart stencil and some q-tips with rubbing alcohol to remove the ink. This created cute little see-through hearts on the vellum. As you can see below, I cut a heart-shaped window on the front of my card with Sizzix Framelits heart dies and adhered the colored vellum behind it to create a window card. The hearts were cute, but I wanted them to stand out more, so I traced them with a Sakura glaze pen and then added some doodles with a Uniball Signo white gel pen. These last steps are totally optional. Enjoy the video below the image. The products I used are listed under the video (I am an Amazon affiliate).


Simon Says Stamp Picture Book Images
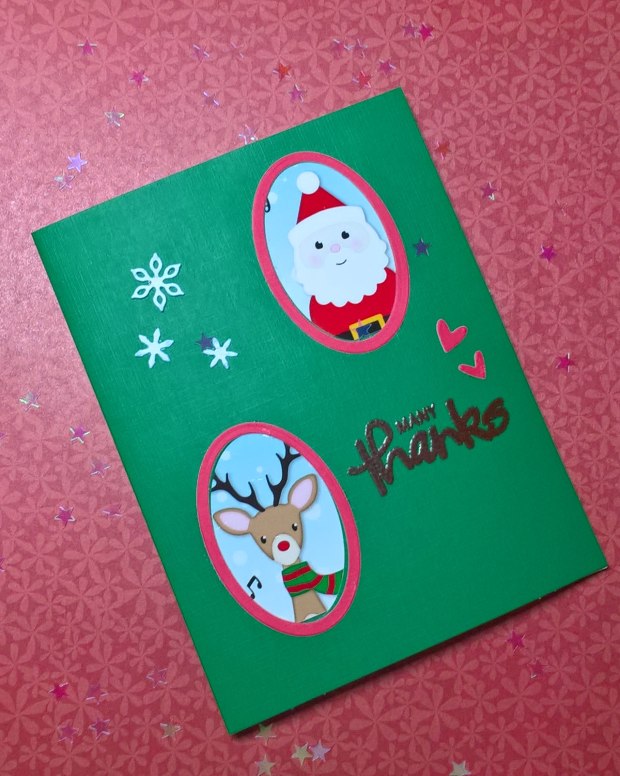
I received a postcard from Simon Says Stamp which had printed on it these adorable little Christmas images of Santa, a reindeer, and snowman. I used them to create this Christmas thank you card. Upon researching at their website, I found that they are actually wafer dies, not stamps, and there are a bunch of other characters in this line such as a monkey, a hippo, a bear, and more. Check them out if you’re interested. I think they can be used for lots of other types of cards. (I am not a Simon Says Stamp affiliate, just love their products. I am an Amazon affiliate.) Links for the products I used can be found under the video I’ve posted below.
The products I used on this card (I am an Amazon affiliate):
Simon Says Stamp Picture Book Dies (I used the postcard which was printed with these images instead of the dies): https://www.simonsaysstamp.com/search?currency=USD&q=picture+book
Poppystamps 1262 Shasta Oval Frame craft die: http://amzn.to/2qe8rhu
Stampendous Make it Pop Cutting Dies: http://amzn.to/2DL5YgH
Art C Thanks Stamp and Cut set: http://amzn.to/2CctFOk or https://goo.gl/dmA9eT (limited stock)
Craftsmith Precut, Folded, Textured cards and envelopes: http://amzn.to/2BGqPlm
We R Memory Keepers Precision Press Stamping Tool: https://www.scrapbook.com/store/ac-663007.html
Ranger Inkssentials Glossy Accents, 2 ounces http://amzn.to/2CsF7c0 (You could also use a glue pen such as the ELMERS Craftbond Fine Line Glue Pen): http://amzn.to/2BRwsx6
Cricut Cuttlebug Embossing and Die Cuttting Machine: http://amzn.to/2rZkmfQ
Tsukineko VersaMark Pigment Inkpad: http://amzn.to/2ymmLoR
Anti-static tool “Inkadinkado Embossing Magic”: http://amzn.to/2xFbJZz
Hampton Art Basics Embossing Collection: http://amzn.to/2yl5xYN
Darice Heat Gun: http://amzn.to/2fUrx89
Plus Glue Tape: http://amzn.to/2qoAnLt
Spectrum Noir Alcohol Markers with Wild Rose Studios Singing Penguin Stamp Set
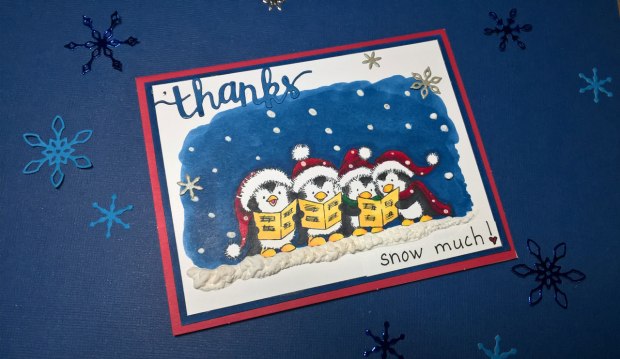
Here is an adorable thank you card for all those penguin lovers. Although I am not a coloring specialist, I love coloring. So, I used Spectrum Noir alcohol markers to color the image after I had stamped it on Spectrum Noir paper with memento dye ink in tuxedo black. The markers I used come from the basic sets as well as the expanded ones.(lights, darks, brights, pastels). Here is a link to a chart which shows which sets the markers come from (https://goo.gl/Un3MPR)and there is a list below the image and video which shows the exact markers I used to color the image.
The products I used on this card (or similar items) are listed below. (I am an Amazon affiliate).
Spectrum noir paper: http://amzn.to/2C4C9qL
Spectrum noir Alcohol markers(I used markers from this set as well as from the brights, lights, darks, pastels): http://amzn.to/2EsjcQB
Please visit my blog for a link to a chart of all colors and which set they are in: https://www.greetingstar.org
Fiskars Sure Cut Paper Trimmer: http://amzn.to/2D0PZdE
Wild Rose Studio Clear Stamp Singing Penguins: https://goo.gl/XML5NL
Hero Arts Thanks Stamp n Cut Set: http://amzn.to/2CrtemJ
Correction Tape(I used a different brand, but this one was available at Amazon): http://amzn.to/2DJEnfE
Memento Dye Ink in Tuxedo Black(choose your color: http://amzn.to/2BdbE28
Uchida Snow Marker: http://amzn.to/2DKrbap
We R Memory Keepers Precision Press Stamping Tool: https://www.scrapbook.com/store/ac-663007.html
Cricut Cuttlebug Embossing and Die Cuttting Machine: http://amzn.to/2rZkmfQ
Zig memory system archival with twin tip: http://amzn.to/2DK5JCl
ELMERS Craftbond Fine Line Glue Pen: http://amzn.to/2BRwsx6
Craftsmith Precut, Folded, Textured cards and envelopes: http://amzn.to/2BGqPlm
The silver snowflakes I used to embellish the card (not shown in video, but in the stills) were made using Poppystamps die set 1262 Shasta Oval Frame: http://www.poppystamps.com/1262-Shasta-Oval-Frame-craft-die_p_292.html
Coloring Guide:
Music sheets: GB1(lights), GB2 (pastels)
Feet, beaks: OR1(yellows), OR2(brights)
Tongue: DR1(reds)
Bodies: IG5(lights), IG6(cool greys), IG8(cool greys)
Hats and Scarf of Last Penguin: DR3(pinks), DR5(reds), DR7(reds)
Scarf of middle penguin: JG5(darks), JG6(greens)
Sky: TB8(darks), TB9(blues)
Stitched Snowflake Cutouts Christmas Card
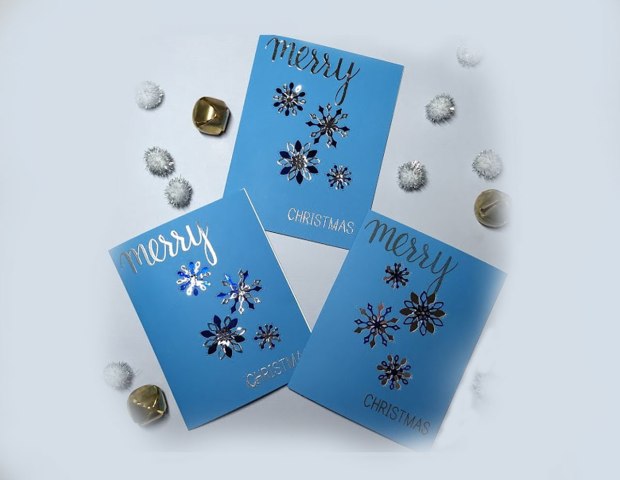
My second Christmas card uses another Poppystamps die, the Stitched Snowflake Cutouts die. I couldn’t find it for purchase on their website, so it must be retired, but it is still available online at other retailers with a quick search. This is a fairly quick and simple card. I used the die to cut out the snowflakes from the front panel of a pre-scored blue card. I saved the die cuts for use on another project. Then, I glued a piece blue foil on the inside, front of the card so it would show through the snowflake cutouts on the front of the card. To give it more pizzazz, I cut out some more snowflakes from another blue foil piece and adhered them over the snowflake cutouts on the front of the card at a different angle. I was very pleased with the look. Finally, I chose three different ways to apply a greeting to the front of the card: heat embossing, die cut and ink, and plain ink. Hope you enjoy! The image is below followed by my YouTube video and finally the links to the products I used on the card (I am an Amazon affiliate).
Poppystamps 1305 Stitched Snowflake craft die (retired but still available online with a search)
ELMERS Craftbond Fine Line Glue Pen: http://amzn.to/2BRwsx6
Hero Arts Merry Stamp & Cut DC170: http://amzn.to/2Dj8uv8
Craftsmith Precut, Folded, Textured cards and envelopes: http://amzn.to/2BGqPlm
We R Memory Keepers Brad Setter and Piercing Tool: http://amzn.to/2skUdr0
Foil paper (not thermal) from Oriental Trading Company (I couldn’t tell if the pack has a yellow or gold foil paper): https://goo.gl/123NKc
Fiskars Sure Cut Paper Trimmer: http://amzn.to/2D0PZdE
We R Memory Keepers Precision Press Stamping Tool: https://www.scrapbook.com/store/ac-663007.html
Cricut Cuttlebug Embossing and Die Cuttting Machine: http://amzn.to/2rZkmfQ
Darice Heat Gun: http://amzn.to/2rFdcjP
Hampton Art Embossing Powder: http://amzn.to/2rnkVTI
Anna Griffin Pigment Ink Pads available on HSN
